
Import Invoices into QuickBooks Desktop (IIF)
Export extracted invoices from DocuClipper as a QuickBooks Desktop IIF file. Choose between Vendor Bill (AP) or Sales Invoice (AR), validate against your Chart of Accounts, and fix the 'Account Name does not exist' error.
Last updated
DocuClipper can export your extracted invoices and receipts as a QuickBooks Desktop IIF file. You can post each invoice as either a Vendor Bill (accounts payable) or a Sales Invoice (accounts receivable). This guide covers both, plus the most common error users hit on the first import.
If you have not yet uploaded your QuickBooks Chart of Accounts (COA) to your DocuClipper project, do that first. See How to export your Chart of Accounts from QuickBooks Desktop. Once your COA is uploaded under Project Settings → QuickBooks Desktop, DocuClipper validates the IIF against it and flags account name mismatches before you ever open QuickBooks.
Once your Chart of Accounts is saved, DocuClipper can also code each invoice line item to the right expense account for you, and turn the Category field in the invoice editor into a dropdown of your real accounts — see Categorize invoice line items with your QuickBooks Desktop accounts.
For a higher-level overview of the use case, see Convert PDF invoices to QuickBooks Desktop.
Before you start
- A QuickBooks Desktop company file (Pro, Premier, Enterprise, or Mac).
- A DocuClipper project with at least one extracted invoice or receipt.
- (Recommended) Your QBD Chart of Accounts uploaded once per project. See the COA export guide.
Step 1. Choose Vendor Bill or Sales Invoice
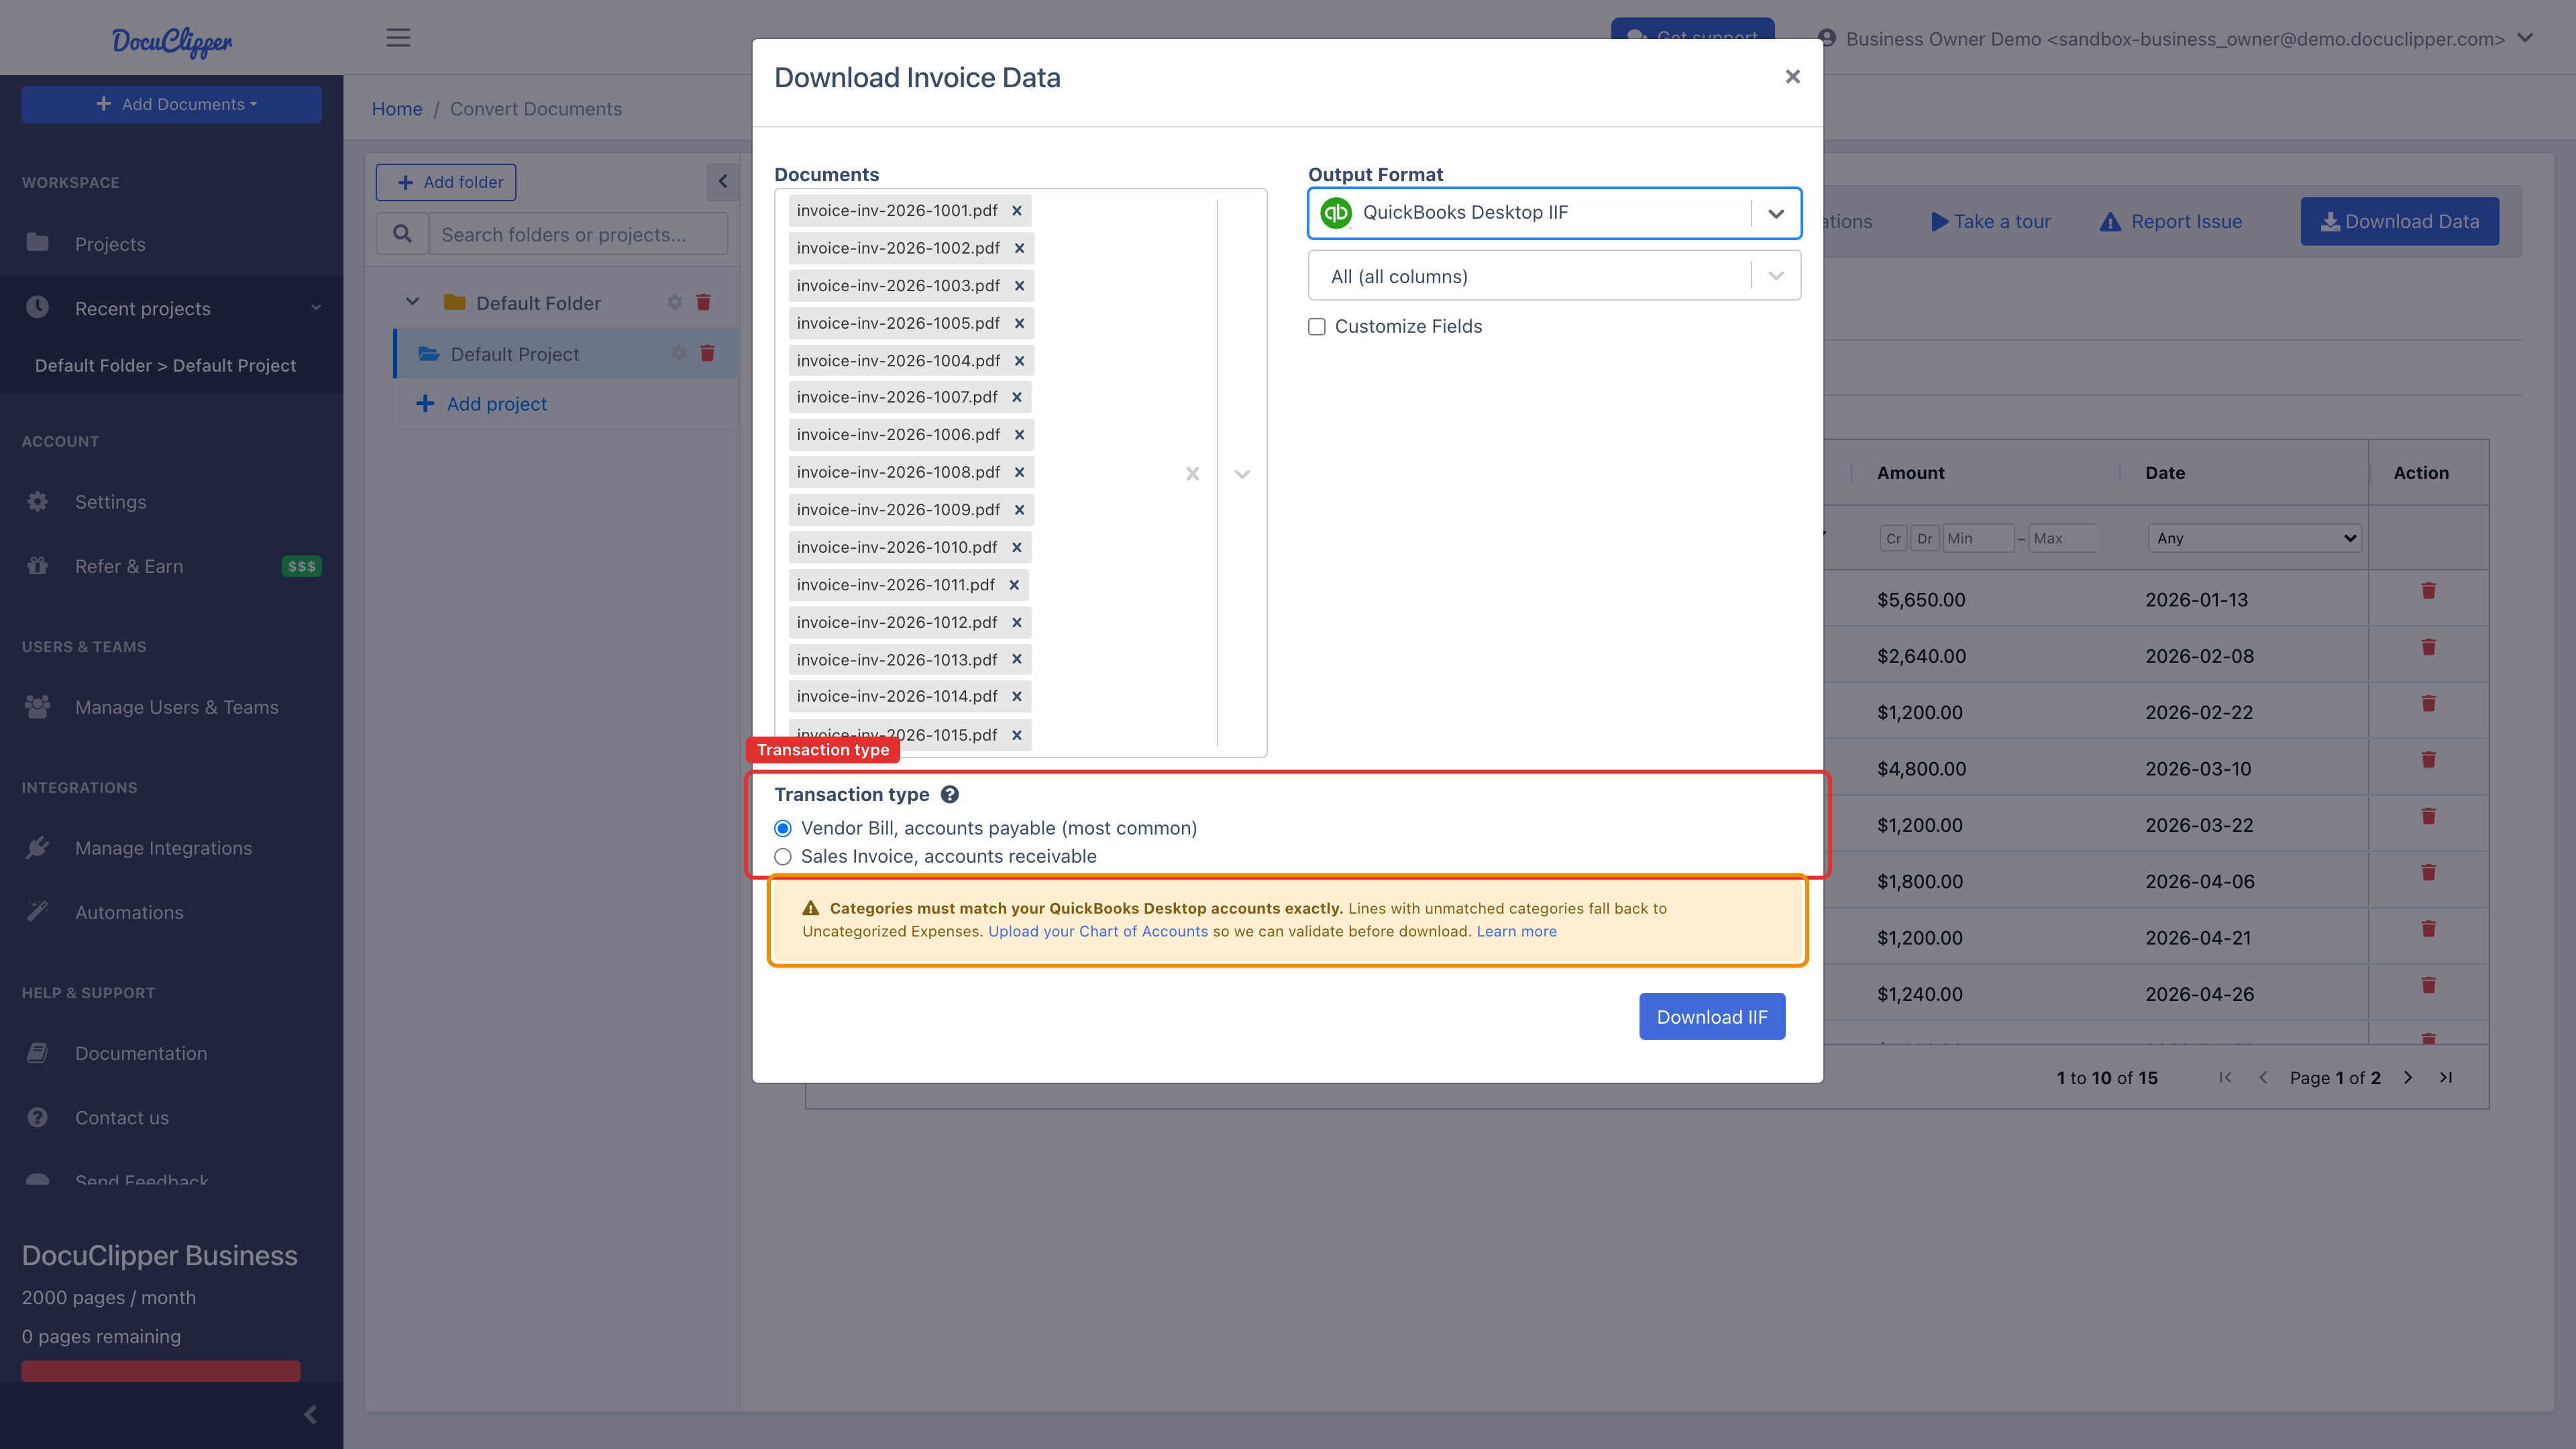
DocuClipper supports two QBD posting types from the same export dialog. The choice is the Transaction type radio at the top of the IIF panel. Pick the one that matches the document.
Vendor Bill, accounts payable (most common)
- Use this for invoices and receipts you receive from vendors and need to pay or record as paid.
- Posts to Accounts Payable as the header account.
- Each line item posts to the matching expense account from your Chart of Accounts.
- This is the right choice for accountants and bookkeepers processing supplier bills, utility statements, and expense receipts.
Sales Invoice, accounts receivable
- Use this for invoices you issue to customers.
- Posts to Accounts Receivable as the header account.
- Each line item posts to the matching income account from your Chart of Accounts.
- Use this when you are migrating customer-facing invoices from another system into QuickBooks.
If you are unsure, choose Vendor Bill. It is the right answer for the large majority of DocuClipper invoice workflows.
Step 2. Export the IIF from DocuClipper
- Open the project that contains your processed invoices.
- Above the invoice table, click Download, then choose QuickBooks Desktop IIF in the format dropdown.
- Pick the posting type with the Transaction type radio:
- Vendor Bill, accounts payable (most common), or
- Sales Invoice, accounts receivable.
- Check the banner at the top of the panel:
- If a Chart of Accounts is uploaded, an info banner reads "Categories will be validated against N accounts in your QuickBooks Desktop Chart of Accounts. Unmatched names will be flagged at the top of the IIF file." Any categories that don't match are listed inline right there, before you download.
- If no COA is uploaded, a warning banner reminds you that categories must match your QBD accounts exactly, and links to upload one.
- Click Download IIF.
The header posts to Accounts Payable (bills) or Accounts Receivable (sales invoices). The IIF dialog has no header-account field — if your QBD company file names these accounts differently, set the account on the invoice, or add/rename the account in your Chart of Accounts so it matches.
When a Chart of Accounts is uploaded, DocuClipper validates every header account and line-item category against it before producing the file. If any names don't match, it adds a ; WARNING: comment block at the top of the IIF listing them, and QuickBooks will reject those lines on import. Without a COA there's nothing to validate against and no warning is written, so upload your COA first to get this safety check.
Step 3. Import the IIF into QuickBooks Desktop
- Open your company file in QuickBooks Desktop.
- Go to File → Utilities → Import → IIF Files.
- Click Import IIF and select the
.iiffile you downloaded. - QuickBooks shows a confirmation when the import finishes.
- Verify the result:
- Vendor Bills appear in Vendors → Vendor Center under the right vendor.
- Sales Invoices appear in Customers → Customer Center under the right customer.
The most common error
If your account names do not match, QuickBooks shows this exact error:
*** YOUR IIF FILE COULDN'T BE IMPORTED ***
[ERROR] [Purchases:Purchases - Dairy] The Account Name on a distribution does not exist in Quickbooks [11110]
QuickBooks writes the errors back into the file it hands you, each one prefixed
[ERROR] and naming the exact account it could not find — search the returned
file for [ERROR] to see only the failed records.
For invoices, this can come from two places:
- The header account (AP or AR) does not match. For example the IIF says
Accounts Payablebut your QBD file usesA/P. - A line-item category does not match an expense or income account in your QBD Chart of Accounts.
QBD account name matching is strict:
- Case-sensitive:
Office Suppliesis not the same asoffice supplies. - Punctuation-sensitive:
Meals & Entertainmentis not the same asMeals and Entertainment. - Whitespace-sensitive: trailing spaces and double spaces count.
- Sub-account paths must match in full, separated by colons. For example
Auto:Fuel, notFuel.
Vendors and customers behave differently
Unmatched accounts stop the import. Unmatched vendors and customers do not — QuickBooks creates them and imports the file normally. That is why an unknown vendor produces a note rather than an error:
; NOTE: the following vendors are not in your QuickBooks Desktop vendors list.
; QuickBooks will CREATE them on import.
Lines beginning with ; are comments and are ignored by QuickBooks, so the note never affects the import. It is there so you can spot a near-duplicate — Julina Foods Inc. alongside an existing Julina Foods Inc dba Leblon Foods — before it becomes two suppliers in your books.
To get that check, save your vendor and customer lists in DocuClipper: see Import your QuickBooks Desktop vendors and customers.
One thing QuickBooks does require: every bill must name a vendor. A bill with an empty NAME is rejected with Missing mandatory field NAME [15103].
How to fix it
- In DocuClipper, open the project, open Project Settings, and click the QuickBooks Desktop tab.
- Upload your QuickBooks Desktop COA (
.iiffile or pasted account names). See How to export your Chart of Accounts from QuickBooks Desktop for the exact steps inside QBD. - Re-run the IIF export. DocuClipper compares every header account and every line-item category against your COA and lists mismatches inline. For each mismatch:
- Rename the category in DocuClipper to match QBD, or
- Add the missing account in QuickBooks and re-upload the COA.
- Re-export and re-import. The error should be gone.
You only need to upload the Chart of Accounts once per project. DocuClipper reuses it for every future IIF export in that project.
How DocuClipper maps fields
For a Vendor Bill (TRNSTYPE=BILL):
- Vendor → bill payee. Comes from the invoice's vendor field (edited values take precedence over automated values).
- Bill date → invoice date.
- Bill number → invoice number.
- AP account → the invoice's account field if set, otherwise the default
Accounts Payable. - Line items → one expense split per line, posted to the line's category and labeled with the line's item description.
- Amounts → use each line's
Price. The bill total is the sum of line amounts.
For a Sales Invoice (TRNSTYPE=INVOICE), the same shape applies but with Customer as the payee, AR account as the header, and income accounts on the line splits.
Limitations
- Sales tax is included in the total but is not split into a separate tax line.
- IIF is a one-way import. Edits made in QuickBooks after import do not flow back to DocuClipper.
- If a line item has no category, DocuClipper assigns it to Uncategorized Expenses (or Sales Income for sales invoices), which QuickBooks creates automatically on first import. To avoid the auto-create, categorize the line in DocuClipper first or upload your COA so the validator catches it.
Troubleshooting
- Some bills or invoices are missing after import. Open the IIF import log file (in the same folder as your company file). It lists rejected rows along with the reason, usually a missing or mismatched account name.
- A new account showed up in my chart of accounts. That category did not match an existing QBD account. Either rename the auto-created account or upload your COA in DocuClipper to prevent this on future imports.
- The vendor name has weird characters. IIF treats tab and newline characters as field separators. DocuClipper strips those out automatically, but other special characters (commas, ampersands) are preserved as-is.