
How To Import Invoices Into Sage
Manually entering invoices into Sage is tedious and time-consuming, especially when dealing with dozens of invoices daily.
Manually entering invoices into Sage is tedious and time-consuming, especially when dealing with dozens of invoices daily.
If you want to run this end-to-end in DocuClipper, see invoice processing software for extraction, approvals, matching, and syncing to accounting systems, or the invoice to Sage Intacct solution for the Sage-specific flow.
Direct answer: Sage does not read PDF invoices directly and does not have a one-click sync like QuickBooks Online or Xero, so the path is CSV import. DocuClipper extracts supplier, invoice date, invoice number, net amount, tax/VAT, and account code from any invoice PDF, then exports a Sage-compatible CSV (or Excel) file that you bring in through Sage's File > Import tool under Audit Trail Transactions. Because the export already matches Sage's required column headers, the field mapping is mostly automatic. The same CSV approach applies to Sage Intacct and NetSuite. See the Sage integration for details.
If you’re stuck typing invoice details one by one, you’re not just wasting time—you’re increasing the risk of costly errors.
Instead of manually inputting data, you can streamline the process by automating invoice imports. In this guide, you’ll learn how to import invoices into Sage efficiently, including how to convert PDF to CSV for Sage to eliminate manual entry and reduce errors.
While you are here
Stop re-typing invoices into your accounting system
DocuClipper captures vendor name, invoice number, line items, totals, and tax from any PDF invoice (digital or scanned) and exports them ready for your ERP or approval workflow.
Step 0: Digitalize Invoices (For Paper Invoices)
If you have paper invoices, the initial step is to scan them into a digital format. Use a scanner to create a clear, high-resolution PDF to ensure accurate data extraction.
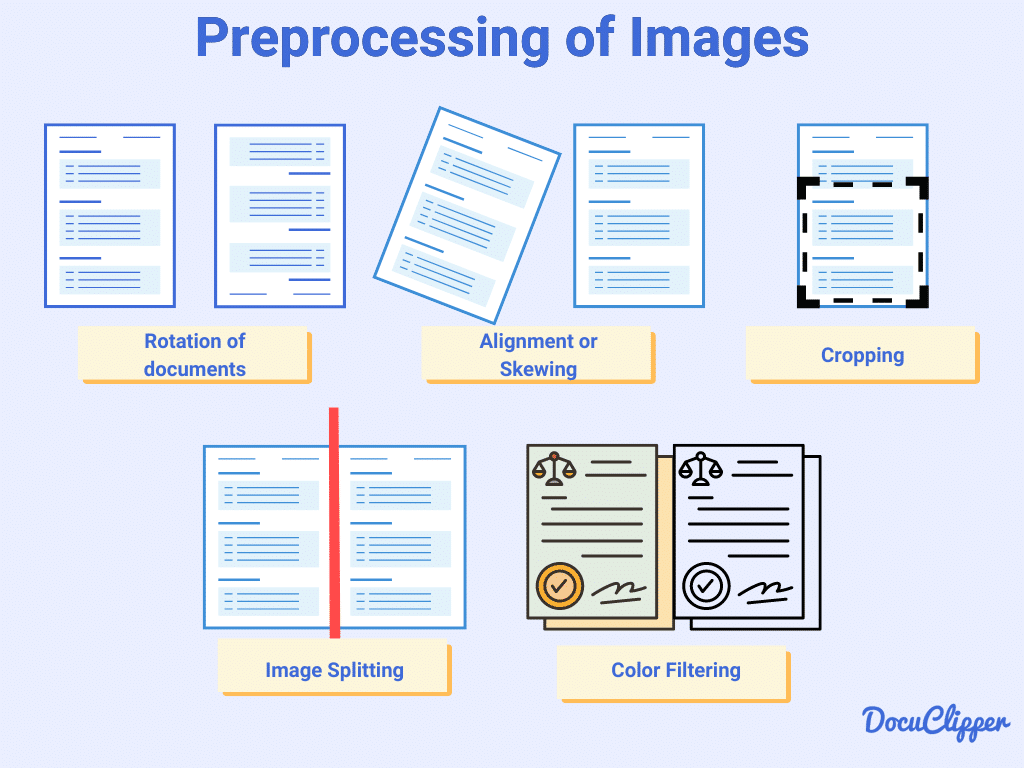
For the best results, follow these OCR preprocessing practices:
- Reduce noise: Ensure the document is clean and free from unnecessary marks.
- Correct angles: Scan invoices straight to avoid misalignment errors.
- High resolution: A sharp, high-quality scan improves OCR accuracy.
Properly scanned invoices make the OCR invoice processing smoother, minimizing errors and ensuring reliable data extraction when converting PDFs to CSV for Sage.
Step 1: Capture Invoice Data
Now that your invoices are in digital format, the next step is to extract their data for import into Sage. Instead of manually entering details into a spreadsheet, DocuClipper automates the process, extracting key invoice information quickly and accurately.
Automatic Invoice Data Capture with DocuClipper
Using invoice scanning software like DocuClipper eliminates the need for manual data entry. It extracts details such as vendor name, invoice date, invoice number, line items, amounts, tax, and quantities, ensuring all required fields are correctly captured.
How to use DocuClipper:
- Open DocuClipper in your web browser and navigate to the invoice OCR section.
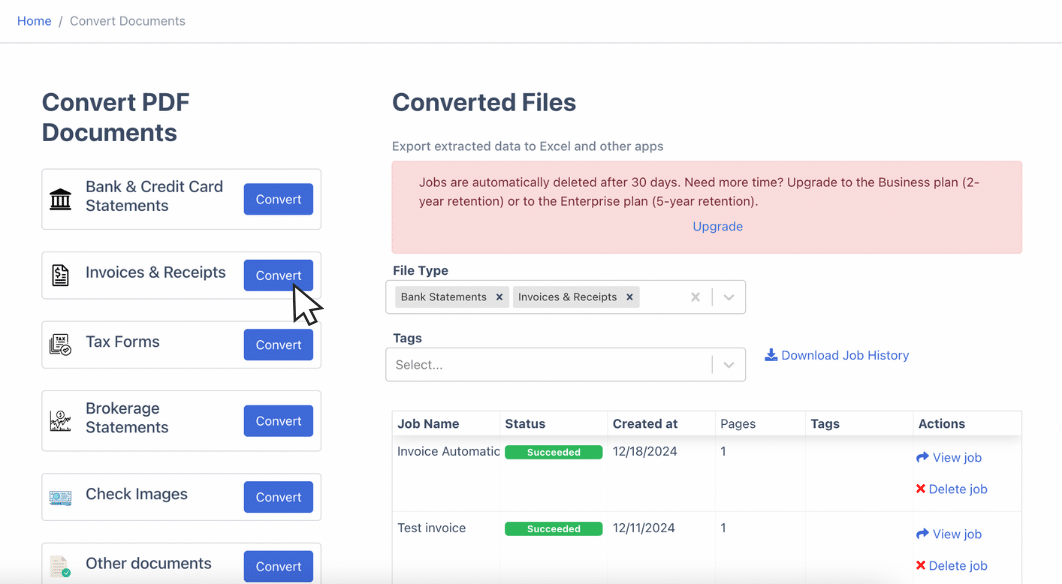
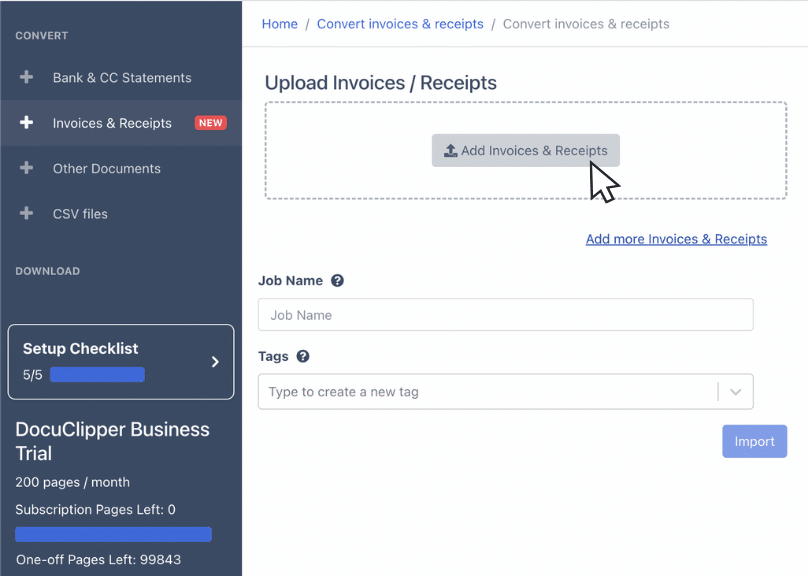
- Drag and drop one or multiple invoices.
- DocuClipper extracts the invoice data automatically, no need to manually parse the sections of the invoices, this applies to all invoice formats.
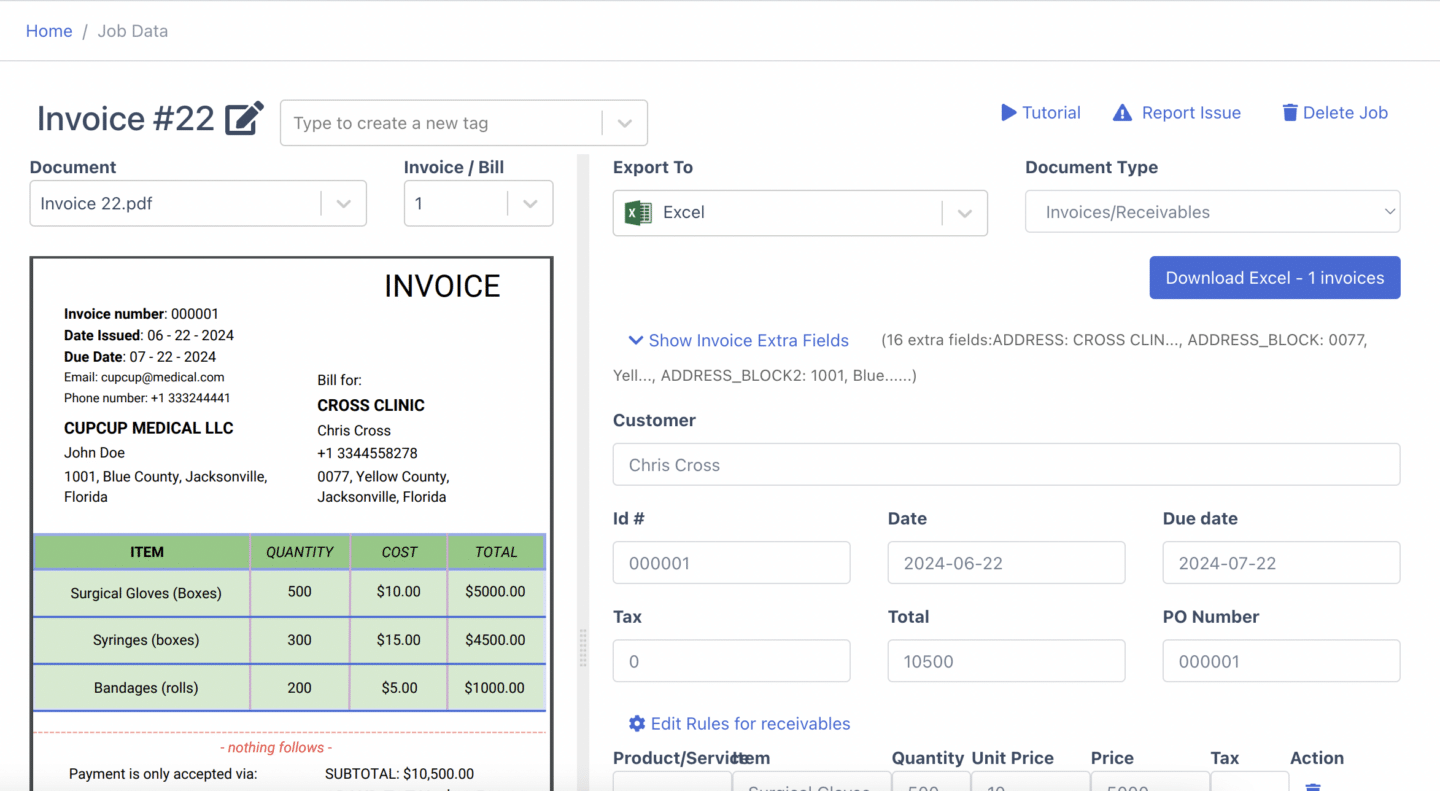
- Review the extracted line item information and adjust fields if needed, including marking transactions as invoices, bills, accounts payable, or accounts receivable.
By using DocuClipper, you get a structured, Sage-compatible CSV file without manual effort, reducing errors and saving hours of work.
The Manual Alternative (Not Recommended)
Manually entering invoice data is time-consuming and prone to mistakes. You would need to:
- Open a spreadsheet and create columns for name, vendor, date, invoice number, line items, amount, tax, and quantities.
- Format the spreadsheet according to Sage’s requirements.
- Save the file as a CSV before importing.
This approach is inefficient. Even with verification, manual data entry has an error rate of 4%, leading to costly mistakes. Processing a single invoice can take up to 30 minutes, making it an impractical choice when dealing with a high volume of invoices.
Automating with DocuClipper ensures accuracy and speed, allowing you to focus on higher-value tasks instead of wasting time on data entry.
Step 2: Export the Invoice Data Into Sage Compatible CSV File
Once the invoice data is captured and reviewed, the next step is to export it in a format that Sage can process.
With DocuClipper, this is straightforward. After uploading and verifying invoice data, go to the export section and select CSV as the export format.
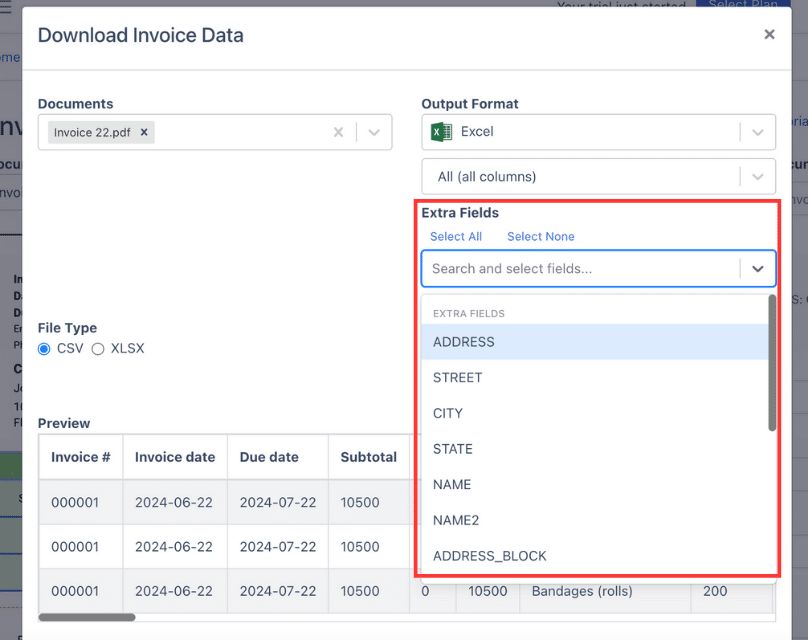
You can adjust the column structure if needed to match Sage’s import requirements. Once everything is in place, download the finalized a CSV file.
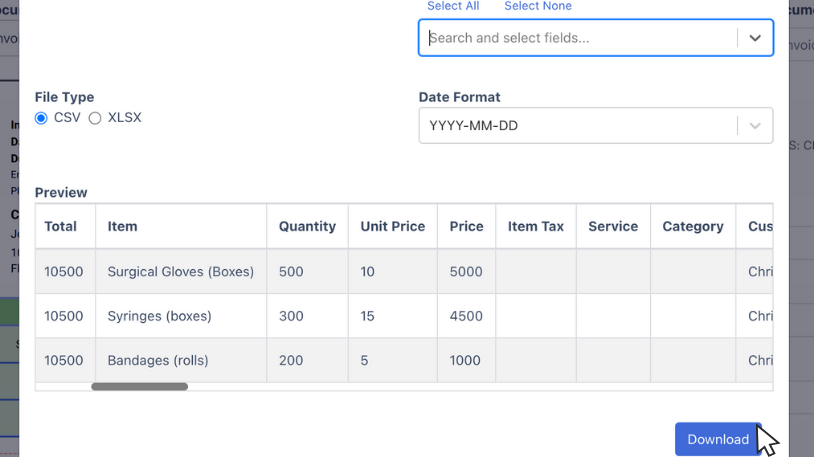
Sage has specific formatting rules for imports. If necessary, review the spreadsheet layout and make any adjustments, such as renaming columns or adding required fields, before proceeding to the import stage.
Step 3: Import Invoice Data Into Sage
Once your invoice data is formatted correctly, the next step is when we show how to import invoices into Sage. Unlike QuickBooks or Xero, Sage has stricter importing criteria, requiring careful attention to detail.
Using Sage’s built-in import function and templates ensures a structured, error-free process. To import invoices smoothly, follow these steps:
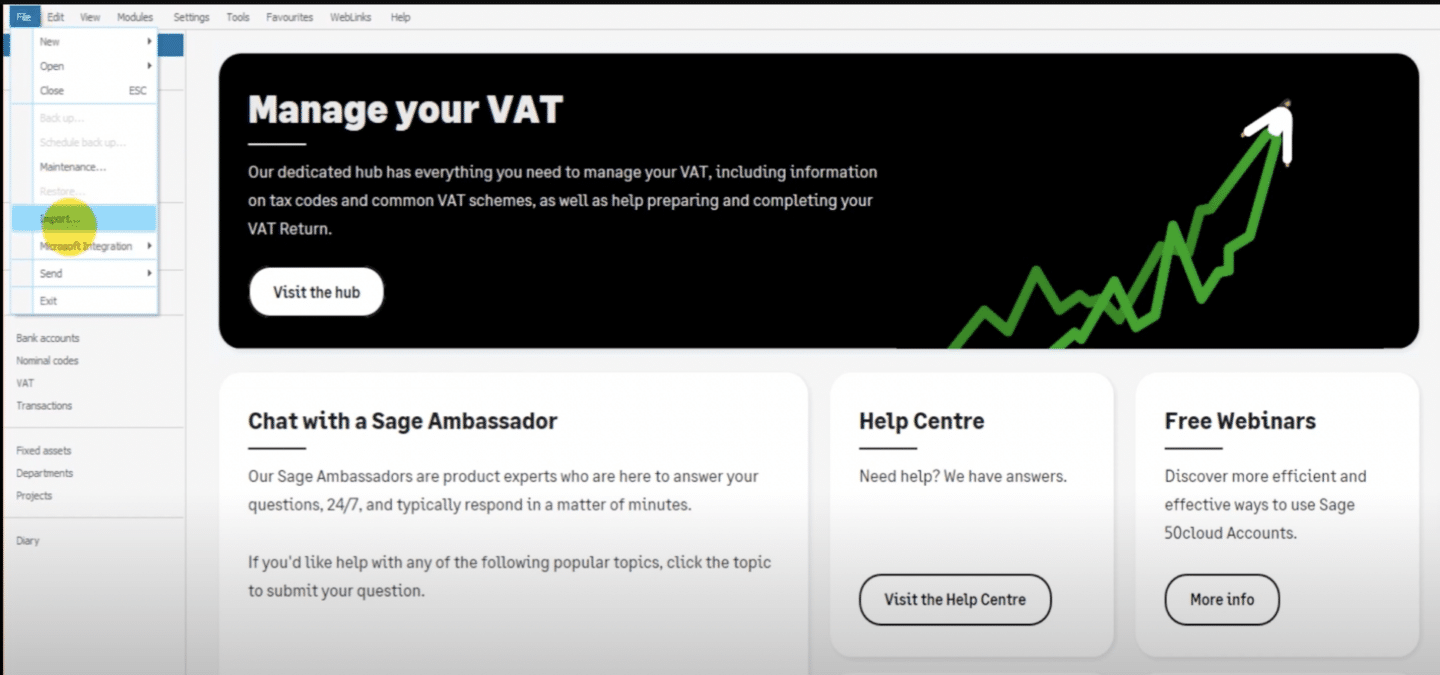
- Access the Import Function: Open Sage, go to File and select Import. This will open the Data Import box, where you can begin the process. Since Sage enforces specific formatting requirements, reviewing the data beforehand helps avoid errors.
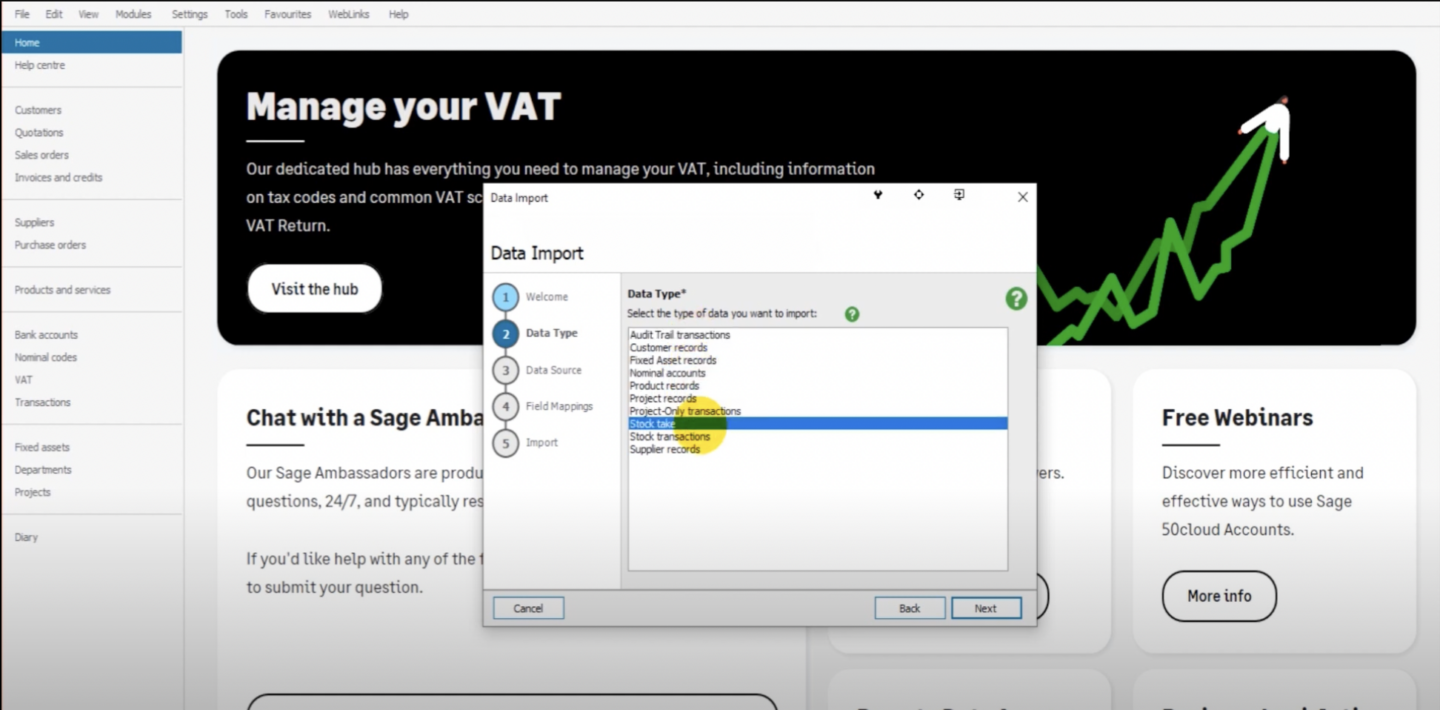
- Use Sage Import Templates: Sage provides free templates to simplify the import process. These templates ensure that all required fields are included. If you’re importing purchase invoices, use the Audit Trail Transactions template. For customer records or stock take data, Sage offers separate templates tailored for those entries.
- Select the Correct Data Type: Sage does not have a direct category for sales or purchase invoices. Instead, these transactions must be imported under Audit Trail Transactions. Selecting the wrong category may cause errors or misclassifications in Sage’s system.
- Prepare the Excel File: Structure your spreadsheet to match Sage’s format. Key columns include Invoice Date, Invoice Number, Customer Reference, Net Amount, Tax Rate, Tax Code, and Nominal Code. The Type column is critical, as it defines the transaction type:
- SI for Sales Invoice
- PI for Purchase Invoice
- PC for Purchase Credit Note
- SC for Sales Credit Note
- Upload the Data File: Sage accepts both CSV and Excel files. Ensure that the column headings are in the first row of your file to facilitate proper mapping. If using Sage’s templates, the format will already be correct.
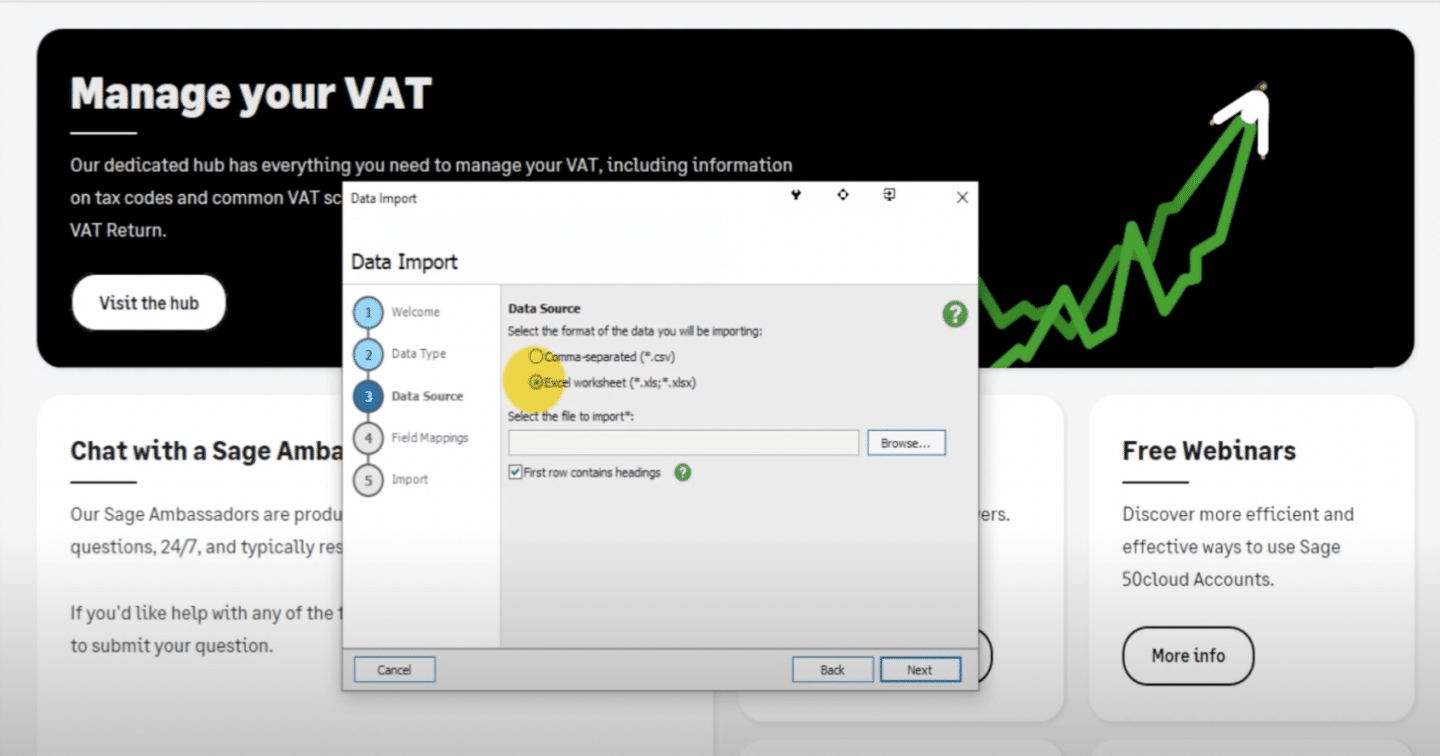
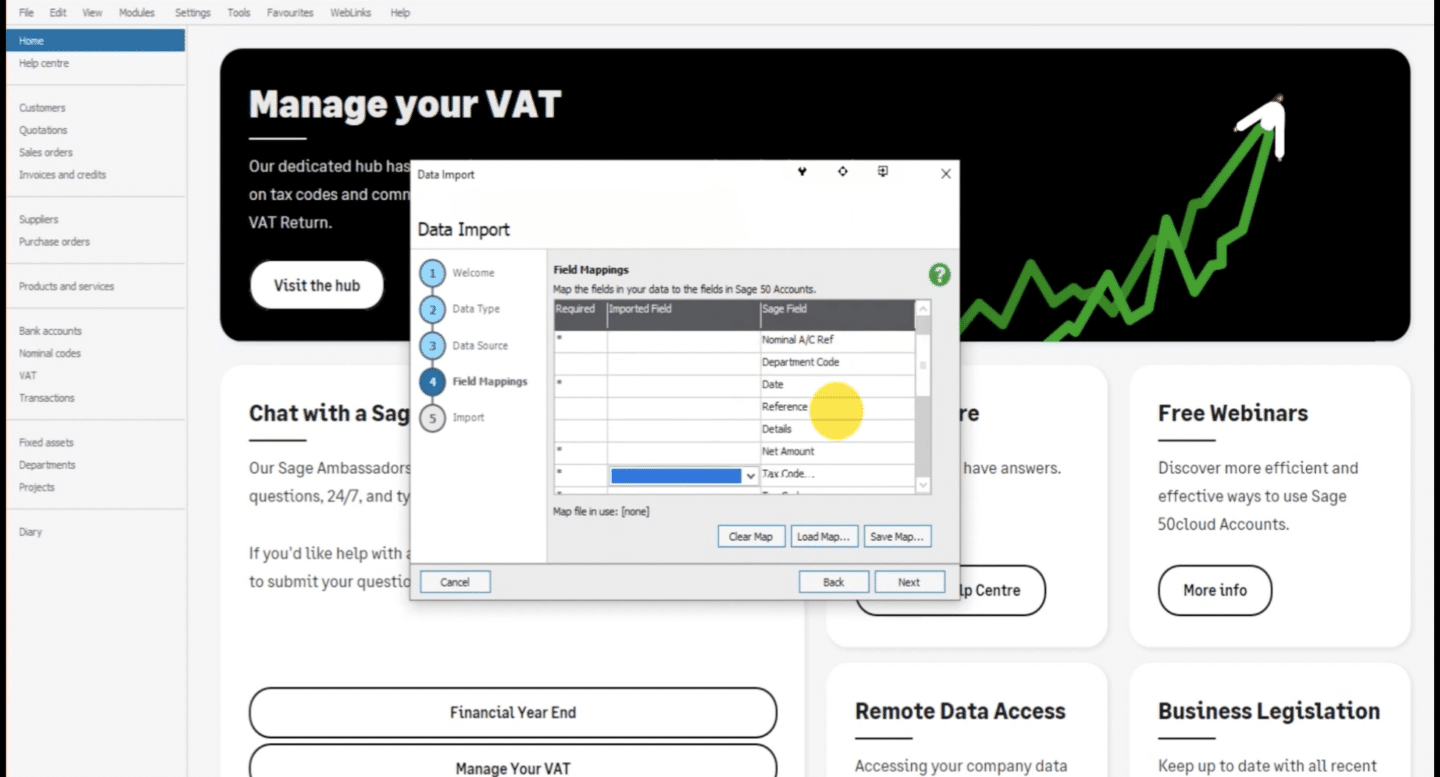
- Map Data Fields: Sage requires mapping your file’s columns to its internal fields. On the right side of the screen, Sage displays its field names, while in the center, you match them with your spreadsheet’s columns. If the column names match exactly, the mapping will be automatic. To save time in future imports, you can store the mapping settings for reuse.
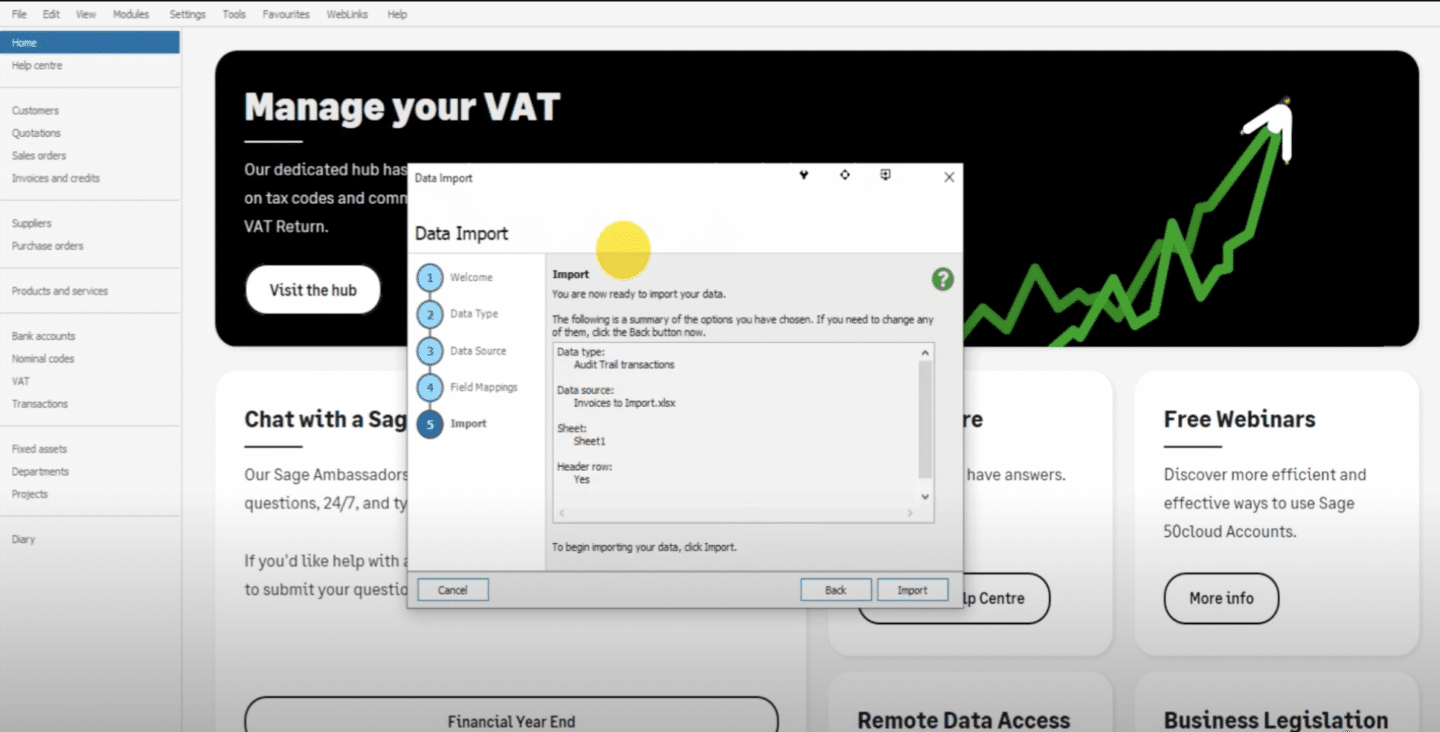
- Import the Data: After reviewing the summary, click Import. Once the import is competed, verify that the invoices appear correctly in Sage by checking the relevant records. Incorrectly formatted entries will be flagged during import.
- Troubleshoot Errors: If an import fails, Sage will display the failed transactions and error messages. Common issues include missing values, incorrect data types, or mismatched customer references. Fix the errors in your spreadsheet and re-import the file.
Check out our other articles on how to import invoices into different accounting software:
- How to Import invoices into QuickBooks Online
- How to Import Invoices into Zoho Books
- How to Import Invoices into Dynamics 365 Business Central
- How to Import Invoices into SAP Business One
- How to Import Invoices into Xero — or use the invoice to Xero solution for direct PDF extraction and Xero import
- How to Import Invoices into FreshBooks
- How to Import Invoices into NetSuite
Put it into practice
Bad line data stalls every approval
Wrong quantities or unit prices create exceptions that clog the queue. Structured extraction gives AP teams and procurement the exact numbers from the PDF, without re-keying.
How DocuClipper Automates Importing Invoices Into Sage
Manually entering invoice data into Sage is slow, error-prone, and frustrating—especially when dealing with a high volume of invoices. Instead of spending hours typing line by line, DocuClipper extracts invoice data automatically and converts it into a Sage-compatible CSV file in seconds.
With DocuClipper, you can upload multiple invoices at once. The system accurately captures key details like invoice numbers, dates, vendors, line items, and totals. The CSV output is fully customizable, allowing you to match Sage’s required column format without extra manual adjustments.
If you prefer it to be in an ordinary spreadsheet, DocuClipper can also convert PDF invoices to Excel via the invoice to Excel solution.
Because of its high OCR accuracy, DocuClipper eliminates typos and data entry mistakes, ensuring that your invoices are imported correctly the first time. Instead of wasting time on repetitive tasks, you can focus on more important work.
Troubleshooting Sage Invoice Import Errors
Sage has stricter import rules than QuickBooks or Xero, so most failures come down to file formatting rather than the data itself. Here are the failure modes we see most often and how to fix them:
- "The file could not be imported" / file won't import: This is almost always a CSV-format problem. Save the file as CSV (UTF-8) with the column headers in the very first row, no blank rows above them, and no merged cells. Re-export from DocuClipper as a fresh CSV rather than editing and re-saving in Excel, which can reintroduce formatting Sage rejects.
- Missing required columns: Sage rejects the whole file if a required field is absent. For Audit Trail Transactions you need, at minimum, Type, Account Reference (Nominal Code), Date, and Net Amount. Add any missing columns in DocuClipper before exporting so the header row is complete.
- Wrong transaction Type code: A blank or invalid Type column fails the row. Use
PIfor purchase invoices,SIfor sales invoices,PCfor purchase credit notes, andSCfor sales credit notes — Sage does not infer these. - Unrecognized supplier or nominal code: Sage will not auto-create suppliers or nominal codes on import the way Xero auto-creates contacts. Make sure the Account Reference and Nominal Code already exist in Sage, or the row is flagged.
- Date or amount format mismatch: Dates must match your Sage regional format (commonly DD/MM/YYYY), and amounts must be plain numbers without currency symbols or thousands separators. Adjust the column in DocuClipper and re-export.
- Duplicate invoice numbers: Sage flags repeated references. Confirm each invoice number is unique before re-importing.
When Sage reports failed transactions, it lists the row and the error message. Correct the field in DocuClipper, re-export the CSV, and re-import only the corrected rows.
FAQs about How to Import Invoices into Sage
Here are some frequently asked questions about importing invoices into Sage:
Can you import transactions into Sage?
Yes, Sage allows transaction imports, including sales invoices, purchase invoices, and bank transactions, using CSV or Excel files. The data must follow Sage’s required format for successful import. Automation tools like DocuClipper simplify this by converting invoices into a Sage-compatible format, reducing manual entry and minimizing errors.
How do I import sales invoices into Sage 50 template?
To import sales invoices into Sage 50, use the Audit Trail Transactions template. Format your CSV file with required columns like Invoice Date, Invoice Number, Customer Reference, Net Amount, and Tax Code. Then, go to File > Import, upload the file, map the fields, and complete the import. Ensure the data matches Sage’s format to avoid errors.
How do I input an invoice into Sage 50?
To input an invoice into Sage 50, go to Customers or Suppliers, select Invoices and Credits, and click New Invoice. Enter the required details, including the invoice number, date, customer or supplier, and line items. Save the entry to record the invoice. For bulk imports, use the Sage import function with a properly formatted CSV file.
Can you import a CSV file into Sage?
Yes, Sage allows CSV file imports for transactions, invoices, and customer records. The CSV must follow Sage’s required format with correct column headers. Go to File > Import, upload the CSV, map the fields, and complete the import. Using tools like DocuClipper can help generate Sage-compatible CSV files automatically, reducing manual data entry.
Can I upload PDF invoices to Sage?
No, Sage does not support direct PDF invoice uploads. You need to convert PDF invoices into a Sage-compatible format like CSV or Excel before importing. Tools like DocuClipper can extract invoice data from PDFs and format it correctly for Sage, making the import process faster and eliminating manual data entry.
What can be imported into Sage accounting?
Sage allows importing various data types, including sales and purchase invoices, bank transactions, customer and supplier records, stock take data, and nominal transactions. Files must be in CSV or Excel format and follow Sage’s required structure. Using automation tools like DocuClipper helps convert and format data accurately, reducing manual entry and errors.
Can you import Excel data into Sage?
Yes, Sage allows Excel data imports for invoices, transactions, customer records, and more. The file must follow Sage’s required format with correct column headers. Go to File > Import, upload the Excel file, map the fields, and complete the import. Using tools like DocuClipper can automate this process, ensuring accuracy and saving time.
Related Articles
Next step
Close the gap between the PDF and the ERP
Route extracted invoices straight into your approval rules and accounting exports. Built for teams that process vendor bills every week, not one-off conversions.