How to Import Invoices Into QuickBooks Online: 3 Ways (2026 Guide)
Import invoices into QuickBooks Online (or Desktop) in 3 ways: manual entry, CSV/IIF upload, or automated OCR with line-item bills. Step-by-step for each.
Transferring your invoice information from PDF or paper to software can be a tedious and time-consuming task.
Fortunately, this blog will show you how to import invoices into QuickBooks.
You’ll learn how to easily transfer your invoice information in just a few clicks, eliminating the hassle and reducing the risk of errors.
Whether you prefer manual data entry or using automation tools, we’ve got you covered with step-by-step instructions and expert tips.
The same platform also outlines end-to-end invoice processing software—extraction through approvals and matching—before data lands in QuickBooks. You can also go straight to the invoice to QuickBooks solution page. The capture step is powered by invoice OCR, which is template-free so it handles new vendors without setup.
Direct answer: Yes — DocuClipper can push invoices into QuickBooks two ways. For QuickBooks Online, it extracts vendor, invoice number, date, line items, and totals from any PDF and syncs the bill directly through the QuickBooks API (no CSV download). For QuickBooks Desktop, it exports an IIF file you import into QuickBooks. QuickBooks itself does not read PDFs, so an OCR step is required first. You generally do not have to map fields by hand: DocuClipper's export is pre-formatted to QuickBooks's expected columns, so the import maps automatically. See the QuickBooks integration for the full sync workflow.
While you are here
Stop re-typing invoices into your accounting system
DocuClipper captures vendor name, invoice number, line items, totals, and tax from any PDF invoice (digital or scanned) and exports them ready for your ERP or approval workflow.
Step 1: Capture Invoice Data
First, you have to collect your invoice data. You might have a whole stack of invoices you need to take care of, and luckily we have a few ways to do it.
There are 2 ways to organize your invoices in a spreadsheet, you can do it automatically or manually.
Manually
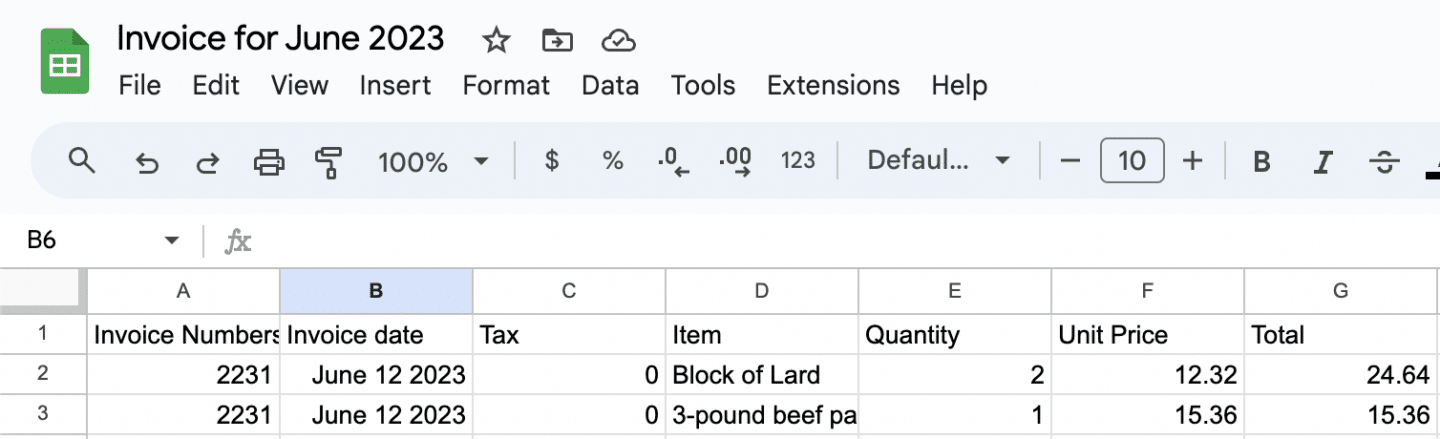
Open a spreadsheet and manually create columns for name, vendor, date, invoice number, line items, amount, tax, and quantities.
There is a list that QuickBooks prefer and the columns and the way it is organized.
Save the spreadsheet as a CSV file.
However, manual data entry has significant drawbacks.
Statistics show that data entries with a verification layer have a 4% error rate, which can lead to costly mistakes, especially when processing a large volume of invoices regularly.
This error rate can accumulate quickly, making manual entry inefficient and error-prone.
Additionally, a person can spend up to 30 minutes on a single invoice being recorded in a spreadsheet, making this a slow, inefficient, and expensive process for your business.
Automatically
You can also extract data from invoices using automated software with much higher accuracy and efficiency.
Using invoice scanning software like DocuClipper can significantly simplify this process.
Steps to Use DocuClipper:
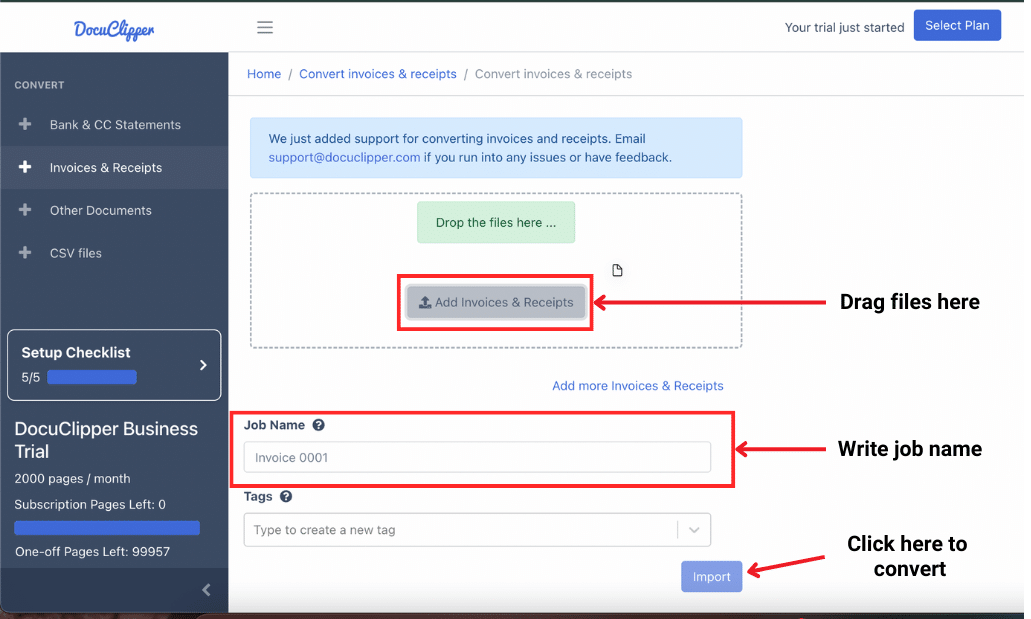
- Open DocuClipper in your web browser and navigate to the invoice OCR section. Drag and drop one or multiple invoices as needed.
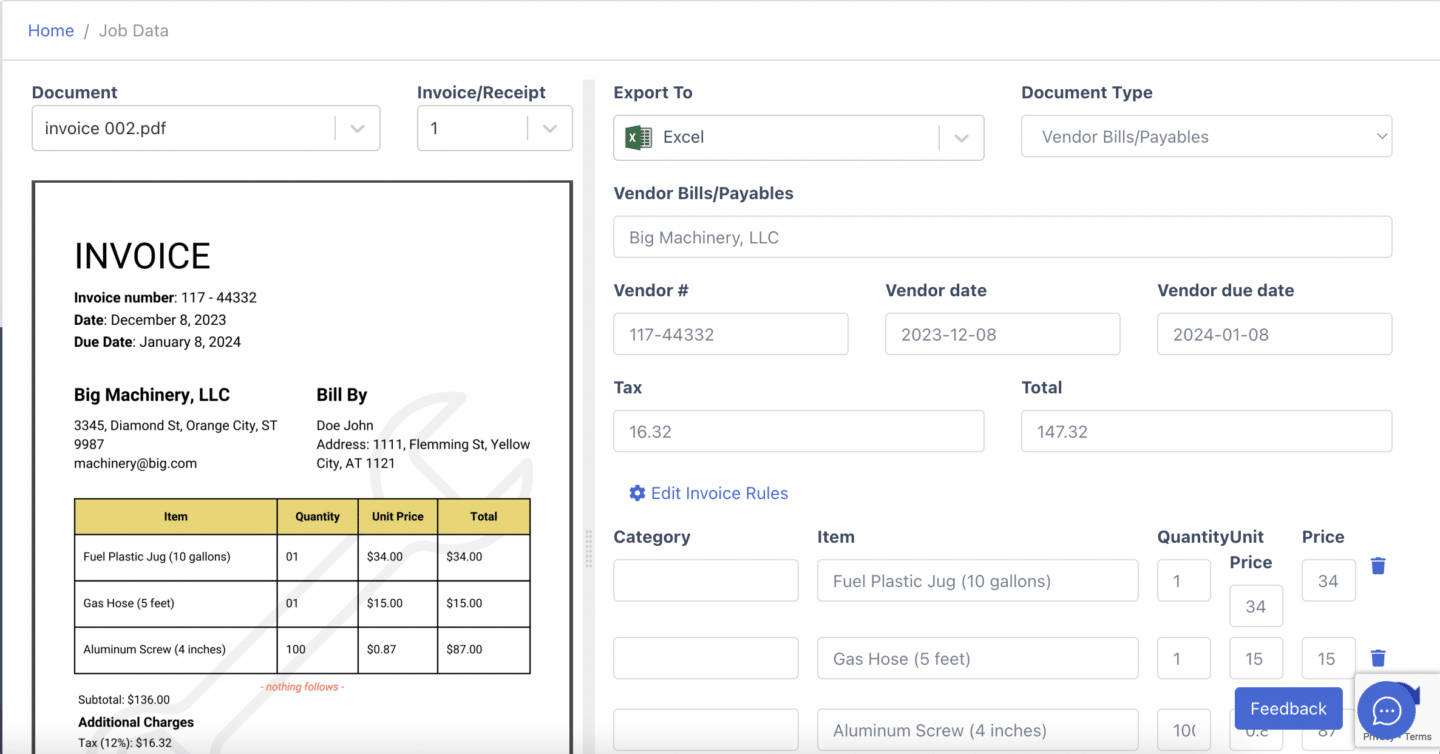
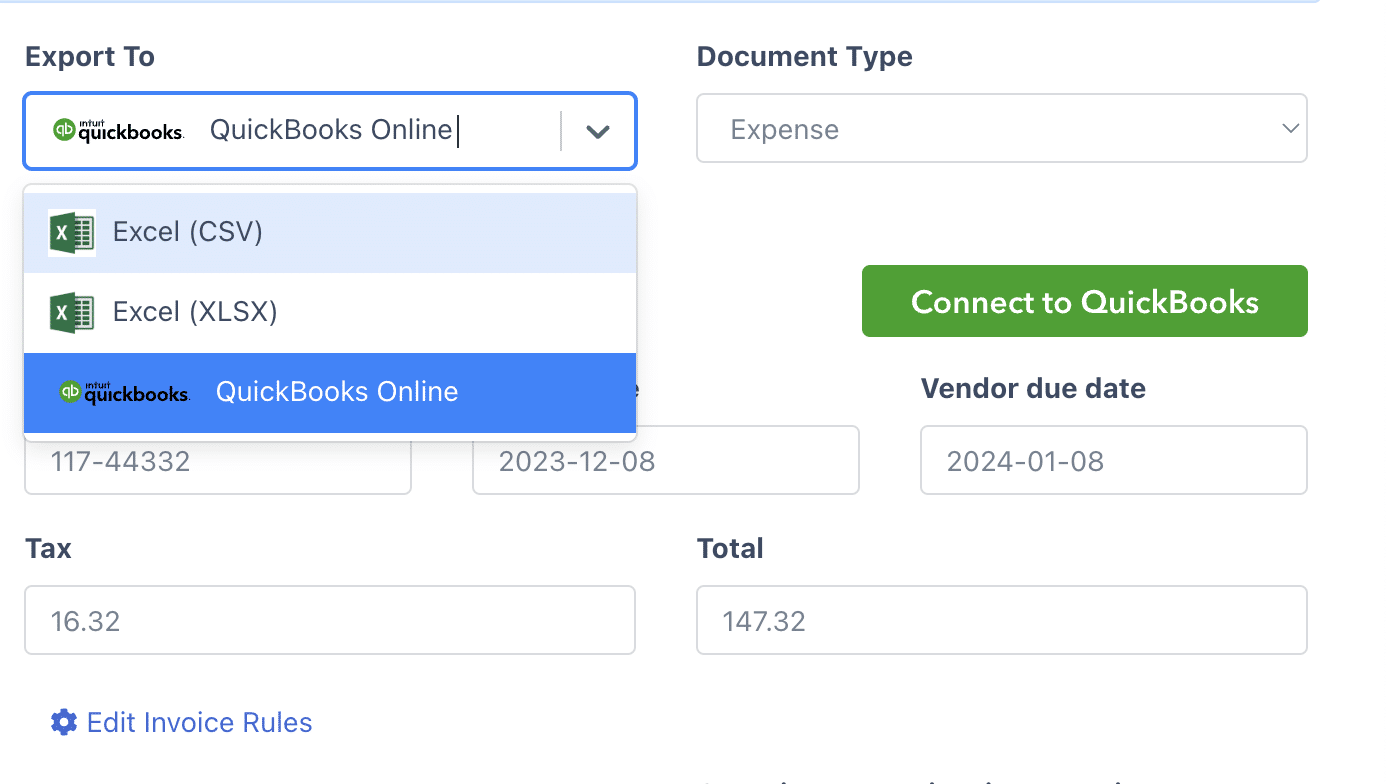
- Extract information by selecting the appropriate option you can extract the converted invoices into Excel or directly to QuickBooks.
- Link your accounts by connecting your QuickBooks account to DocuClipper for seamless data transfer.
For a detailed guide, view this article: How to Convert Invoices and Receipts with DocuClipper.
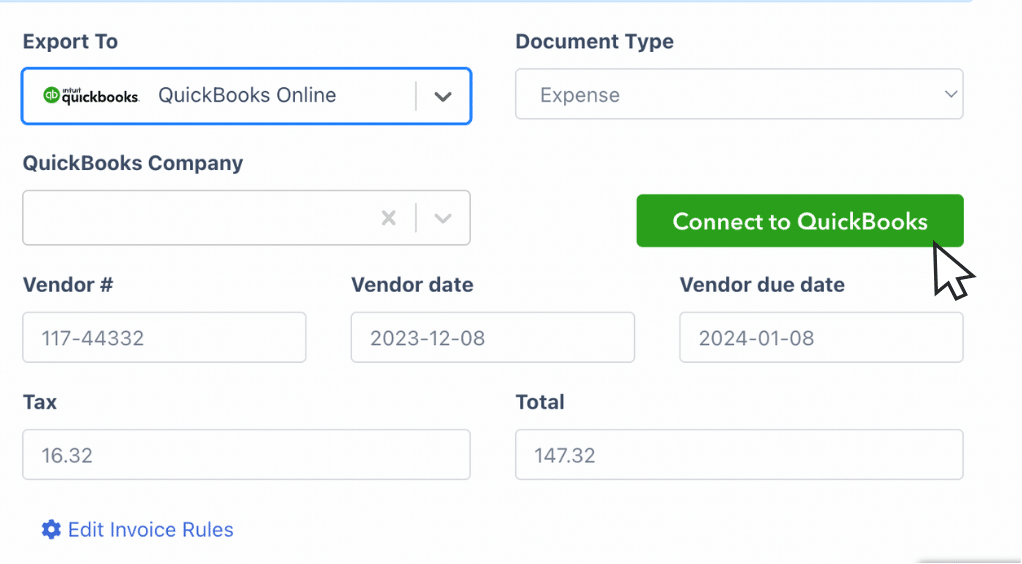
DocuClipper enables the automatic import of invoices into your QuickBooks account, skipping the next step entirely.
You can also create rules for invoices to automatically categorize expenses based on the line item descriptions.
Step 2: Login into QuickBooks
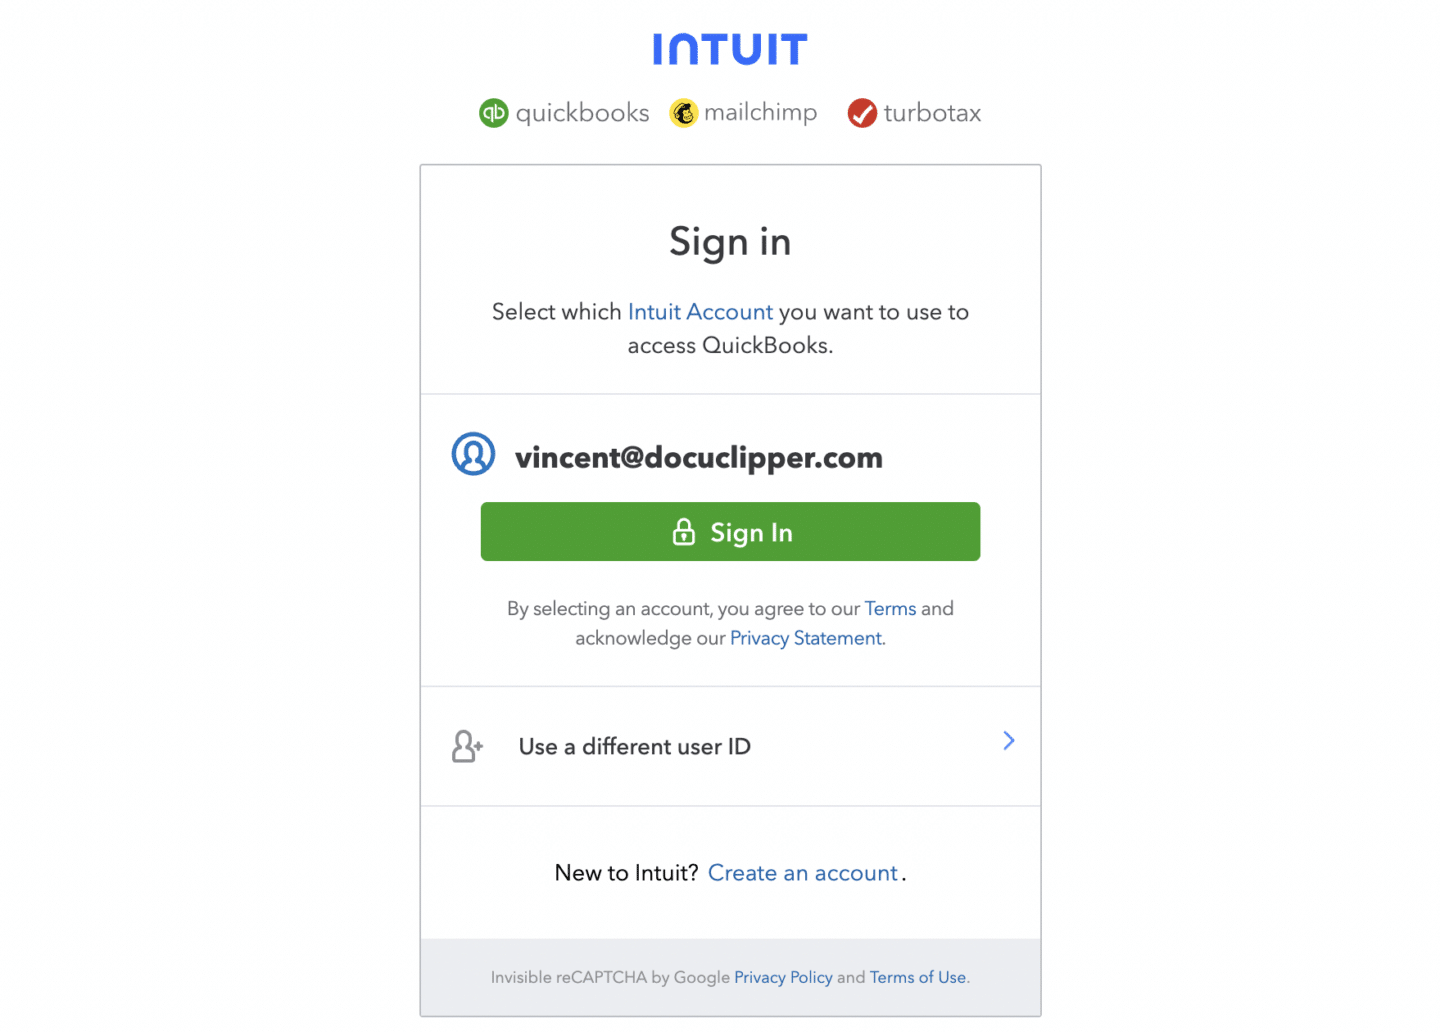
Once you have your list of invoices in a CSV format or have used DocuClipper for direct import, log in to QuickBooks by entering your email address and password.
After logging in, you’ll be directed to the QuickBooks dashboard, where you can manage your invoices and continue the import process.
Step 3: Upload Your Spreadsheet
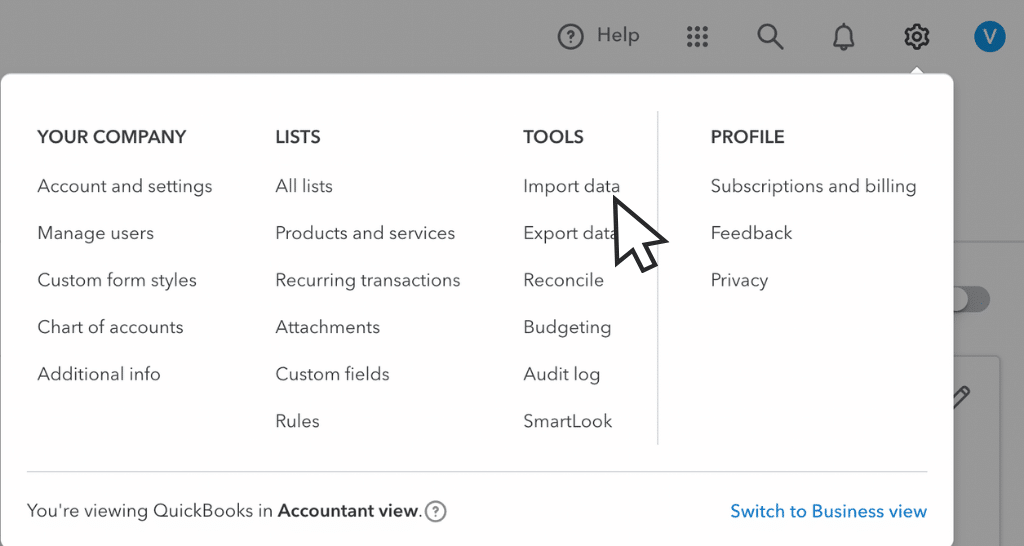
Once you are in the dashboard, click on the gear icon in the upper right-hand corner of the screen.
![]()
When the pop-up appears, select “import data.”
This will take you to a section where you can choose various types of data to import. In this case, select “invoices.”
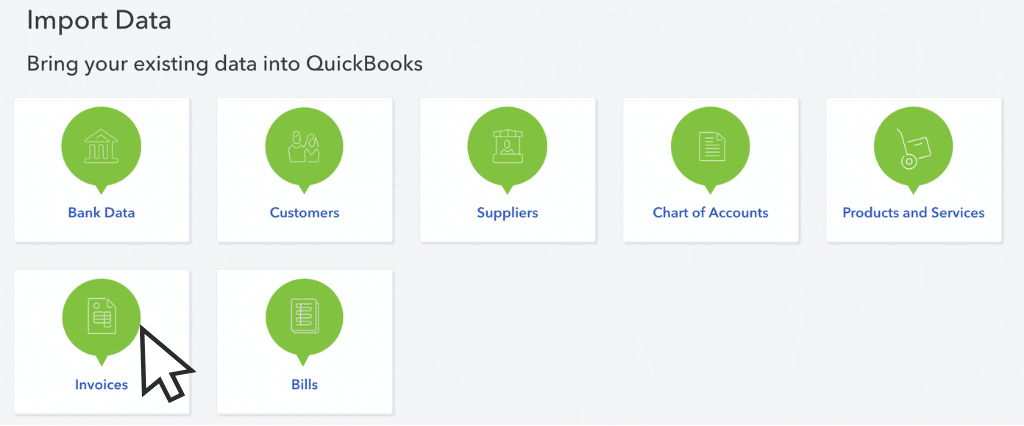
QuickBooks provides a guide for more detailed instructions and a template to help you map your import fields accurately.
If you used DocuClipper, the fields will already be mapped for you.
Upload your file here and, if necessary, check the box to add new customers.
Once the file is uploaded, double-check the columns to ensure they match the required fields. You can toggle through the options to make any necessary adjustments.
Step 4: Map Your Import Fields
After uploading, map the column headers with the corresponding invoice fields in QuickBooks. Required fields are marked with an asterisk (*).
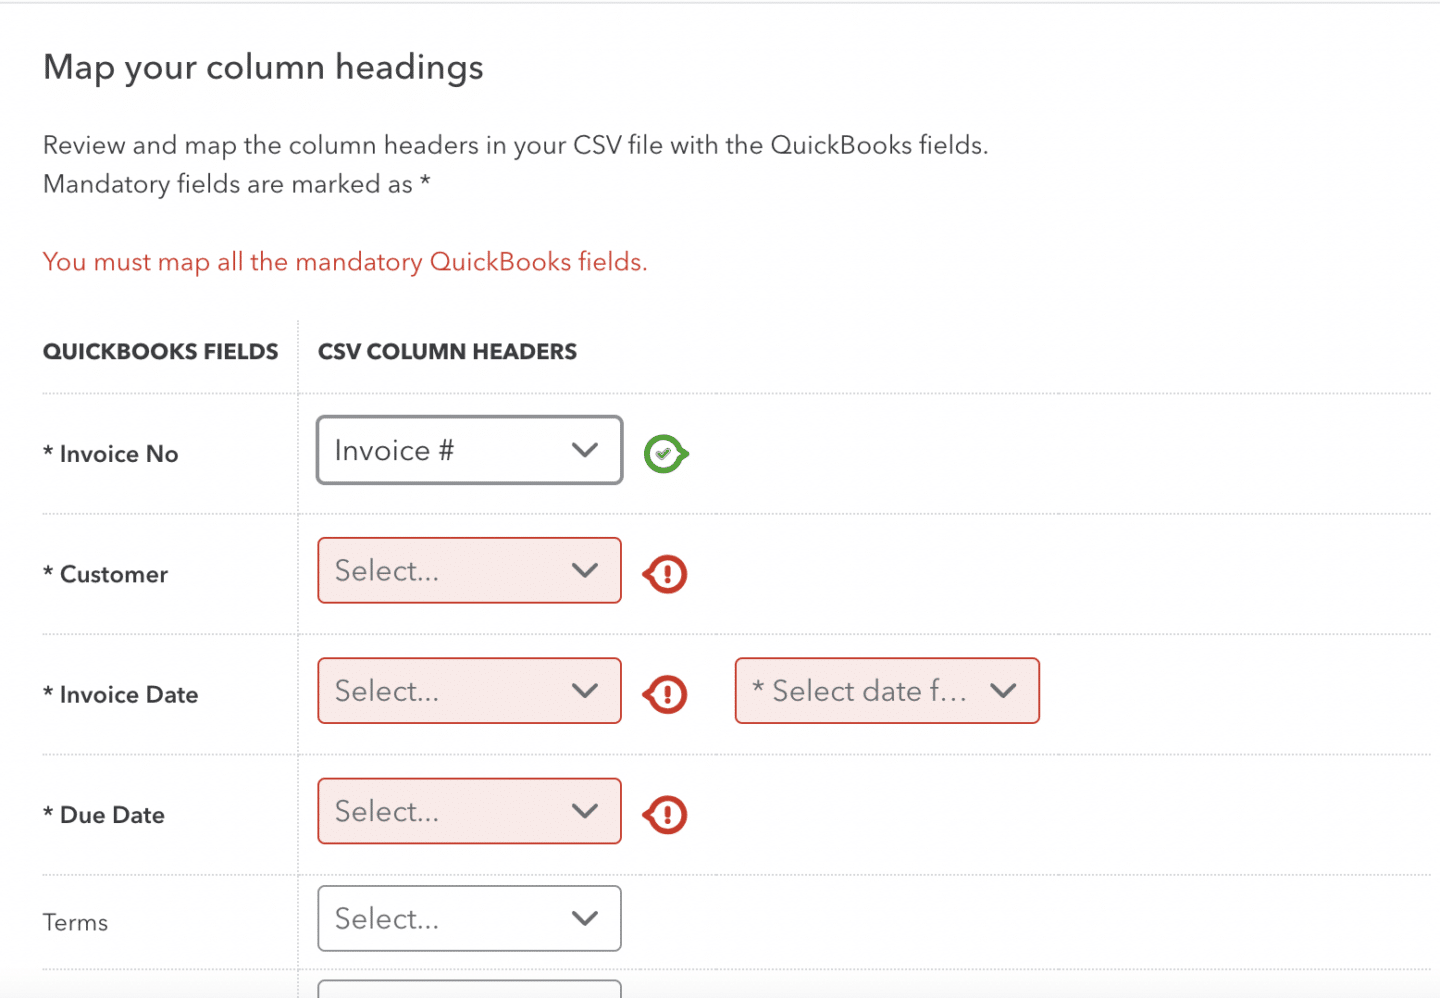
For any fields not in your spreadsheet, select “Not applicable.”
QuickBooks will use a generic item called “sales” for any missing products and services.
Be sure to select the correct date format you used, such as DD/MM/YYYY.
This ensures all your data is accurately imported and aligns with QuickBooks’ requirements.
Put it into practice
Bad line data stalls every approval
Wrong quantities or unit prices create exceptions that clog the queue. Structured extraction gives AP teams and procurement the exact numbers from the PDF, without re-keying.
Step 5: Import Invoices
After mapping the fields, review the import summary. If everything looks good, select “Start import.”
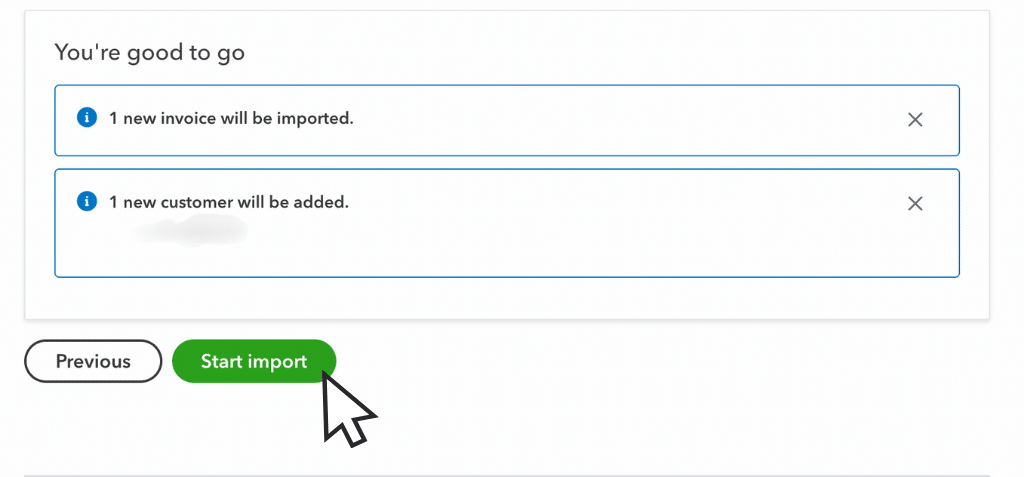
Once the import is complete, select “OK” if all your invoices have been successfully imported. If some invoices fail to import, note the reasons provided and then select “Done.”
This final review step ensures that your data is accurately transferred into QuickBooks, allowing you to address any issues immediately and maintain accurate records.
- How to Import Invoices into Zoho Books
- How to Import Invoices into Dynamics 365 Business Central
- How to Import Invoices into SAP Business One
- How to Import Invoices into Xero
- How to Import Invoices into Sage
- How to Import Invoices into NetSuite
How DocuClipper Automates Importing Invoices Into QuickBooks
DocuClipper simplifies the steps mentioned above by allowing you to import invoices directly from its platform. As a financial document OCR software, DocuClipper processes PDF invoices and receipts into editable formats such as CSV, QBO, and XLS with a remarkable 97% accuracy.
It can handle hundreds of documents in a single click, eliminating the need for manual invoice data entry and mapping import fields. This not only saves time but also reduces the chances of mistakes, making your invoice management process more efficient and reliable.
Also, we have more guides how to import bank statements into different software:
- Import bank statements into QuickBooks
- Import bank statements into Sage
- Import bank statements into Xero
- Import bank statements into NetSuite
Keep QuickBooks in Sync After Import
When you use the direct QuickBooks Online integration rather than a file import, the connection works two ways. DocuClipper remembers the bill it created in QuickBooks, so if you later correct a line item in DocuClipper — its category, tax code, or service — the change re-syncs to the existing QuickBooks record and updates it in place, rather than creating a duplicate. (If QuickBooks has locked the record — for example, a bill already marked paid — it can reject the update, and DocuClipper surfaces the message so you know.)
Before any invoice or bill is pushed, DocuClipper runs a pre-flight validation. It checks that the required fields are present — the vendor or customer, plus a category and amount on every line — and blocks the export with a precise, line-level error message if anything is missing. That keeps incomplete data from ever landing in your books.
FAQs about Import Invoices into QuickBooks
Here are some frequently asked questions about importing invoices into QuickBooks:
If I edit an invoice in DocuClipper, does QuickBooks update too?
Yes. When you use the direct QuickBooks Online integration, DocuClipper tracks the record it created in QuickBooks. Editing a line item in DocuClipper — category, tax code, or service — automatically re-syncs to the existing QuickBooks record and updates it in place, with no duplicate. Records QuickBooks has locked (such as a paid bill) can reject the update, and DocuClipper shows you the message.
Does DocuClipper check for missing fields before sending to QuickBooks?
Yes. Every export runs a pre-flight validation first. DocuClipper confirms the vendor or customer and a category and amount on each line are present, and blocks the export with a precise, line-level error if anything is missing — so incomplete data never reaches QuickBooks.
Can I import invoices into QuickBooks?
Yes, you can import invoices into QuickBooks using various methods such as CSV files, Excel spreadsheets, and integrated tools like DocuClipper, which streamline the process and ensure accurate data transfer directly into your QuickBooks account.
Can you upload invoices to QuickBooks from Excel?
Yes, you can upload invoices to QuickBooks from Excel. QuickBooks provides an import feature that allows you to upload Excel files directly. By mapping your Excel columns to QuickBooks fields, you can ensure accurate data transfer, making the process efficient and straightforward.
Can you import PDF invoices into QuickBooks?
Yes, you can import PDF invoices into QuickBooks. To do this, you need to use OCR software like DocuClipper, which converts PDF invoices into formats compatible with QuickBooks, such as CSV or QBO files, ensuring a smooth and accurate data transfer.
Can you upload your own invoice to QuickBooks?
Yes, you can upload your own invoice to QuickBooks. QuickBooks supports importing custom invoices in formats like Excel or CSV. Additionally, tools like DocuClipper can help convert your invoices into QuickBooks-compatible formats, ensuring a smooth import process. This flexibility allows you to use your unique invoice templates and maintain accurate records.
How do I import old transactions into QuickBooks?
To import old transactions into QuickBooks, first, export the data from your previous accounting software into a CSV or Excel file. Then, use QuickBooks’ import feature to upload the file. Map the fields correctly to ensure accurate data transfer. This method works for both QuickBooks Online and QuickBooks Desktop versions.
How do I scan invoices into QuickBooks?
To scan invoices into QuickBooks, use OCR software like DocuClipper. First, scan the invoices and upload them to DocuClipper. The software extracts the invoice data and converts it into a format compatible with QuickBooks. Then, link your DocuClipper account with QuickBooks for direct import. This streamlines and automates the entire process.
Can I import a CSV file into QuickBooks?
Yes, you can import a CSV file into QuickBooks. Use the “import data” feature in QuickBooks to upload your CSV file. Follow the prompts to map your CSV columns to the corresponding QuickBooks fields. This ensures accurate data transfer and simplifies the import process.
How do I manually import transactions into QuickBooks desktop?
To manually import transactions into QuickBooks, first, save your transaction data in a CSV or Excel file. Open QuickBooks Desktop, go to the “File” menu, select “Utilities,” and then choose “Import” and “Excel Files.” Follow the prompts to map your data fields correctly. Complete the process by confirming and importing your transactions.
How to import transactions into QuickBooks Online from Excel?
To import transactions into QuickBooks Online from Excel:
- Log in to QuickBooks Online and go to the dashboard.
- Click on the gear icon in the upper right corner and select “Import Data.”
- Choose the type of data you want to import, such as “Bank Data” or “Invoices.”
- Upload your Excel file and map the columns to the corresponding QuickBooks fields.
- Follow the prompts to review and confirm the import.
Can I scan directly into QuickBooks?
Yes, you can scan documents directly into QuickBooks. Using integrated scanning software or OCR tools like DocuClipper, you can scan invoices and receipts, which are then converted into compatible formats for QuickBooks. This allows for seamless data transfer, reducing manual entry and ensuring accuracy.
Can I scan an invoice into QuickBooks Online?
Yes, you can scan an invoice into QuickBooks Online. By using integrated scanning software or OCR tools like DocuClipper, you can scan your invoices and convert them into formats compatible with QuickBooks Online. This streamlines the process, reduces manual data entry, and ensures accurate and efficient data transfer.
Where do invoices go in QuickBooks?
Invoices in QuickBooks are stored in the “Sales” section. To access them, go to the left-hand menu and click on “Sales,” then select “Invoices.” Here, you can view, manage, and track all your invoices, including their status, due dates, and payment information. This section helps you keep your billing organized and up-to-date.
Related Articles
Next step
Close the gap between the PDF and the ERP
Route extracted invoices straight into your approval rules and accounting exports. Built for teams that process vendor bills every week, not one-off conversions.