
Categorize Transactions with Your QuickBooks Desktop Accounts
Save your QuickBooks Desktop Chart of Accounts once and DocuClipper builds a categorization group from it - one category per account - then add vendors so your transactions categorize against those exact accounts and export a clean IIF with matching account dropdowns.
Last updated
When you save your QuickBooks Desktop (QBD) Chart of Accounts in DocuClipper, DocuClipper does two things for you automatically:
- Builds a categorization group named QuickBooks Desktop Accounts, with one category for every account in your Chart of Accounts, and selects that group.
- Turns the Source Account and Destination Account fields in the IIF export into dropdowns populated from your saved accounts, so the accounts you export match QuickBooks exactly and you avoid "Account Name does not exist" errors on import.
This gives you the exact QuickBooks account vocabulary to categorize against, end to end: the categories in DocuClipper are your real QuickBooks Desktop accounts.
One important thing to know up front: saving your Chart of Accounts creates the categories, but it does not categorize your transactions on its own. DocuClipper categorizes by matching the text in each transaction - a transaction is assigned to a category when its description contains one of that category's vendors (the vendor or merchant names you add to it). There is no AI that guesses categories for you. The categories start empty, so before anything gets categorized you add vendors (in bulk from a CSV, or by hand per category). The rest of this article walks through that flow: save accounts → add vendors → categorize → export.
Before you start
- A DocuClipper project (TreeView interface) with at least one extracted bank statement.
- Your QuickBooks Desktop Chart of Accounts, ready to paste or upload as an IIF. If you have not exported it yet, see How to export your Chart of Accounts from QuickBooks Desktop.
Step 1. Save your Chart of Accounts
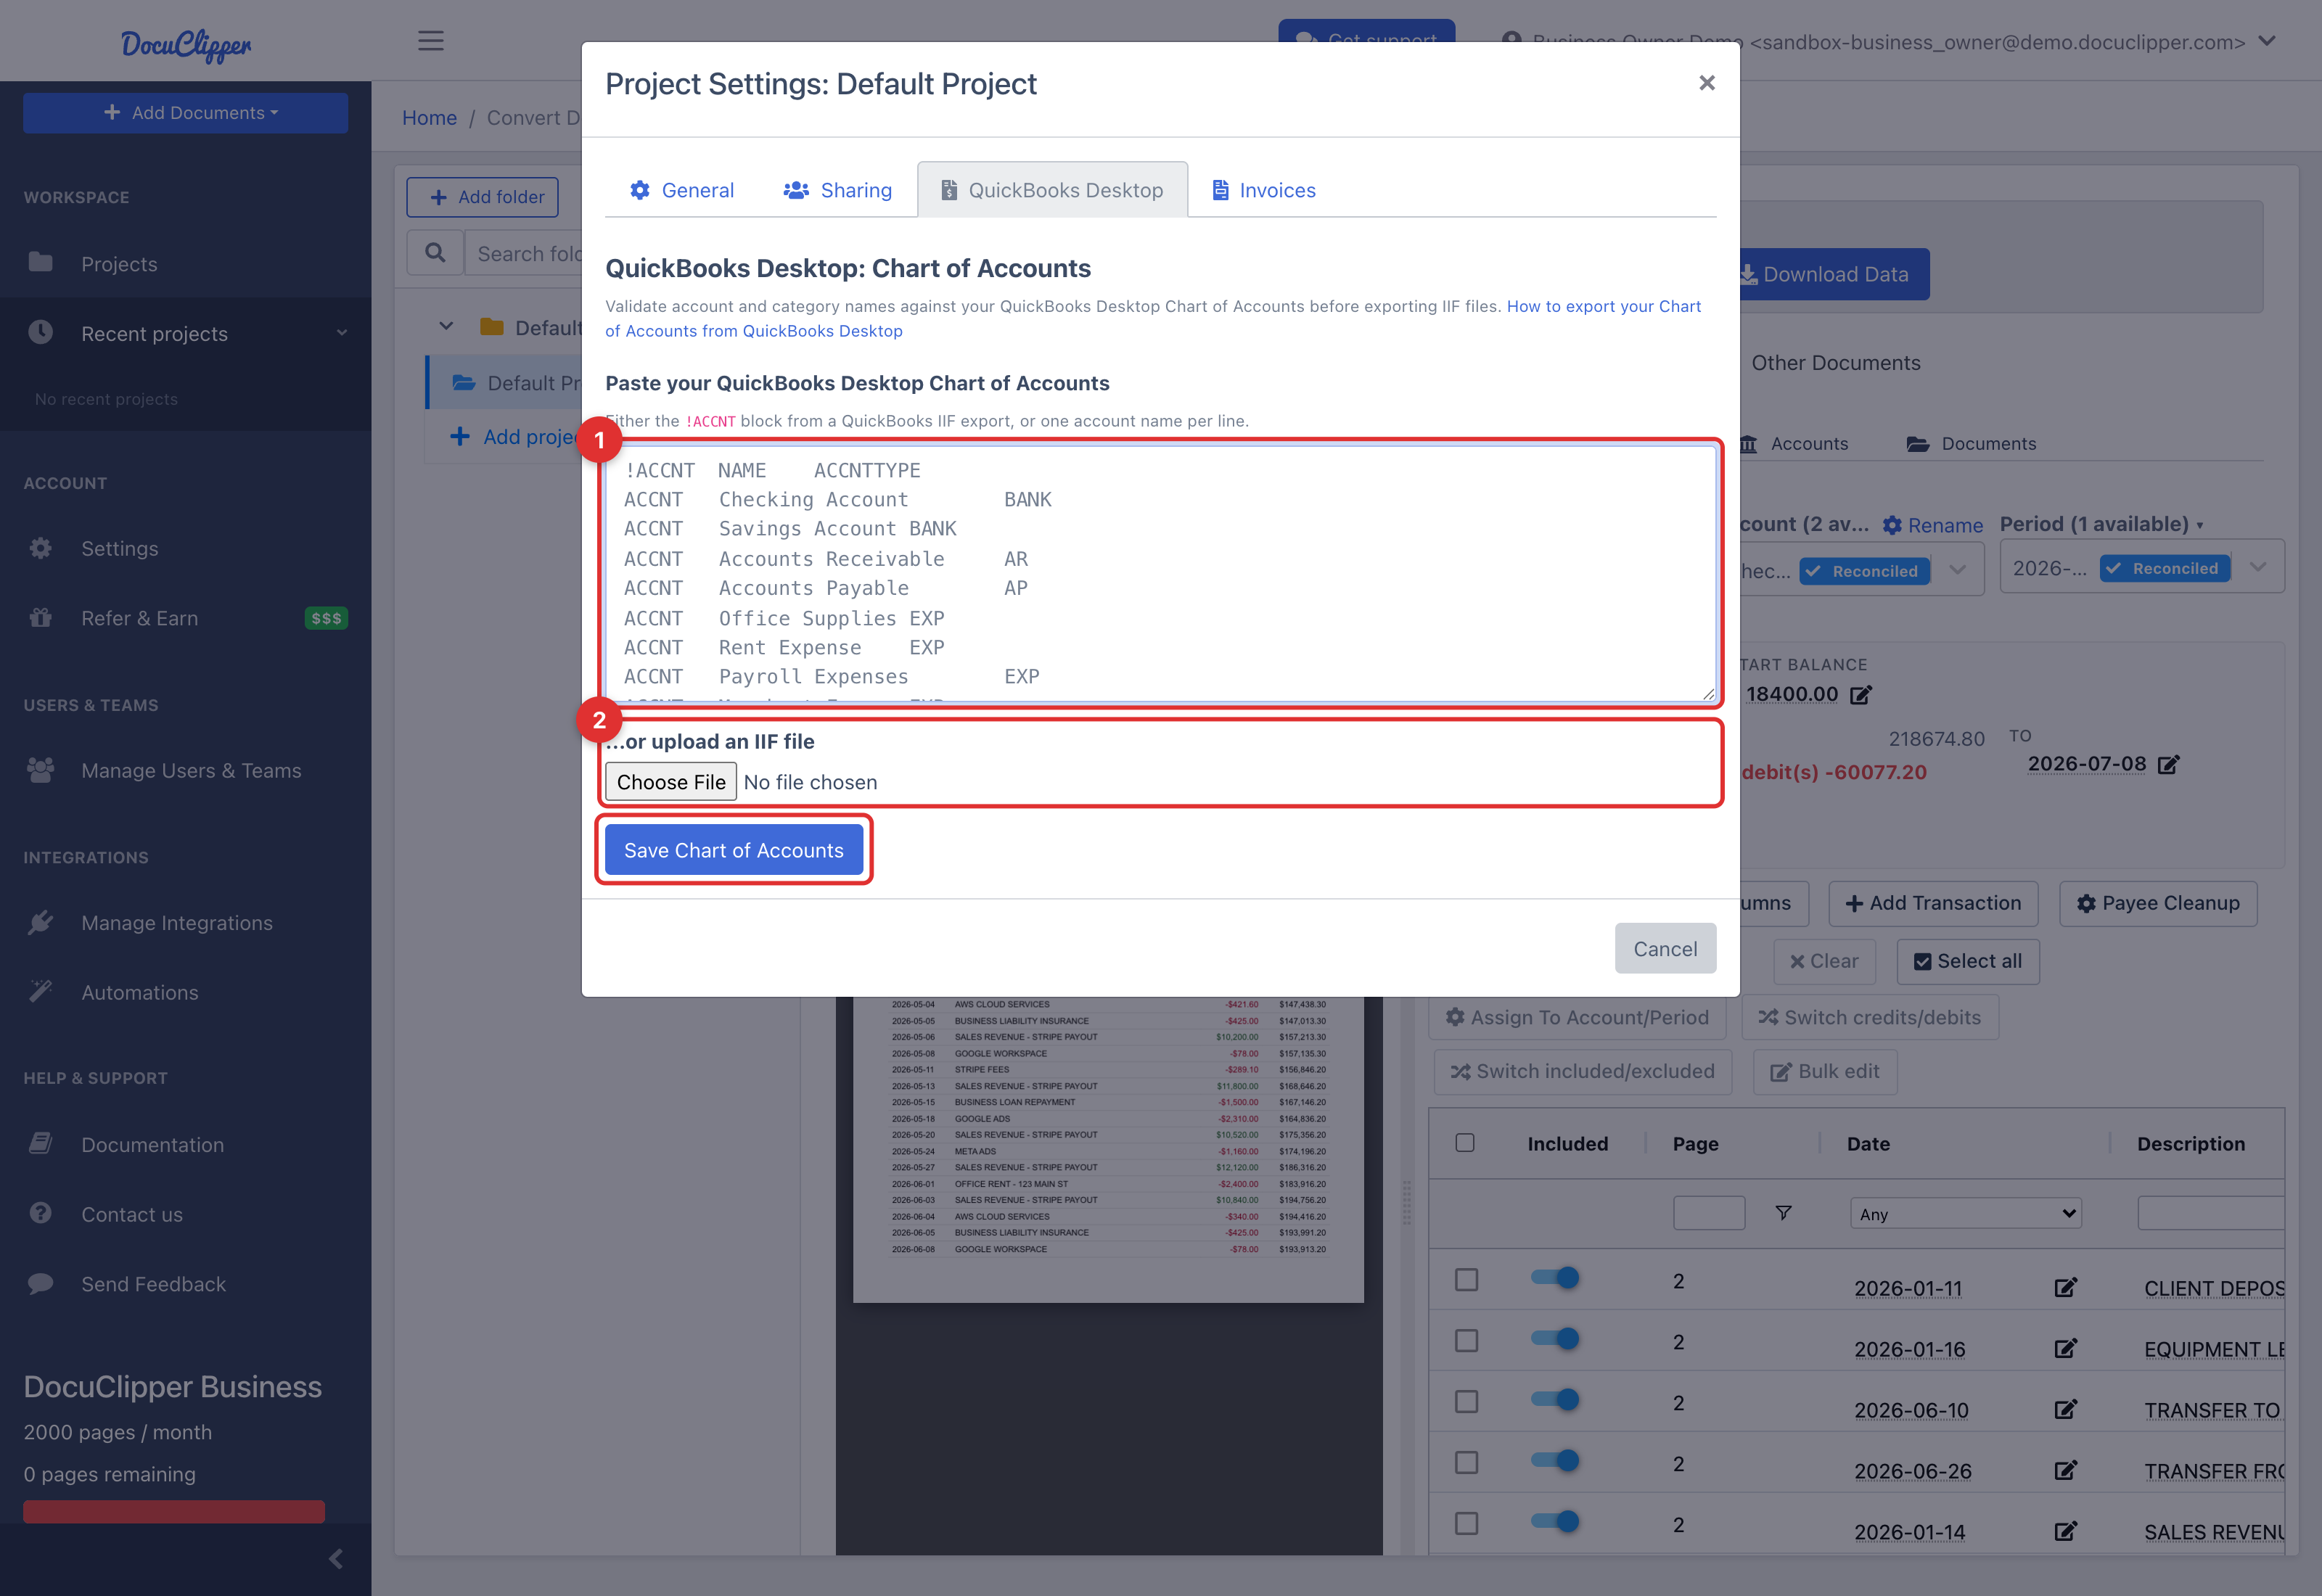
- Open your project, open Project Settings, and click the QuickBooks Desktop tab.
- Under Import from QuickBooks Desktop at the top, upload the
.iiffile from File → Utilities → Export → Lists to IIF Files and click Import lists. Tick Vendor List and Customer List in QuickBooks too and the same upload fills those as well - see Import your QuickBooks Desktop vendors and customers. - To save the chart on its own, or to paste a plain list of account names, use the QuickBooks Desktop: Chart of Accounts section below instead:
- Paste the
!ACCNTblock from a QuickBooks IIF export, or one account name per line, into the textarea, or - Upload an IIF file with the file picker, then click Save Chart of Accounts.
- Paste the
DocuClipper parses your accounts, de-duplicates them, and confirms with a message like "Saved 142 QuickBooks Desktop accounts." The panel then shows a count badge and a searchable list of the saved accounts, with Replace and Remove buttons.
Your chart is saved on the project. If you keep a separate project per QuickBooks company file - which is what we recommend - each one categorizes against its own accounts, and one client's chart is never offered in another client's project. Keywords are the part you build up over time, and those stay available to any project whose chart lists the same account name.
Step 2. DocuClipper creates the "QuickBooks Desktop Accounts" group
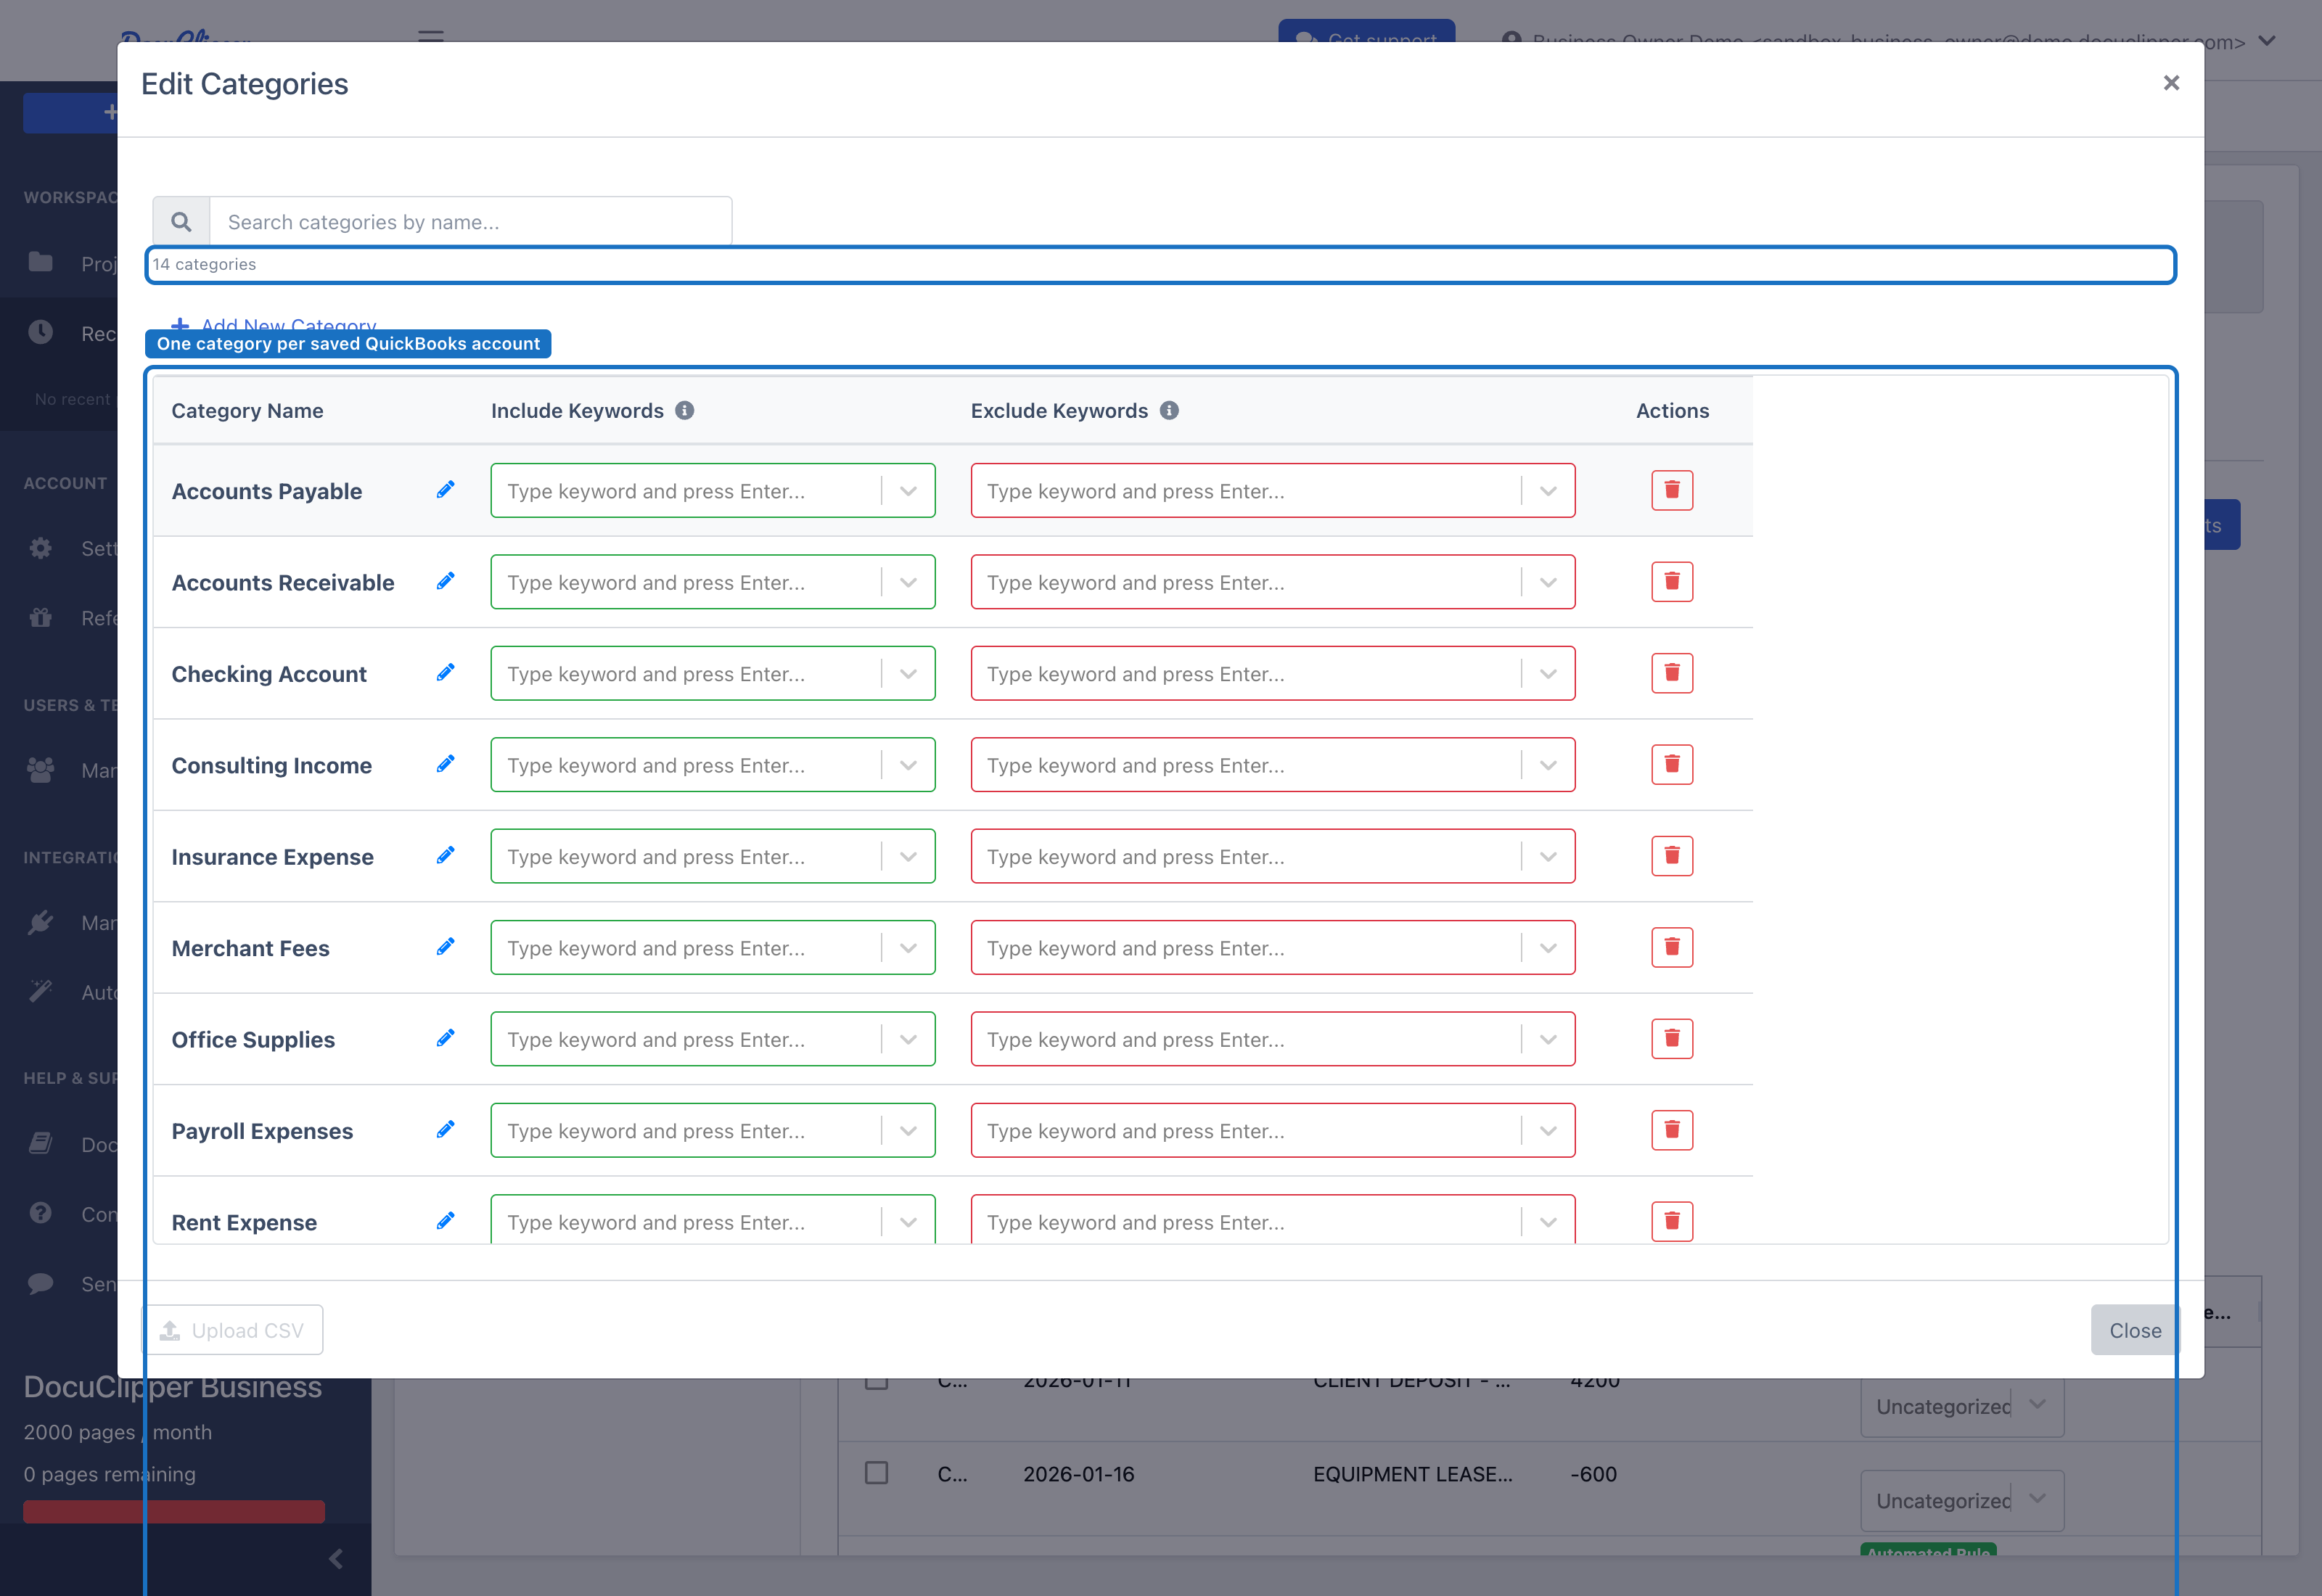
As soon as you save, DocuClipper creates (or updates) a categorization group named QuickBooks Desktop Accounts containing one category per saved account, and selects it as your active group. The category names are your QuickBooks account names exactly as they appear in your Chart of Accounts.
If your company file uses account numbers and you saved the chart from QuickBooks' IIF export, each category also carries its account number as its label. The category picker on the transactions table lists it as Ask My Accountant - 6161, so you can type either the account name or the number to find it. The number is for finding the account; the IIF export still writes the account name, which is what QuickBooks Desktop expects.
This is a normal categorization group. It behaves exactly like any group you create yourself - you can open it, rename or remove individual categories, and add your own vendors and rules to any category.
The categories start with no vendors. The group's job is to give you the exact QuickBooks account vocabulary; it does not come with matching rules. Because DocuClipper matches on the text in each transaction, a category with no vendors never matches anything - so nothing is categorized yet. The next step is where you make categorization actually happen.
Step 3. Add vendors so transactions match
Categorization in DocuClipper works by text match: DocuClipper assigns a category to a transaction when the transaction's description contains one of that category's vendors. So to categorize against your QuickBooks accounts, you attach vendors to the categories in the QuickBooks Desktop Accounts group. There are two ways to do it - use whichever fits how you work.
Option A - Import a category + vendor CSV (recommended)
The fastest way to categorize a lot of transactions is to build a mapping spreadsheet once and upload it. From the Edit Categories view, click Upload CSV to open Import categories from CSV, then upload a CSV with two columns, category and vendor:
- Put one vendor per row. Multiple rows for the same category roll up into that one category with several vendors - e.g.
Merchant Fees, stripe/Merchant Fees, paypal/Merchant Fees, square. - The category names must match your QuickBooks account names. When they do, the import merges the vendors into the categories that already exist in your QuickBooks Desktop Accounts group instead of creating duplicates - so the accounts you saved in Step 1 pick up their vendors.
- A downloadable template is provided in that screen. Start from categories-with-vendors.csv to get the column layout right.
This is the recommended path: build a proper account-to-vendor mapping for your recurring transactions once, and every future statement categorizes against your QuickBooks accounts in seconds.
Option B - Add vendors by hand, per category
If you only need a few rules, add vendors directly in the Edit Categories table. For any category, click into the Include Keywords field, type a vendor name, and press Enter to add it as a chip. Add as many as you like. You can also:
- Add Exclude Keywords - DocuClipper will skip a transaction for that category if its description contains any of them, even when an include entry matches.
- Optionally filter by amount when you edit a category rule, so a category only applies above/below a threshold.
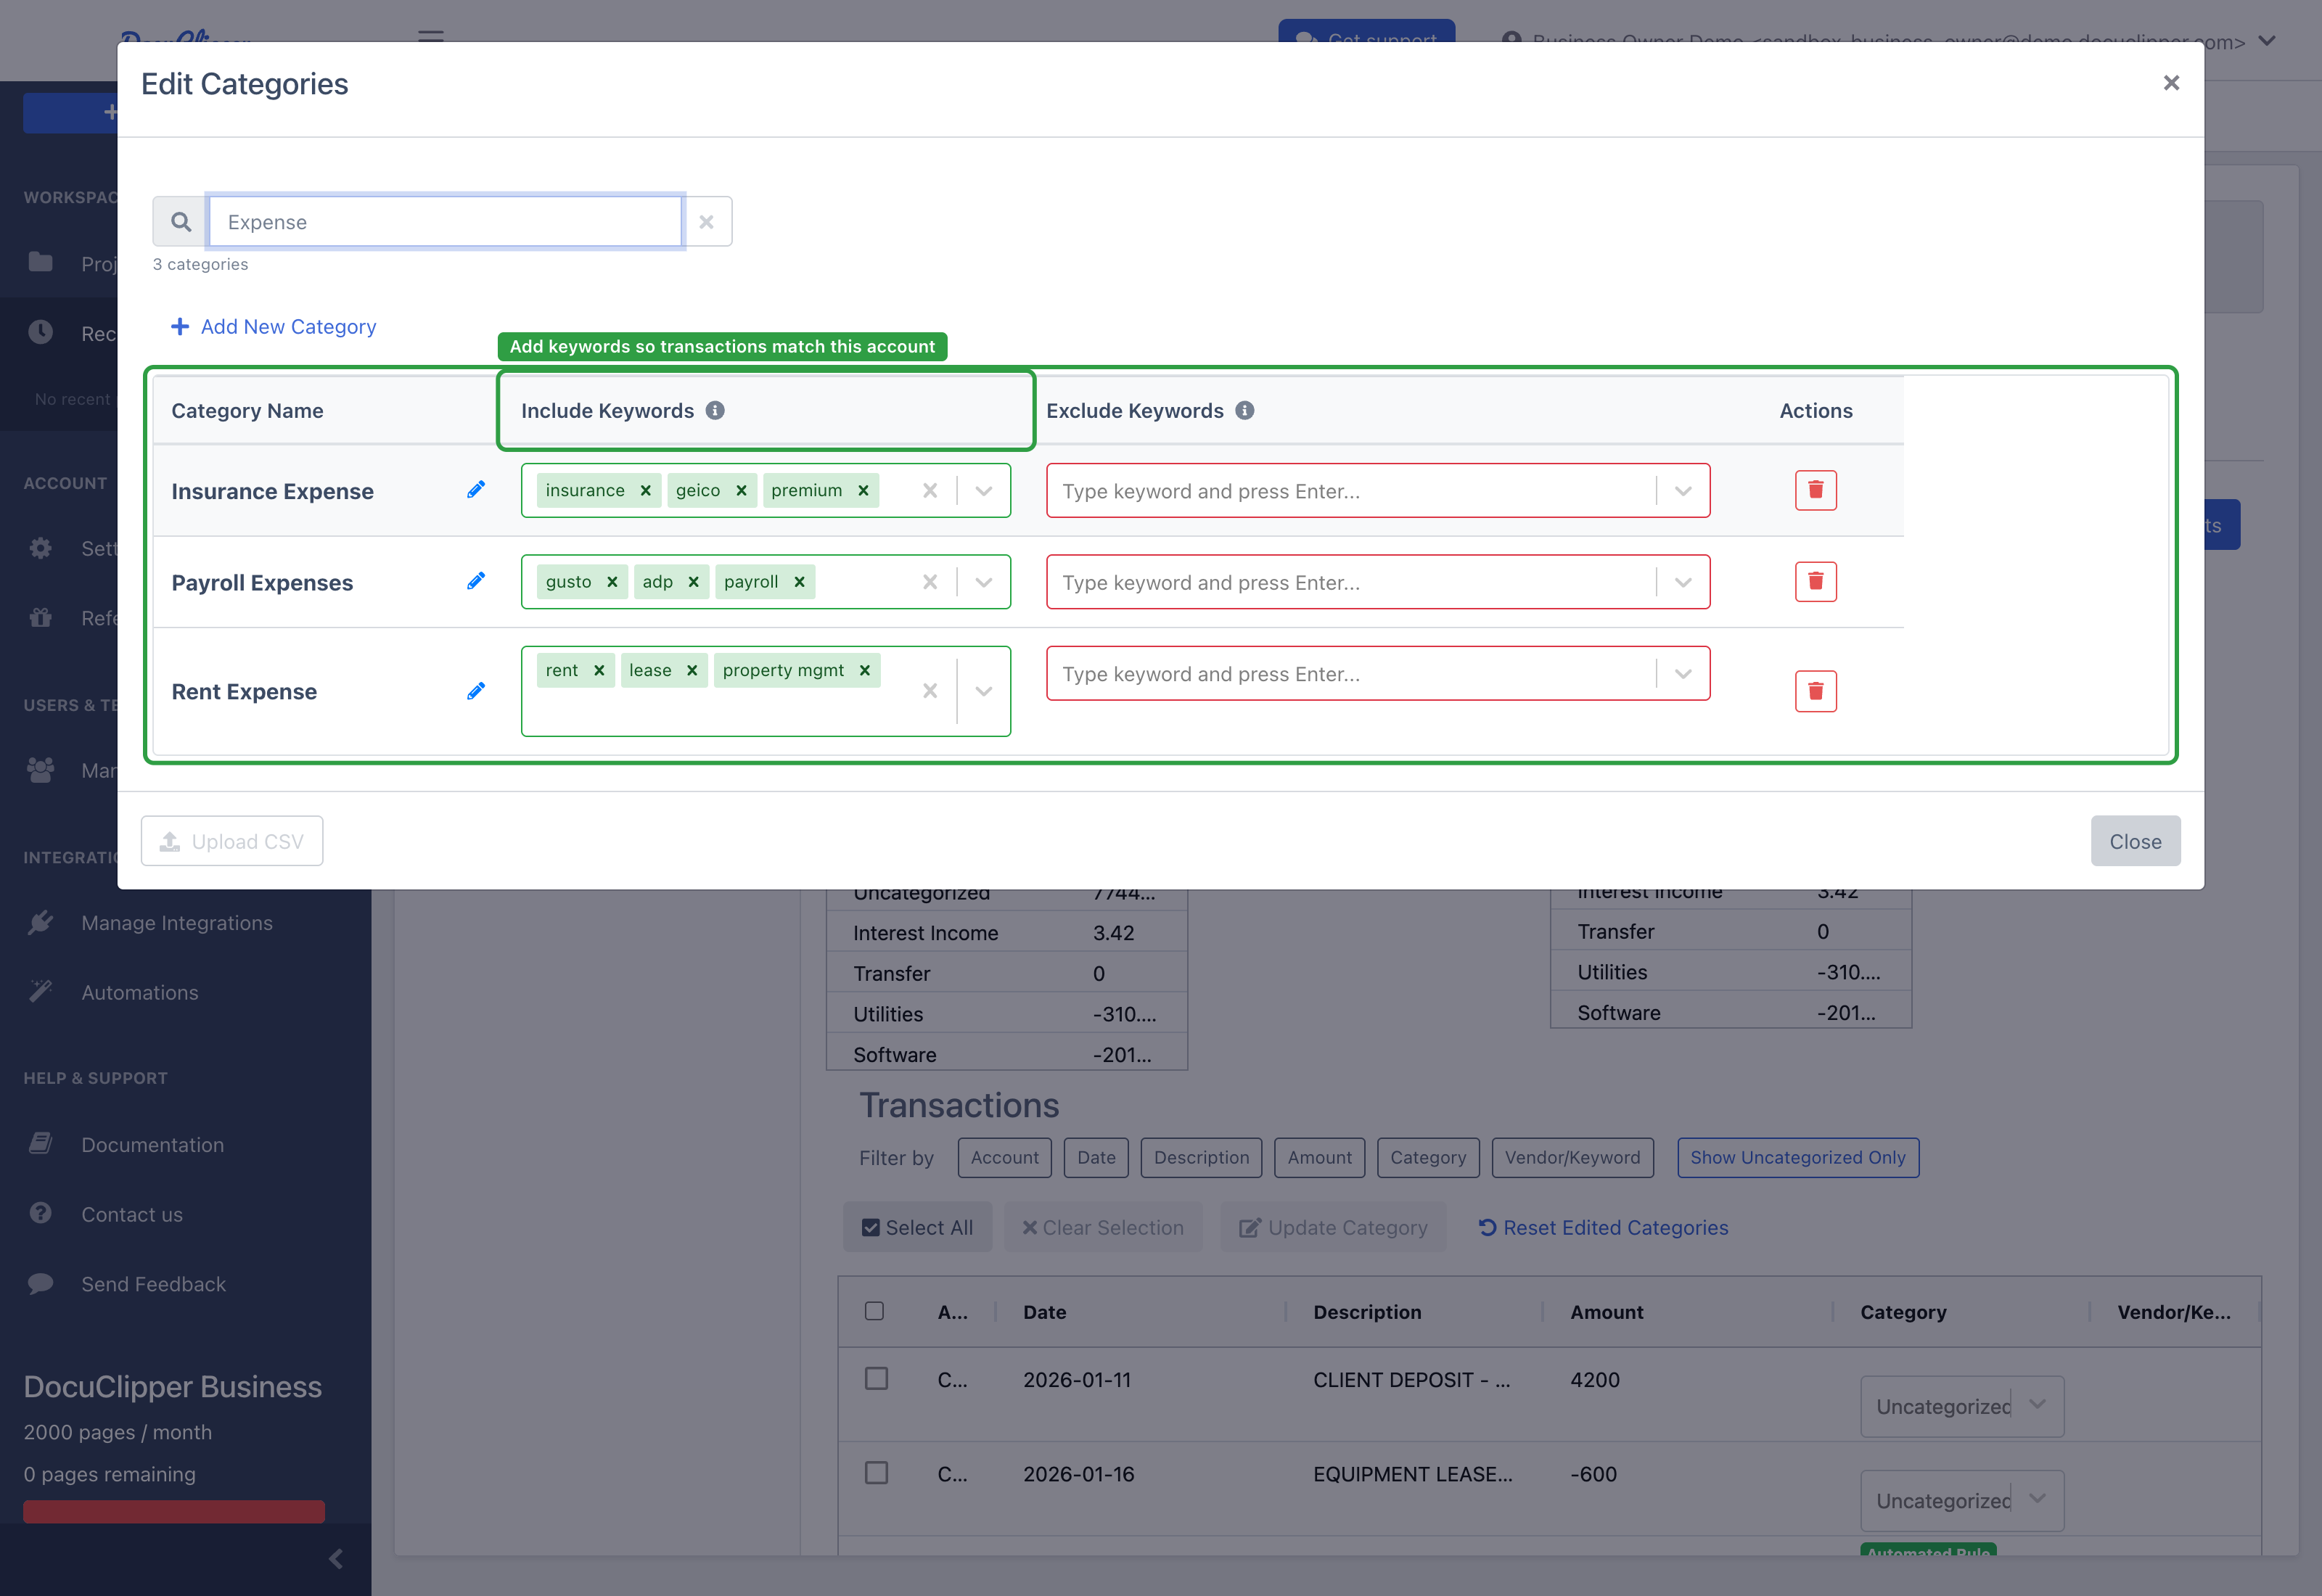
Whichever way you add them, the vendors you attach to a category are yours to keep - they're preserved when you re-save your Chart of Accounts (see below).
Step 4. Run categorization
Once your categories have vendors, run (or re-run) categorization. With the QuickBooks Desktop Accounts group selected, DocuClipper matches each transaction's description against your vendors and assigns the matching category.
Review the assigned categories in the transaction grid and correct any that need it. Add or adjust vendors whenever a recurring transaction lands in the wrong place, then re-categorize - over time the group covers your recurring vendors and matching becomes automatic. Because every category name is a real QuickBooks Desktop account, whatever you assign here lines up with QuickBooks on export.
Step 5. Export IIF with matching accounts
When you export, DocuClipper uses your saved accounts to keep the export aligned with QuickBooks.
-
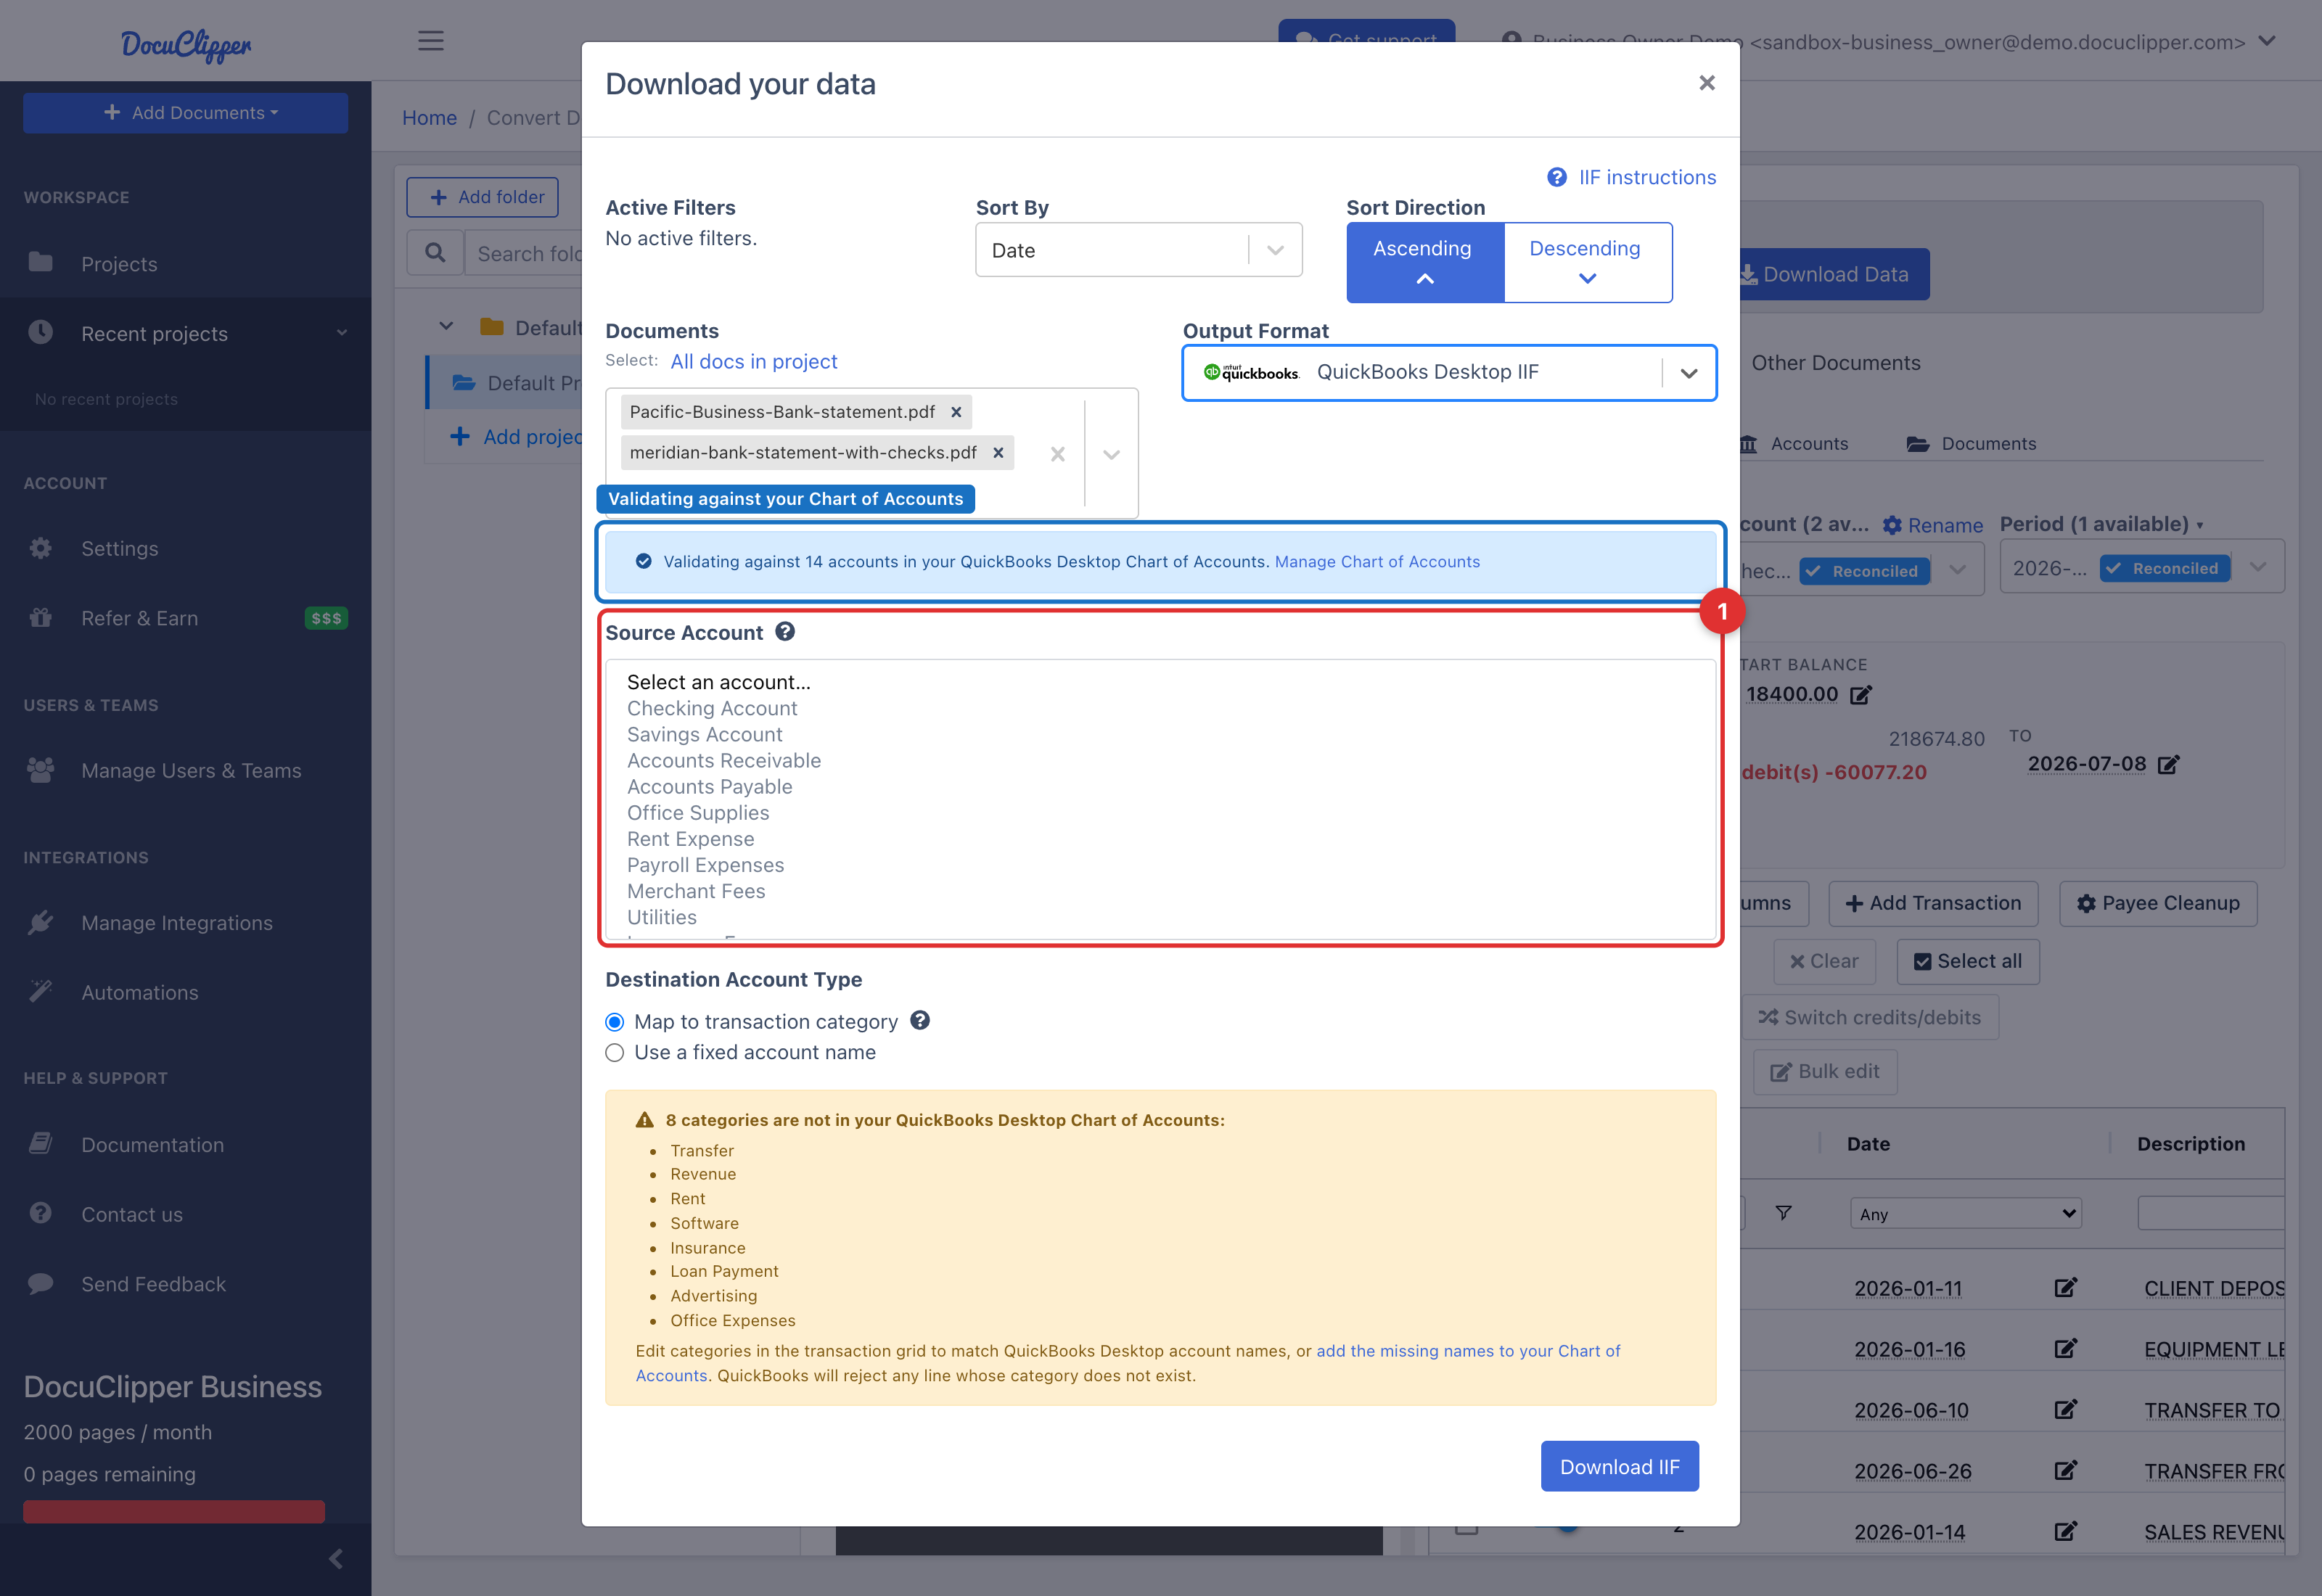
Above the transactions table, click Download Data.
-
In the Output Format dropdown, choose QuickBooks Desktop IIF.
-
At the top of the panel you'll see an info banner: "Validating against N accounts in your QuickBooks Desktop Chart of Accounts."
-
Fill in the account fields - now backed by your saved Chart of Accounts:
Source Account (required)
- This is a dropdown populated from your saved QuickBooks Desktop accounts. Pick the account the transactions came from, for example
Checking Account. Because you select from the list, the name always matches QuickBooks exactly.
Destination Account Type
- Map to transaction category (default). Each transaction's category is used as the destination account on the IIF split. Since your categories come from the QuickBooks Desktop Accounts group, they already match your QuickBooks accounts. If any category is not in your Chart of Accounts, DocuClipper lists the unmatched categories inline so you can fix them before download.
- Use a fixed account name. All transactions post to one account. When selected, the Destination Account field appears as a dropdown of your saved accounts.
- This is a dropdown populated from your saved QuickBooks Desktop accounts. Pick the account the transactions came from, for example
-
Click Download IIF, then import it into QuickBooks Desktop (File → Utilities → Import → IIF Files).
Because both the Source Account and the destination categories come from your saved Chart of Accounts, the exported accounts match QuickBooks exactly - which is what prevents the "The Account Name on a distribution does not exist in Quickbooks" error on import.
Re-saving updates the group
If your Chart of Accounts changes in QuickBooks - you add, rename, or remove accounts - re-save it in DocuClipper (use the Replace button on the QuickBooks Desktop tab). DocuClipper updates the existing QuickBooks Desktop Accounts group in place rather than creating a duplicate:
- New accounts are added as new categories.
- Accounts that no longer exist are removed from the group.
- Categories that are unchanged are left as-is, so any vendors or rules you attached to them are preserved.
Removing the Chart of Accounts (the Remove button) tears the group back down. DocuClipper does not auto-sync with QuickBooks Desktop, so the saved accounts always reflect whatever you last saved.