
Organize Folders, Projects, and Sharing
Folders vs projects in DocuClipper: what each project stores, how to set up one project per QuickBooks company file, how to move a project to another folder, and how to share folders and projects with your team.
Last updated
DocuClipper organizes your work in a two-level hierarchy: folders at the top (one per client, case, or year) and projects inside each folder. This article shows how to create them, set sharing, and adjust access for individual teammates.
If you're new to the project interface, start with DocuClipper's project-based interface and come back here for sharing.
Folders vs projects
A folder groups projects. It has a name and sharing settings, and nothing else: no documents, accounts, or export settings live on the folder itself. Every document belongs to a project, never directly to a folder.
A project is where the work happens. Each project keeps its own:
- Documents and everything extracted from them (transactions, invoices, forms).
- QuickBooks Desktop lists: Chart of Accounts, vendor list, and customer list, under Project Settings → QuickBooks Desktop. See Import your QuickBooks Desktop vendors and customers.
- Default accounts for IIF exports, such as where freight, sales tax, and uncategorized lines post. See Default accounts.
- Linked QuickBooks Online or Xero connection, under Project Settings → General → Linked Integration.
- Check image auto-fill, which fills the payee and memo of
Check #Nrows from check images, under Project Settings → General → Check Images. See Auto-fill payee and memo from check images. - Invoice settings, such as the default expense account and invoice number prefix, under Project Settings → Invoices.
- Sharing, which adds people or teams to this one project on top of everyone who has access through its folder.
Categorization rules are not per project: a rule you save applies in all of your projects.
Because the accounts and lists belong to the project, two QuickBooks company files should never share one. Put each company file in its own project, so every export validates against, and posts to, the right accounts.
Recommended setup for accounting firms
- One folder per client. For example,
Harbor Dental Group. - One project per QuickBooks company file inside that folder. A client with one company file needs one project; a client with two entities that keep separate books needs two, such as
Harbor Dental - Main OfficeandHarbor Dental - Westside Clinic. - Upload each company file's Chart of Accounts to its own project once. DocuClipper reuses it for every export from that project.
Where things live
The project interface is the default landing screen at /extractdata. The folder and project tree is next to the sidebar, and the open project is on the right. The sidebar's Workspace section has Projects, which brings you back here, and Organize Folders & Projects, a full-page view for moving projects and documents in bulk.
Create a folder
- Click + Add folder at the top of the project tree.
- Enter a folder name (for example, "Acme Corp").
- Click Create.
By default, a new folder is shared with Edit access with every team you belong to. Teams you are not on get no access. The line under the folder name lists exactly which teams will have access and with which role, so you can check it before you click Create.

To choose a different role for a team, click Advanced: customize team access. The per-team table starts from the default, so each team shows the access it will actually get, and the folder is created with exactly the roles in the table.

The role options are:
- No Access - the team cannot see the folder.
- Read Only - view and export, no changes.
- Edit (Write) - upload documents, edit transactions.
- Full Control (Admin) - the highest role on the folder.
You always keep Edit access to a folder you create, and your account's admins can open every folder. Creating folders and changing who a folder or project is shared with is done by your account's admins.
Create a project
- Click a folder in the project tree to expand it.
- Click + Add project under the folder's projects.
- Enter a project name and click Create.
You need Edit (Write) or Full Control on the folder to add a project to it. Everyone with access to the folder has the same access to the new project. The project is also shared with the teams you belong to and with you, so you can keep working in it.
Folder names are unique in your account, and project names are unique inside a folder, so a folder and project name always point to exactly one project. DocuClipper asks for a different name if the one you type is already taken at that level.
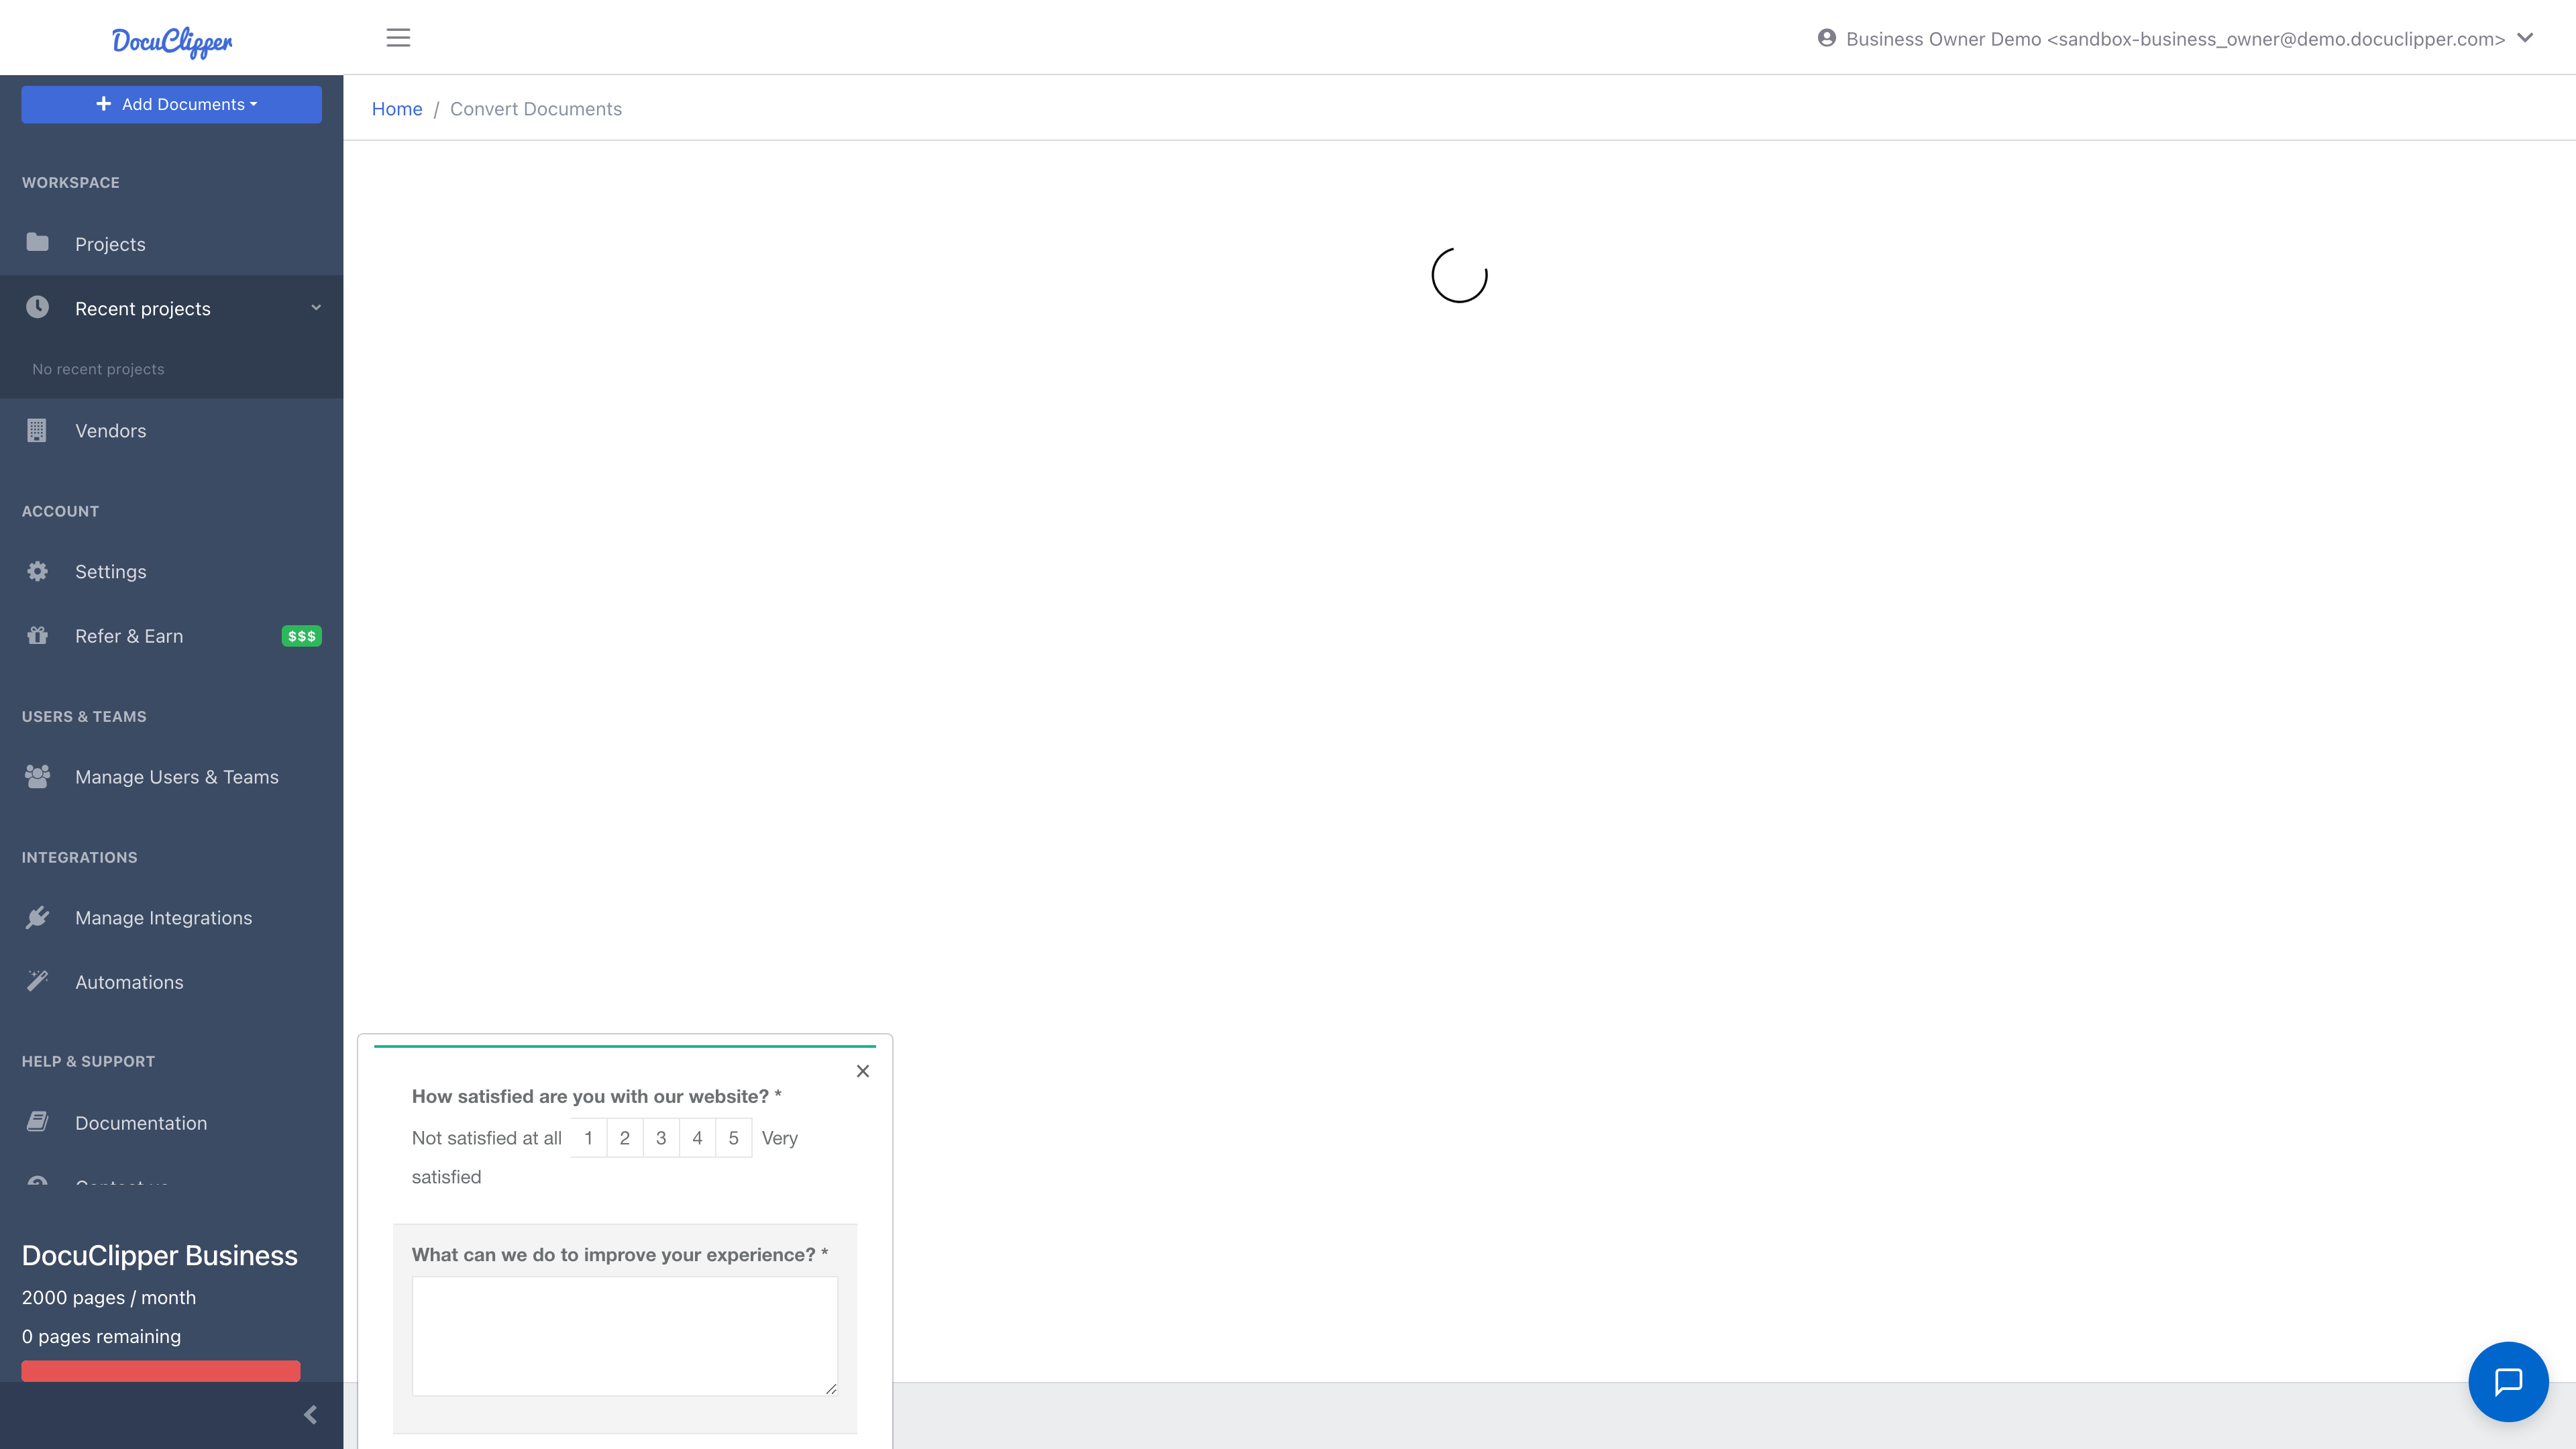
Every upload goes into a project. If you have no projects left, for example after deleting your last one, the upload page tells you and lets you create one right there: enter a name and click Create project. The new project is selected as the destination, so you can add your documents straight away. If you click Convert without creating one, DocuClipper creates Default Project for you: inside the folder the upload page names when it has no projects yet, otherwise inside your Default Folder (it makes one if you have none). After the conversion finishes you land in that project, so it always shows up in the project tree.
Edit sharing for an existing folder
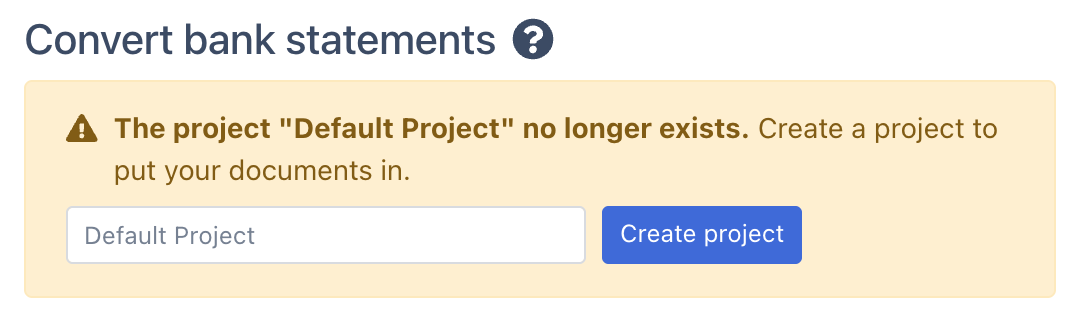
- Right-click the folder in the sidebar (or click its gear icon) → Edit settings.
- Switch to the Sharing tab.
- The top section, Team Access, controls per-team roles.
- The bottom section, Individual User Access, lets you grant access to specific people who aren't on a relevant team.

Click Save to apply.
Edit sharing for an existing project
Projects have their own Sharing tab, separate from the folder. Use it to give a team or a person access to one project without giving them the rest of the folder, for example a contractor who works on a single client entity.
- Right-click the project → Edit settings.
- Switch to the Sharing tab.
- Under Team Access, give a team a role on this project. Under Individual User Access, add specific people.
Everyone you add here sees the folder in their project tree with just this project inside it, and can open it with the role you picked. Project sharing only adds access: people who reach the project through its folder keep that access. To keep a project away from someone, don't give them access to its folder; put the project in a folder shared only with the people who need it.

Move a project to another folder
You can move a project, with all of its documents, accounts, and settings, to a different folder. Use this when a project was created under the wrong client, or to regroup projects after a client restructures. There are two ways to do it.
From the project tree
- In the folder and project tree on the left of the project interface, right-click the project.
- Choose Move to folder.
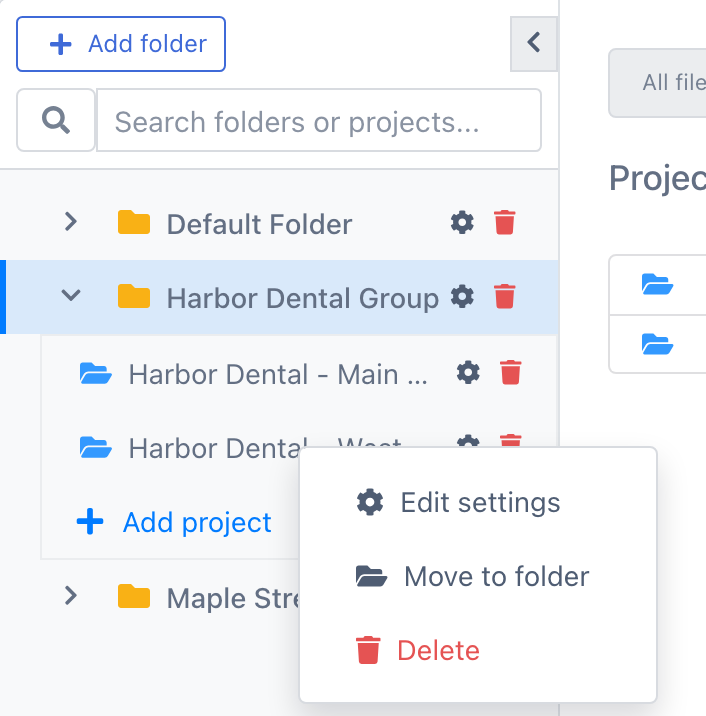
- Pick the folder you want to move it to and click Move.
The tree opens the new folder so you can see the project in its new place. If the project was open, it stays open.
By dragging on the Organize page
The Organize Folders & Projects page shows every folder and project at once, which is handy when you are regrouping several projects.
- In the left sidebar, under Workspace, click Organize Folders & Projects.
- Find the project under its current folder. Use the search box to narrow a long list, and collapse folders you are not working in. They stay collapsed after each move.
- Drag the project by its name into the project list of the folder you want to move it to. The list is outlined while you hover over it.
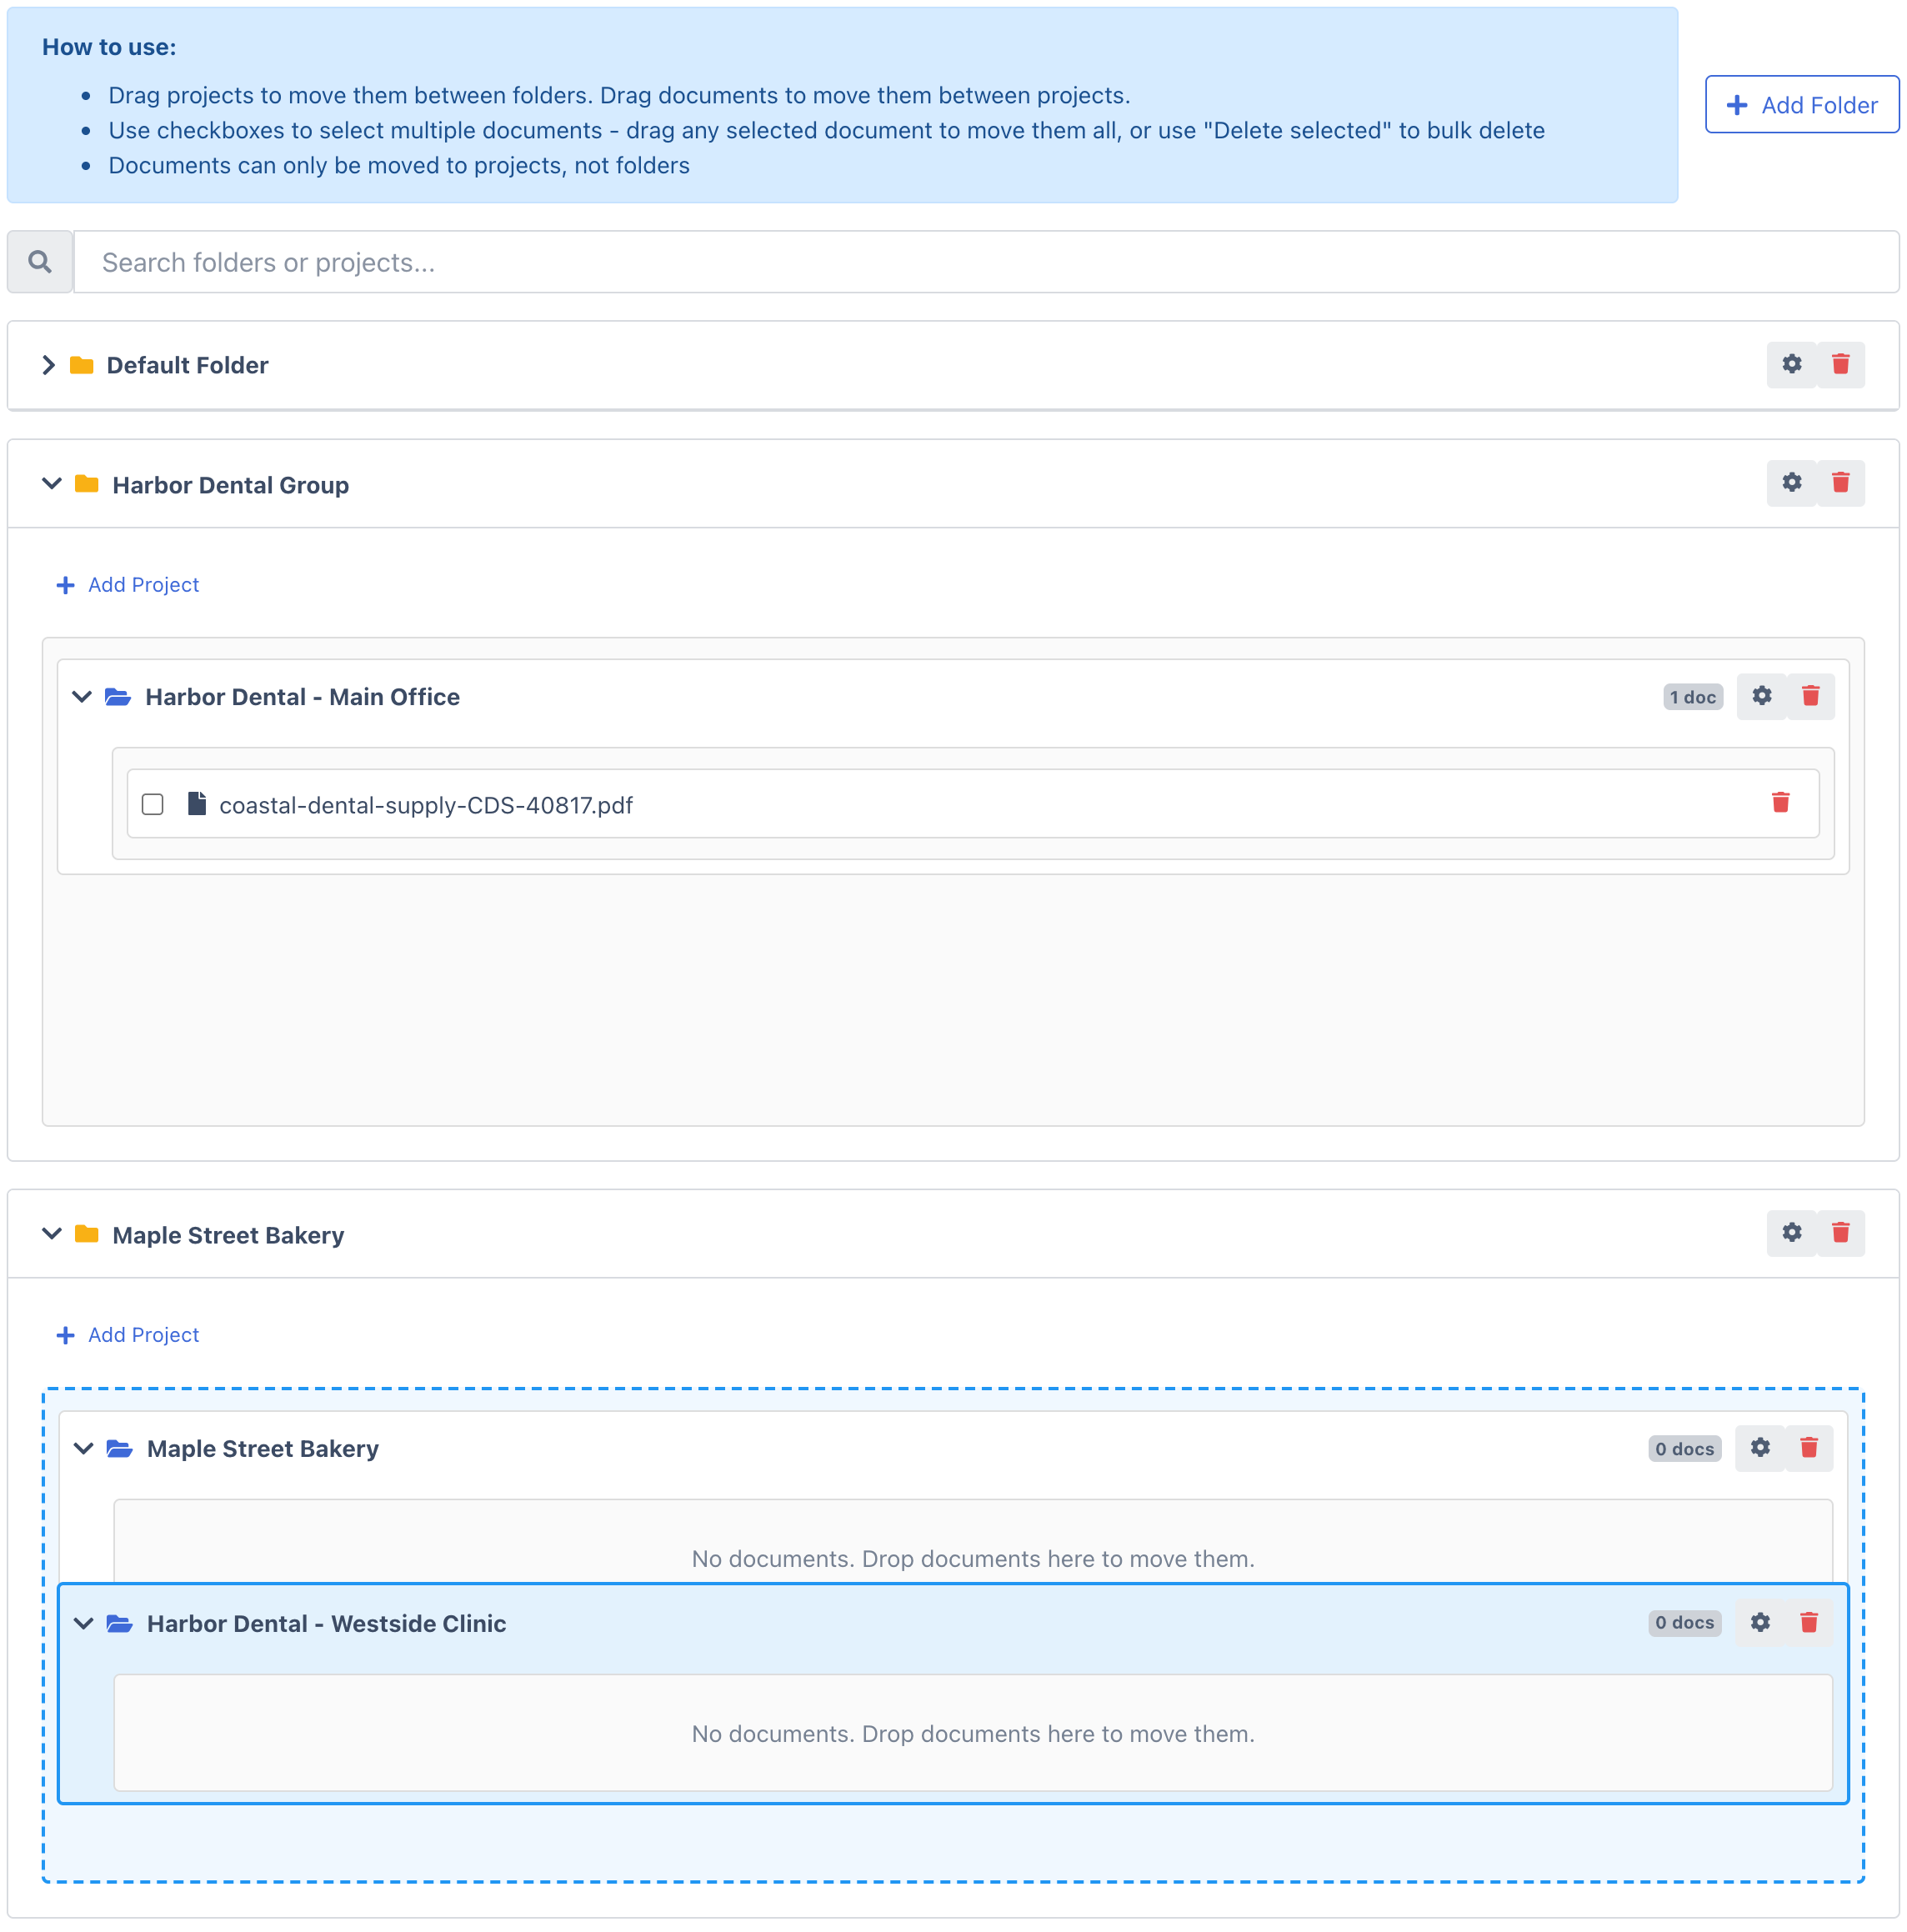
The project appears in the new folder as soon as you drop it, and dragging pauses for a moment while the move is saved. A confirmation appears when the move is done; if it is refused, the project goes back to its folder and the reason is shown. Everything inside the project moves with it: documents, extracted data, its Chart of Accounts, vendor and customer lists, default accounts, and linked integration.
Things to know:
- You need Edit (Write) or Full Control on the folder the project is in and on the folder you are moving it to.
- The target folder cannot already hold a project with the same name. Rename one of them first.
- After the move, the project inherits sharing from its new folder, not its old one. Its own project-level sharing stays as it was.
Move documents on the Organize page
The same page moves documents between projects. Expand a project to see its documents, then drag a document onto the document list of another project. To move several at once, tick their checkboxes and drag any one of them; all the ticked documents from that project move together. Documents can only be dropped on a project, not on a folder.
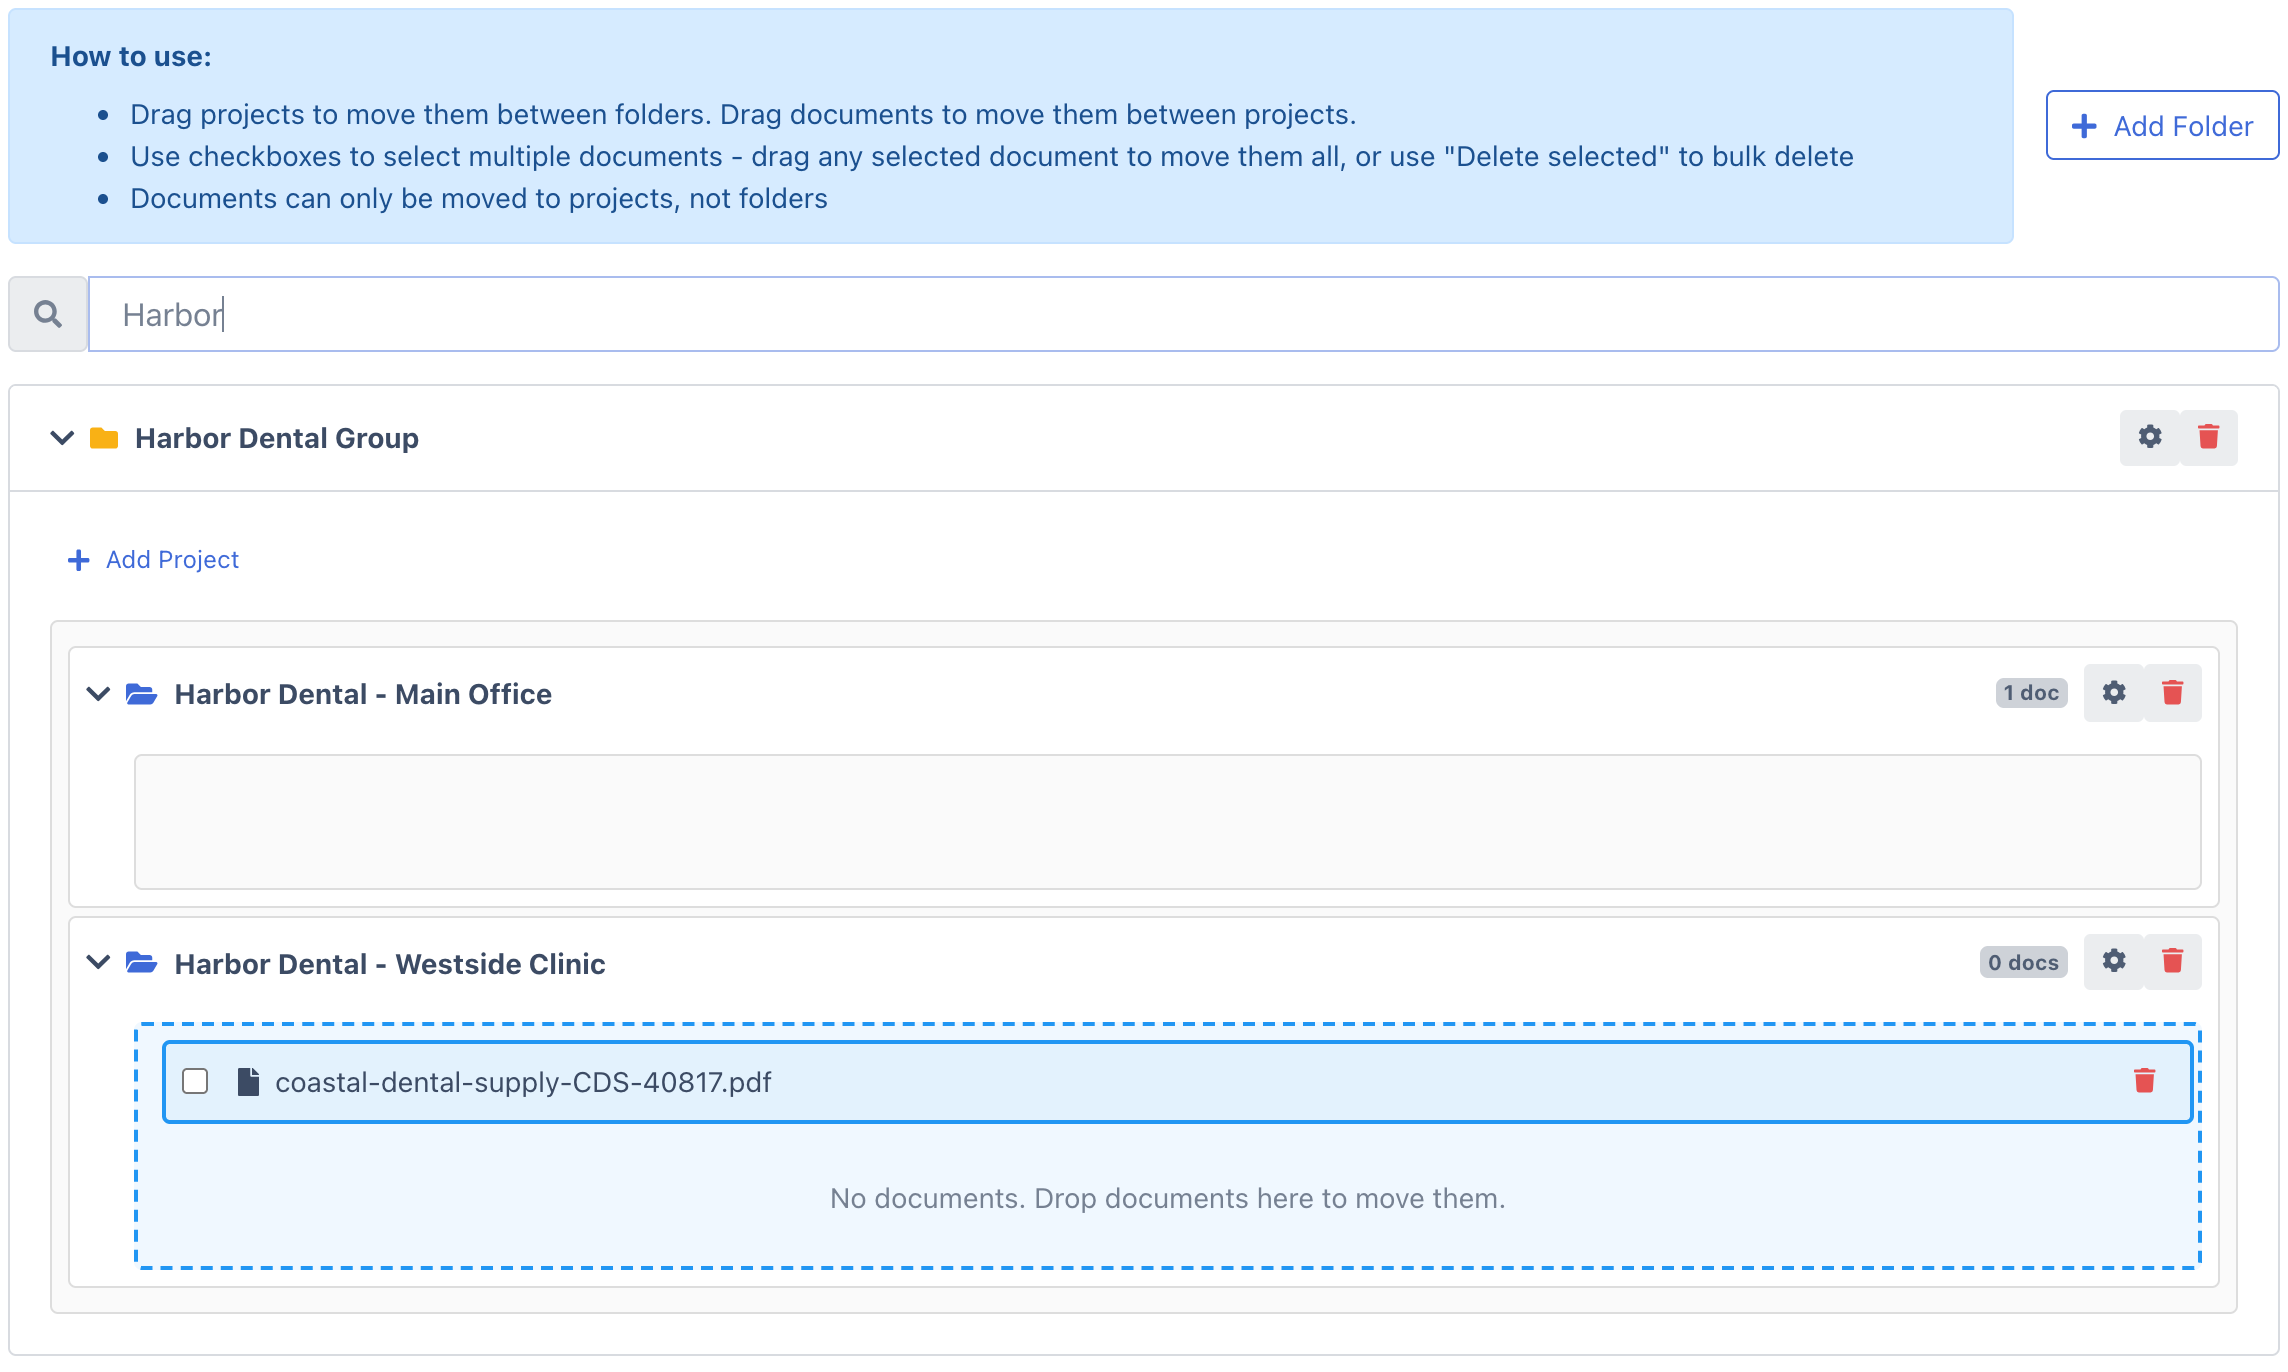
For the other ways to move documents, see Move documents between projects.
Delete a project or folder
Click the red trash icon next to a project or folder, in the project tree or on the Organize Folders & Projects page (in the tree you can also right-click a project and choose Delete), then confirm.
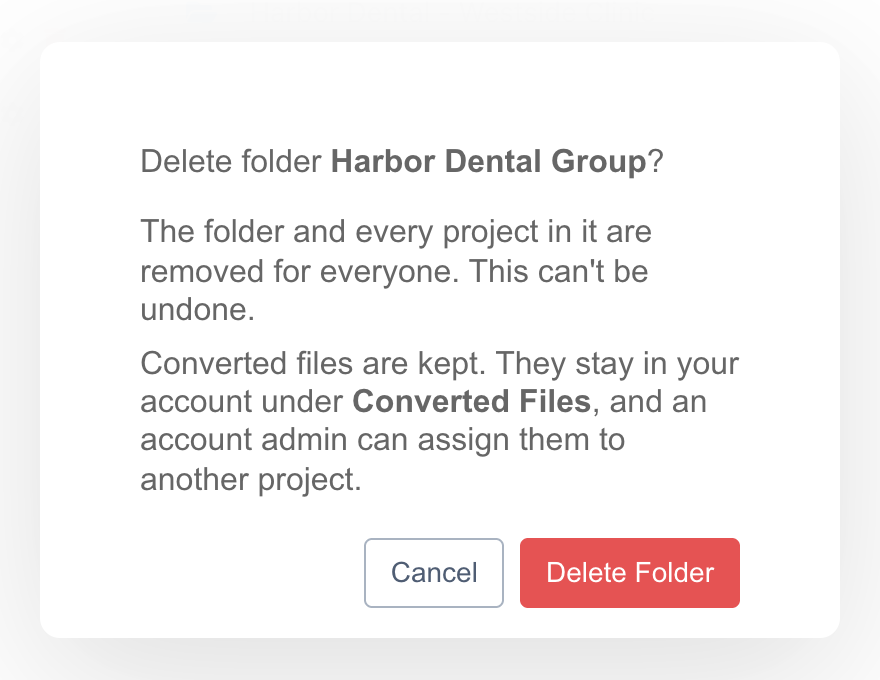
Deleting removes the structure, not your conversions:
- Deleting a project removes the project and its sharing settings for everyone.
- Deleting a folder removes the folder and every project inside it.
- Converted files are kept. The documents and extracted data from those projects stay in your account under Converted Files, outside any project. Account admins see a notice at the top of Projects, for example 1 conversion isn't in a project yet, with an Assign to project button to file them in another project.
If the deleted project or folder was open, DocuClipper moves you to its folder, or to the first remaining folder. To remove the files themselves, delete the documents from the project first, or delete the conversions from Converted Files. See Locating converted files.
How permissions combine
One rule decides what someone can see and do, everywhere in DocuClipper: the project tree, the jobs list, opening a project or document, moving things, and the API.
- Account admins have Full Control on every folder and project in the account.
- Everyone else gets, on a project, the highest role from:
- the folder's sharing (Team Access and Individual User Access on the folder), which covers every project in the folder,
- the project's own sharing (Team Access and Individual User Access on the project's Sharing tab).
- On a folder, it's the highest role from the folder's own sharing.
- A folder or project that isn't shared with someone, through a team they're on or individually, is hidden from them. Only account admins see folders and projects nobody has been given access to.
The highest role wins. So if Sarah has Read Only on a folder through her team but Editor on one project through the project's Individual User Access, she can edit that project and view the rest of the folder.
What each role allows:
- Viewer / Read Only - open the project, view and export its documents and data. No changes.
- Contributor - upload documents into the project. Contributors don't see the project's existing documents.
- Editor / Edit (Write) - upload, edit, process, and move documents and projects.
- Admin / Full Control - the highest role.
Best practices
- Make one top-level folder per client, and one project per QuickBooks company file. See Recommended setup for accounting firms.
- Keep the default "share with team" sharing unless you have a real reason to scope down.
- Use Individual User Access for short-term access (a contractor on one project) instead of creating new teams for one-offs.
- For stricter setups, create a new team (Account → Users & Teams → Teams) and share specific folders with just that team.