Categorize Credit Card Transactions in QuickBooks (4 Ways)
Quickbooks is one of the tools that are used by many accounting and finance professionals around the world along with its countless features.
It is also used in categorizing credit card and bank transactions by many professionals. In this blog, we’ll talk about how to use QuickBooks to categorize credit card transactions and what alternative can you use aside from QuickBooks.
Download Expense and Transaction Categorization and Spreadsheet
While you are here
Stop relabeling the same merchants every month
DocuClipper applies rules and smart suggestions so bank and card activity lands in the right GL bucket before close, without manual coding for every new payee.
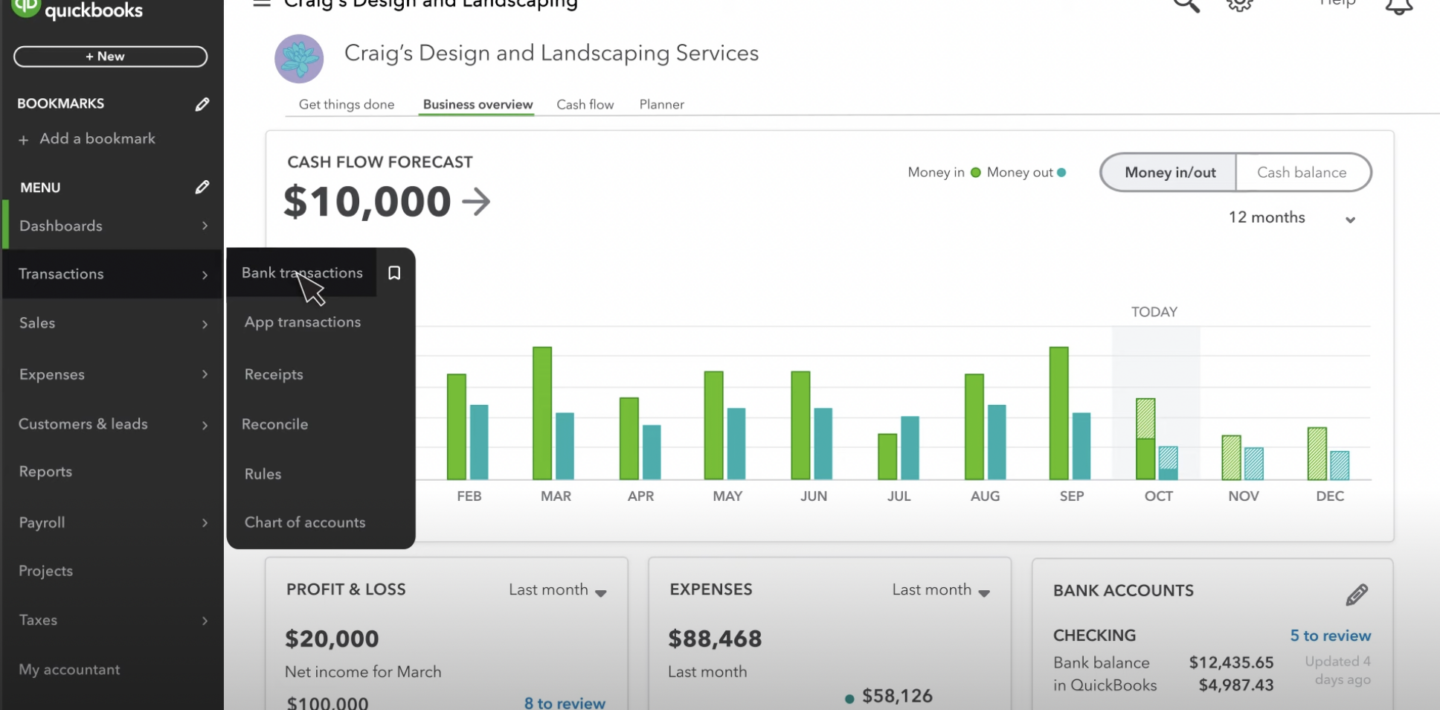
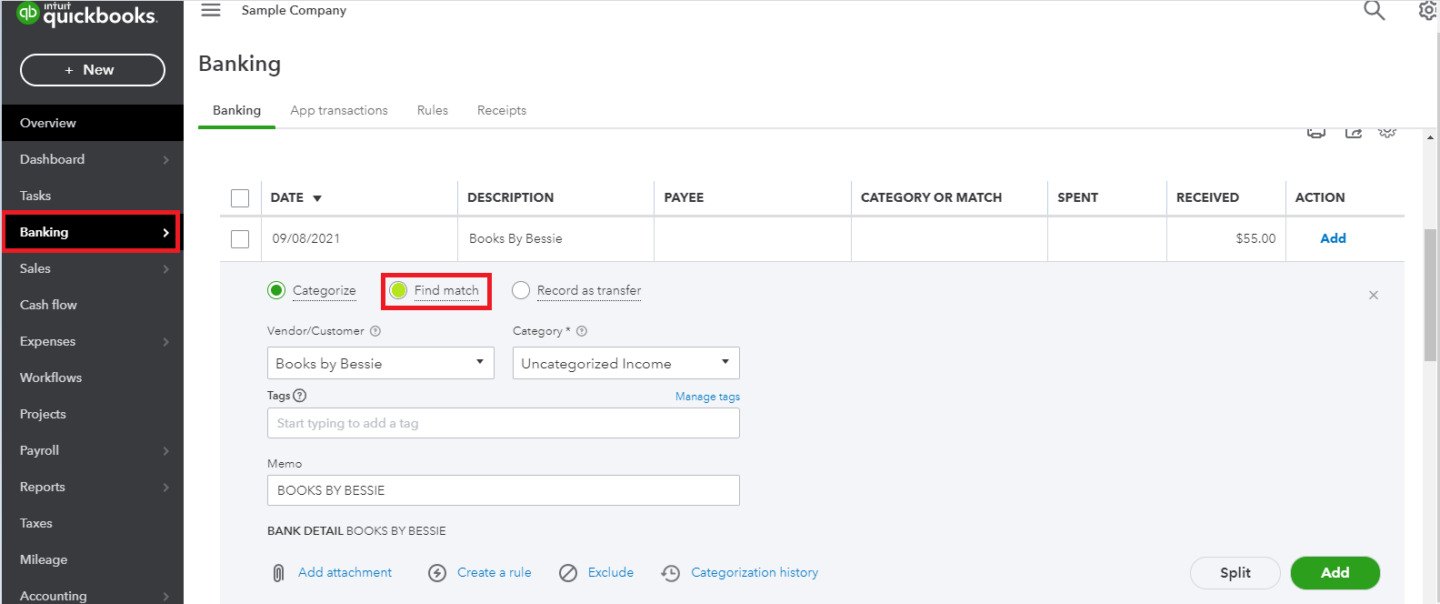
Way #1: Categorize Credit Card Transactions from Bank Feed
Categorizing credit card transactions in QuickBooks directly from your bank feed is a seamless way to ensure your financial records are always up-to-date.
This method is a step towards automating your bookkeeping.
It is much of the process by leveraging QuickBooks’ ability to download transactions daily once your bank accounts are connected. Here’s a condensed guide to streamline the categorization process:
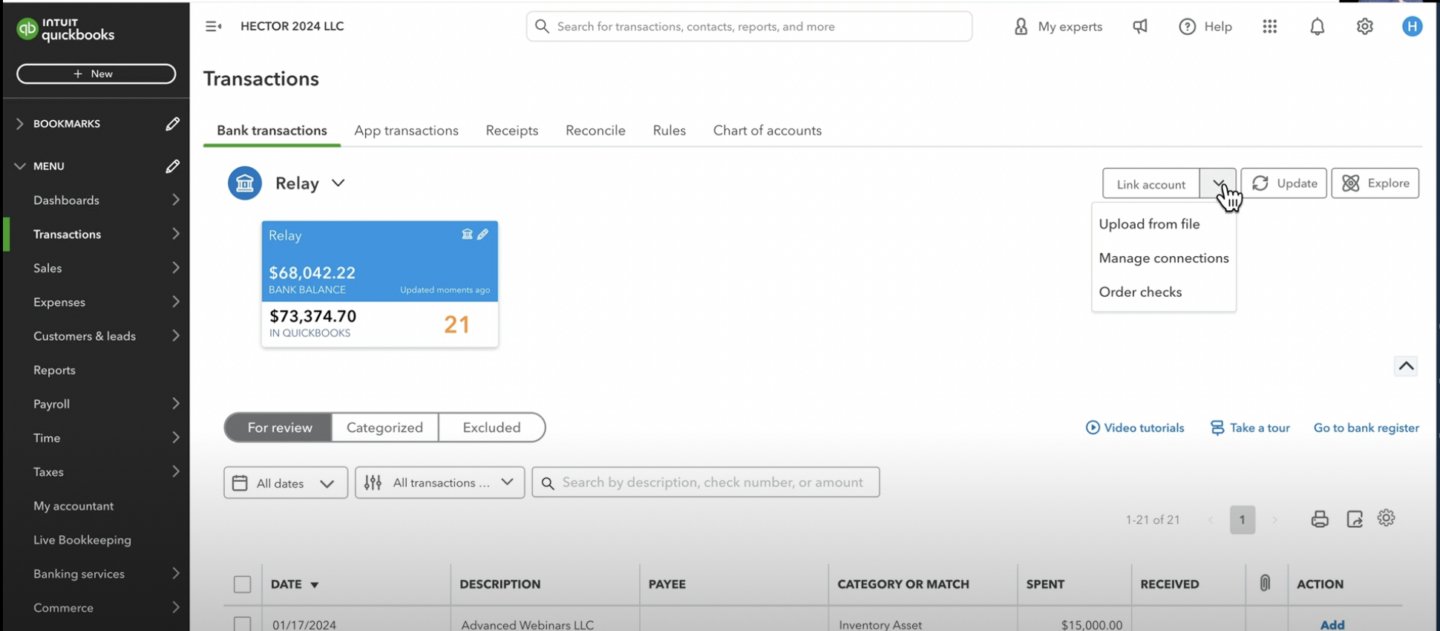
- Link Your Accounts: Begin by connecting your bank and credit card accounts to QuickBooks for automatic transaction downloads.
- Review Transactions: Navigate to the “Transactions” section to see all your downloaded transactions. QuickBooks may automatically suggest categories for some transactions, marked as “Confirm,” based on previous patterns. For others, marked as “Review,” you’ll need to manually assign a category.
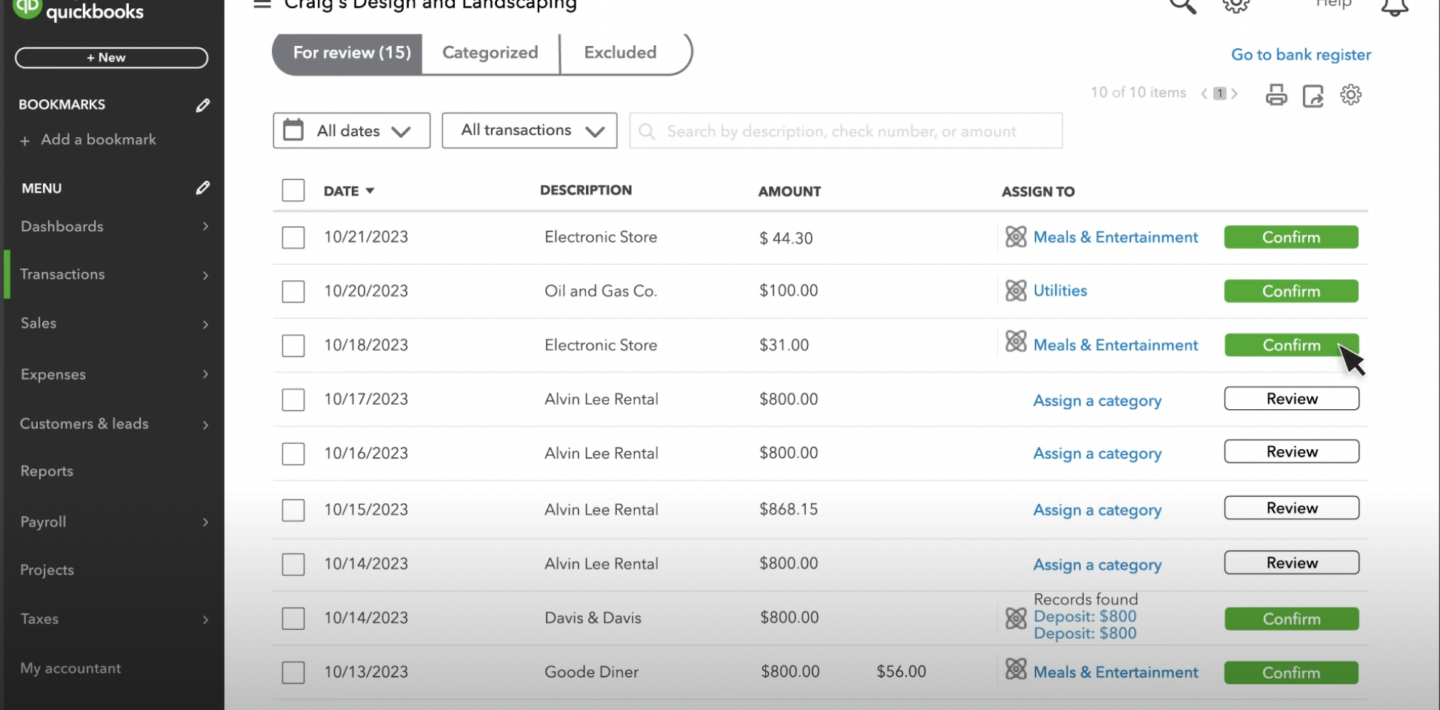
- Categorize and Edit: Accept QuickBooks’ suggestions or choose the appropriate categories for your transactions. You can categorize sales as income, purchases as expenses, and significant investments as fixed assets. If a transaction spans multiple categories, split it accordingly.
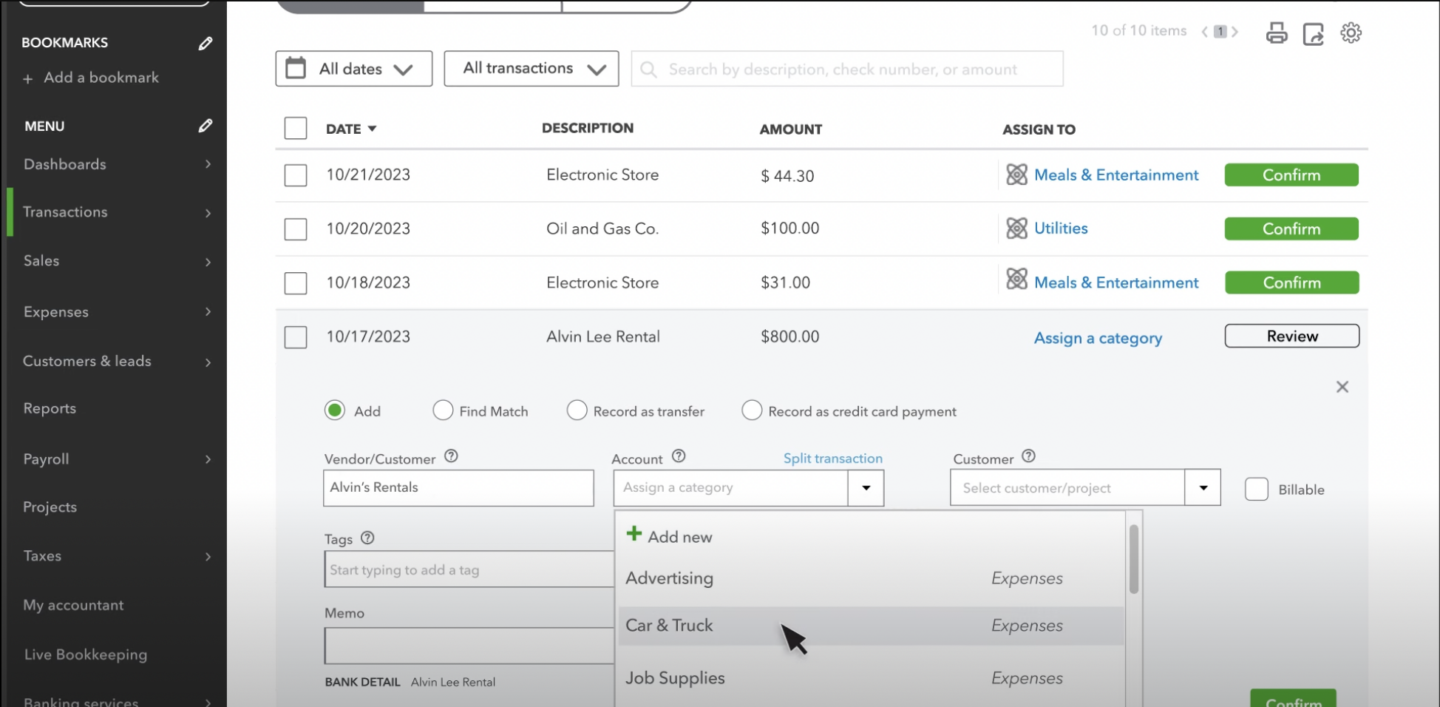
- Finalize Details: Optionally add vendor or customer details for more precise tracking and reporting. If uncertain about a transaction, refer to the provided bank details for clues.
- Confirm Categorization: After reviewing and adjusting details as needed, confirm each transaction to finalize its categorization.
Way #2: Categorize Credit Card Transactions from CSV/QBO File
Categorizing credit card transactions in QuickBooks when you’re unable to directly connect your bank account involves downloading transactions from your bank’s website and then importing them into QuickBooks.
This method is particularly useful if you’re working with transactions outside of QuickBooks’ direct download date range or if a direct connection isn’t available.
Here’s a streamlined approach to handling this process:
- Download Transactions from Your Bank: Log into your online banking portal and locate the option to download and extract bank activity. This feature might be labeled differently depending on your bank, but look for terms like “Download Bank Activity” or simply “Download.” Banks like Bank of America offer options to select the period for which you want to download transactions or to specify a custom date range. Choose the file format that QuickBooks supports, such as CSV (spreadsheet) or QBO (Web Connect).

If your bank does not provide any CSV and XLS formats in their statements, DocuClipper is the best bank statement converter for effectively converting PDF bank statements from your banks.
- Import Transactions into QuickBooks:
- In QuickBooks, go to the banking section and look for an option to upload transactions, which might be under a dropdown menu labeled “Link Accounts” or similar.
- Select “Upload from File” to initiate the manual upload process.
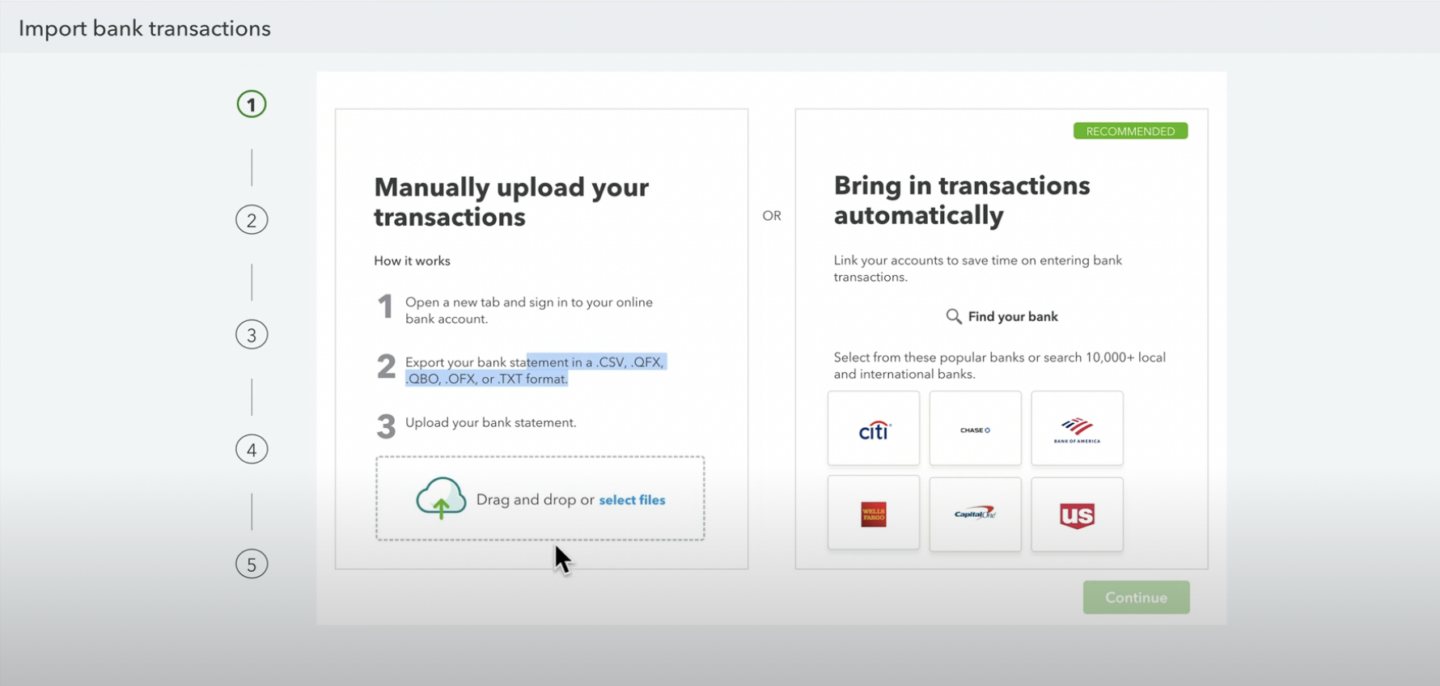
- Follow the prompts to drag and drop or select the file you downloaded from your bank.
- But which accounts do you want to start categorizing? This mapping step is important to separate the transactions according to their intended use.
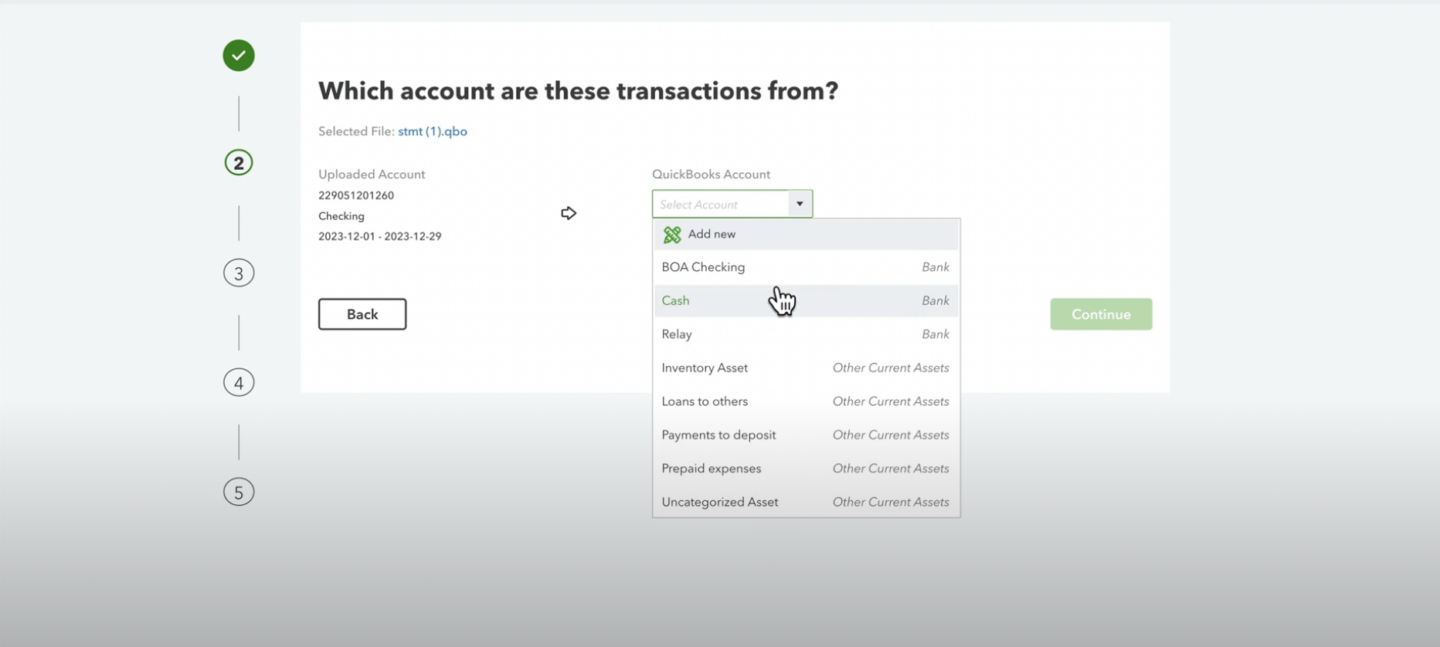
- After mapping, you can see that your upload is successfully uploaded.

- When it’s done you can see all the logged transactions. Double-check if it’s the right account and correct transactions before processing.
For more information, we recommend you read our articles:
- Categorize Transactions:
Once the account is selected and the mapping is complete, you’ll see all the transactions listed, including both debits and credits in the correct account.

For some of your transactions, QuickBooks should be able to automatically categorize them, although you still want to double-check to ensure it is done correctly.
But for those uncategorized transactions, you need to categorize them yourself.
Here is how you do that:
- For each transaction, you’ll need to categorize it by selecting the appropriate customer or vendor.
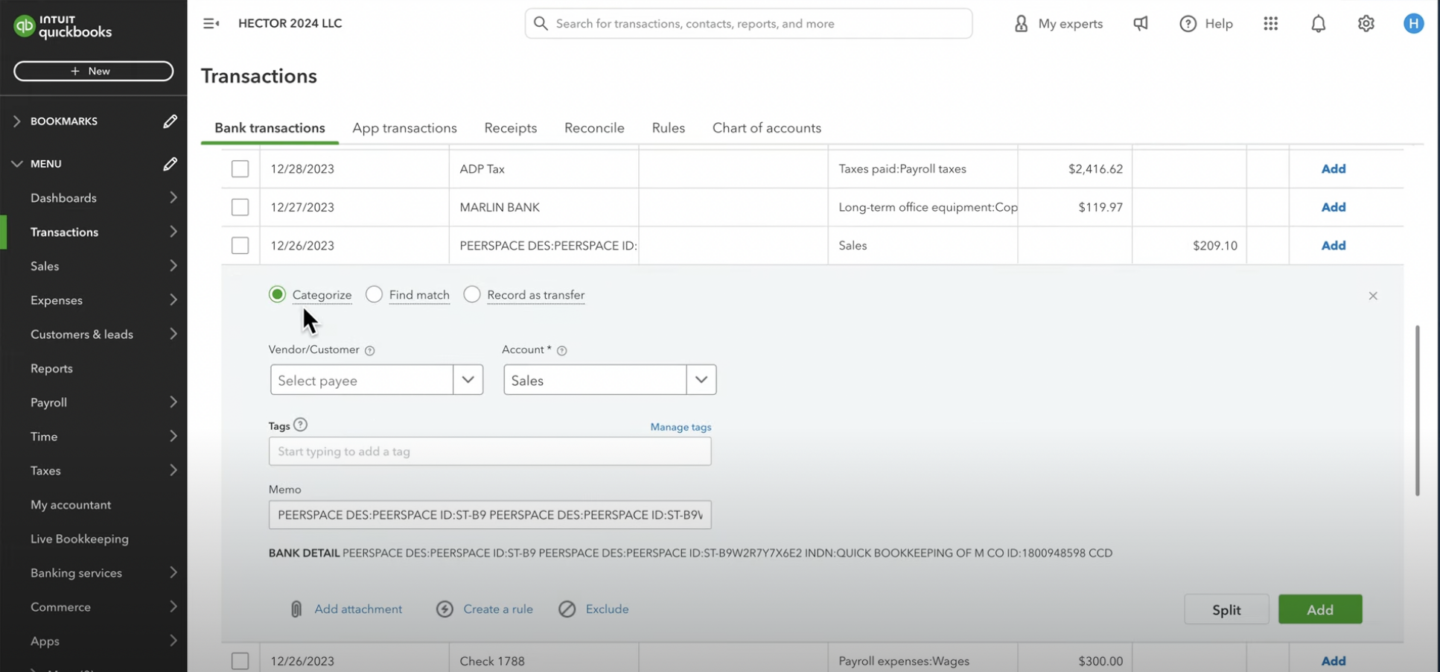
- Then from the “Account” dropdown categorize the transaction into the right expense or income category.
- And lastly, click on “Add” transaction.
Categorizing transactions is not an easy and simple process. There are always complications especially when conducting in-depth analysis.
We recommend you get a CPA to help you with this.
Way #3: Categorize Credit Card Transactions from Bank Statements Manually
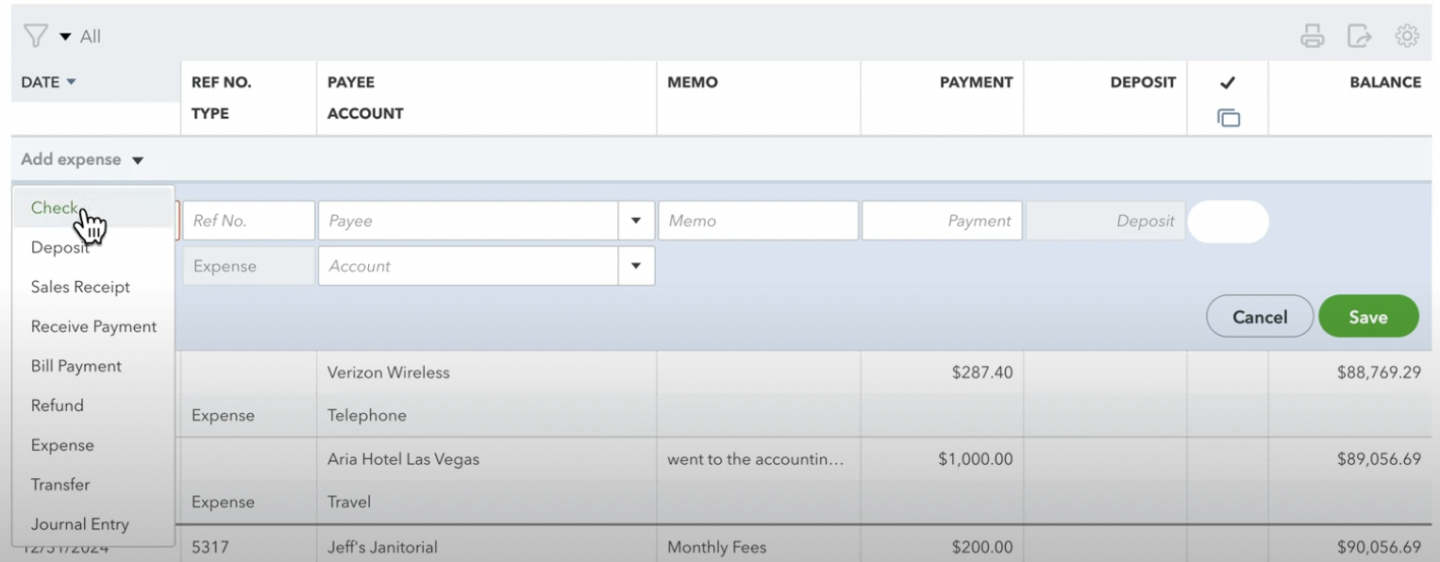
When dealing with a batch of transactions from a bank or credit card statement that you need to enter into QuickBooks, the register provides a streamlined solution.
This method is especially helpful for processing multiple transactions simultaneously, making a quicker alternative to individual entries. Here’s a general guide on how to use the register in QuickBooks for categorizing transactions:
1. Navigate to Chart of Accounts: Begin by accessing the gear icon located in the top right corner of QuickBooks, and select “Chart of Accounts.”
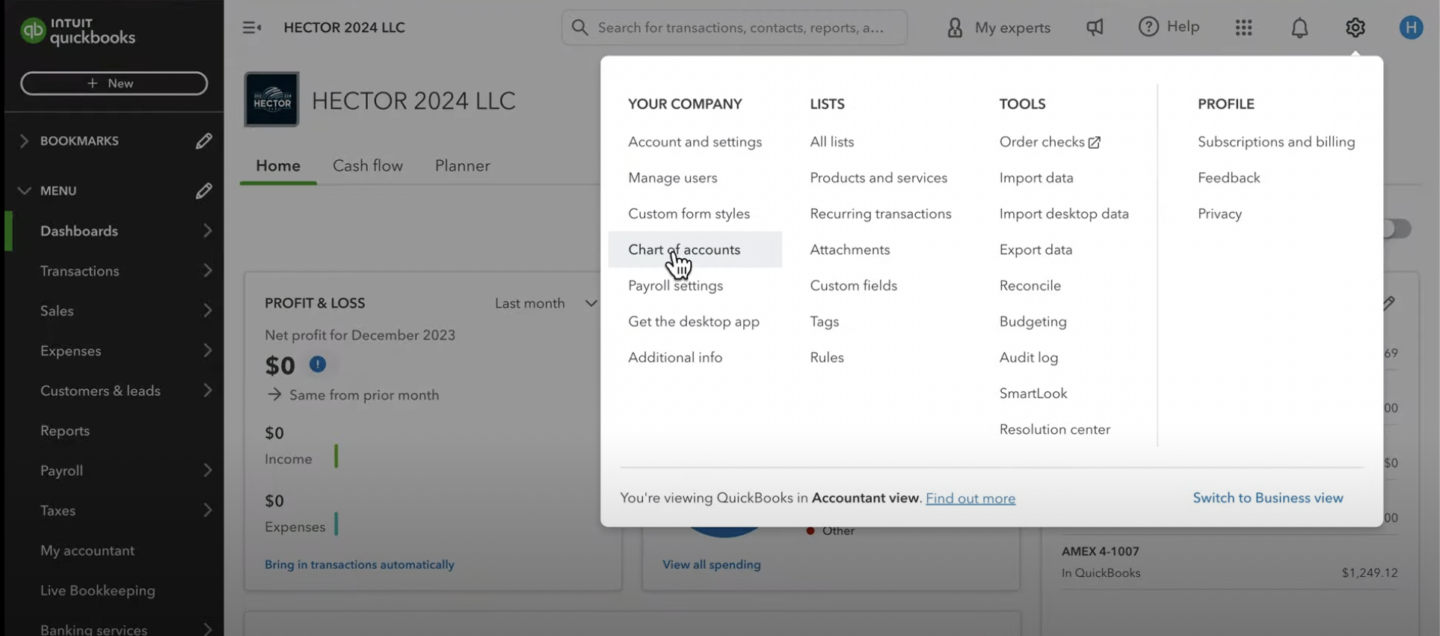
2. Choose the Relevant Account: Identify and select the bank or credit card account that corresponds with your statement from the list of accounts. Choose among the lists of accounts you are going to work on and click “View Register”.
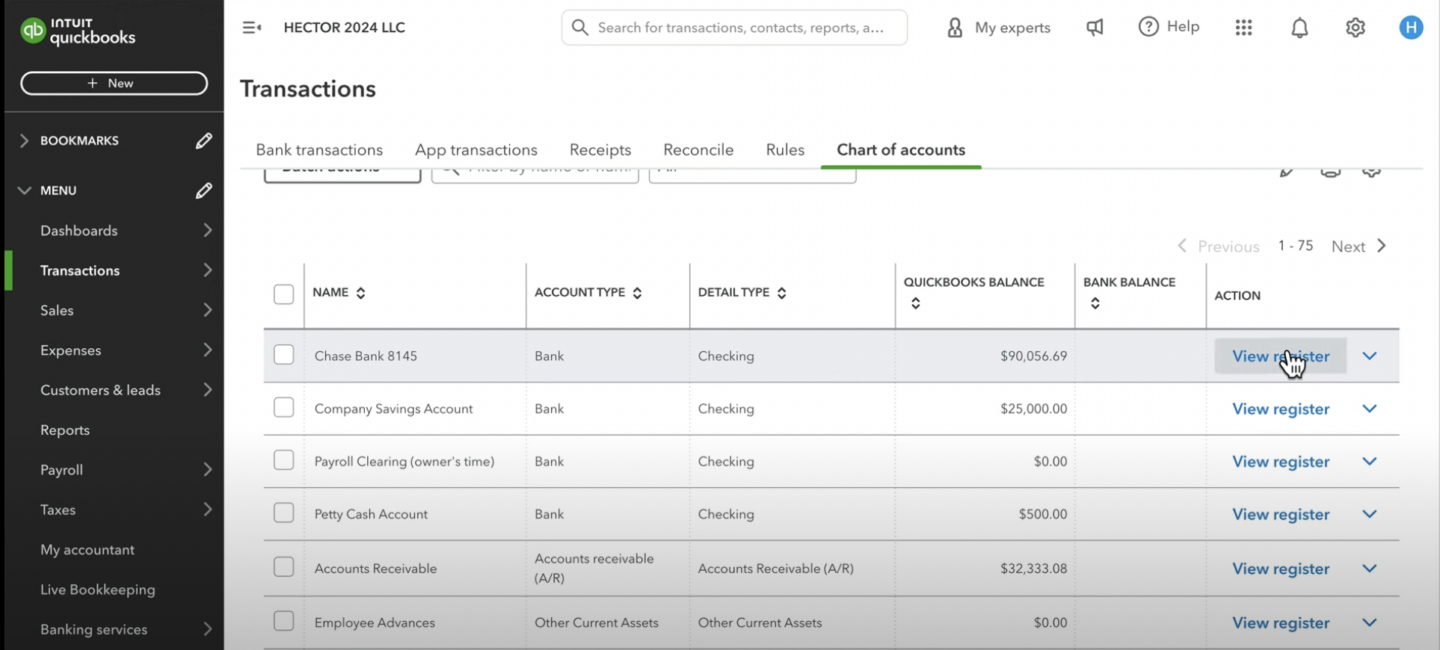
3. Open the Account Register: Clicking on the chosen account will open its register, which lists all the transactions associated with that account.
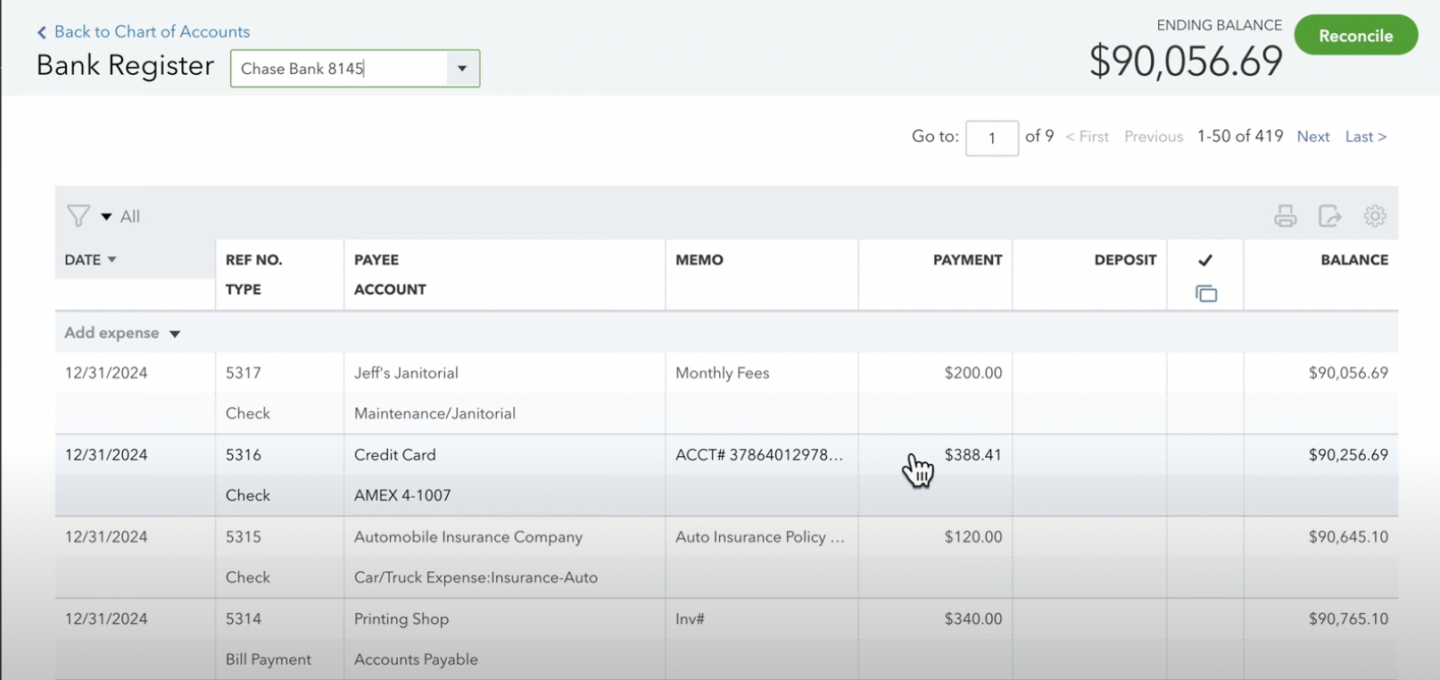
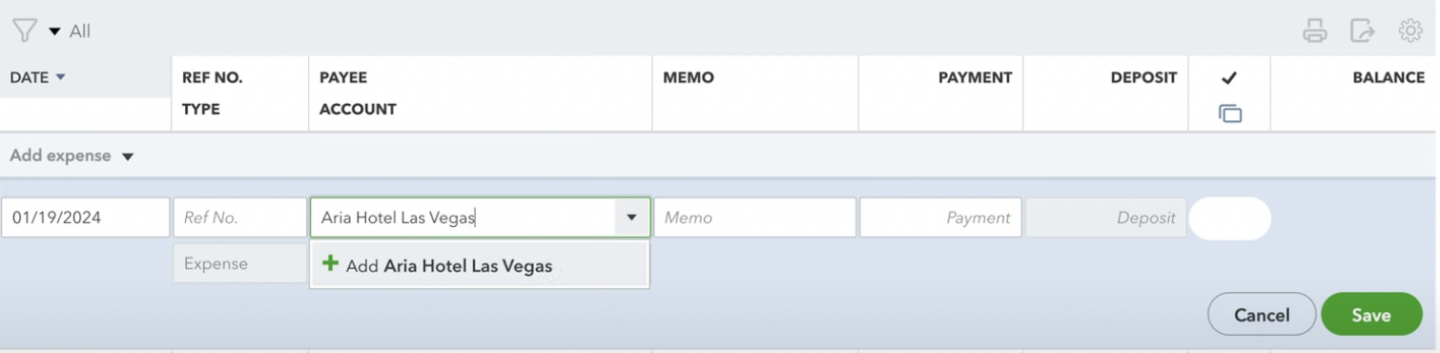
4. Begin Adding Transactions: Initiate the process by selecting the option to add an expense, which presents a grid-like interface conducive to fast data entry.
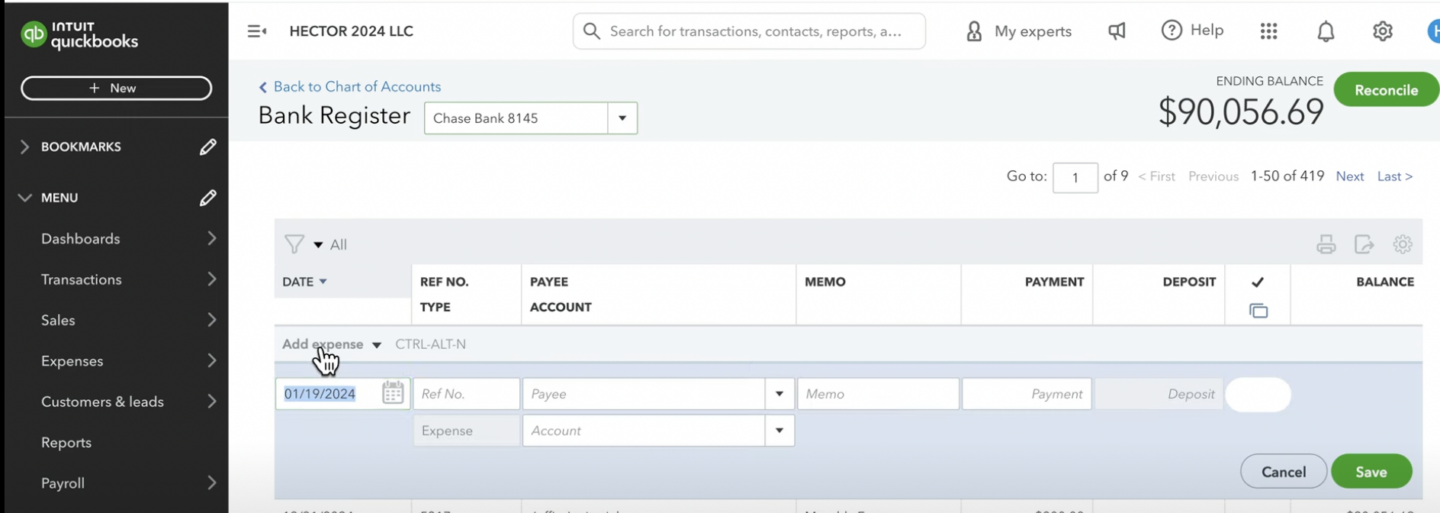
5. Enter Transaction Details:
- For each listed transaction, either select an existing vendor or add a new one directly within the interface. Click on the payee section for the drop down if the vendor is existing within QuickBooks or add your own by typing.
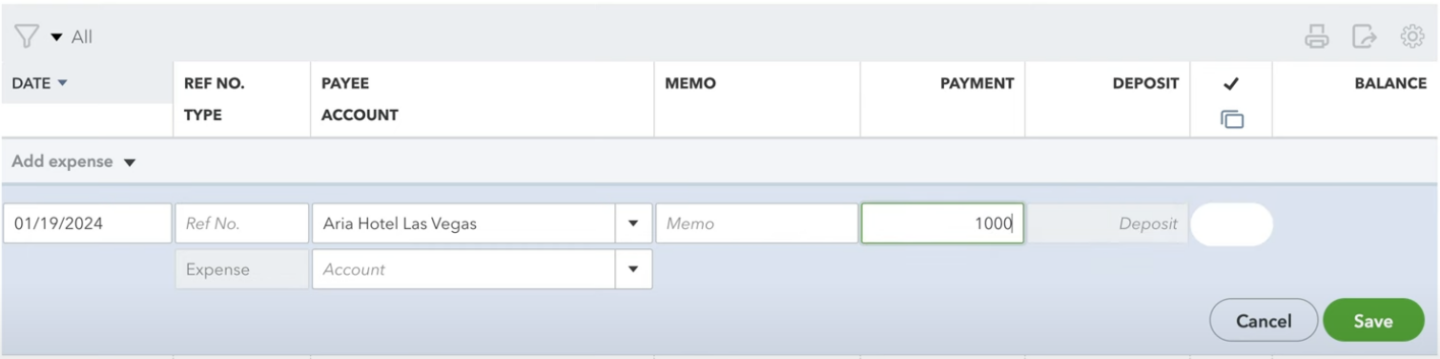
- Input the transaction amount as indicated on your statement. There is a section between the “memo” and “deposit” where you can type the specific amount.
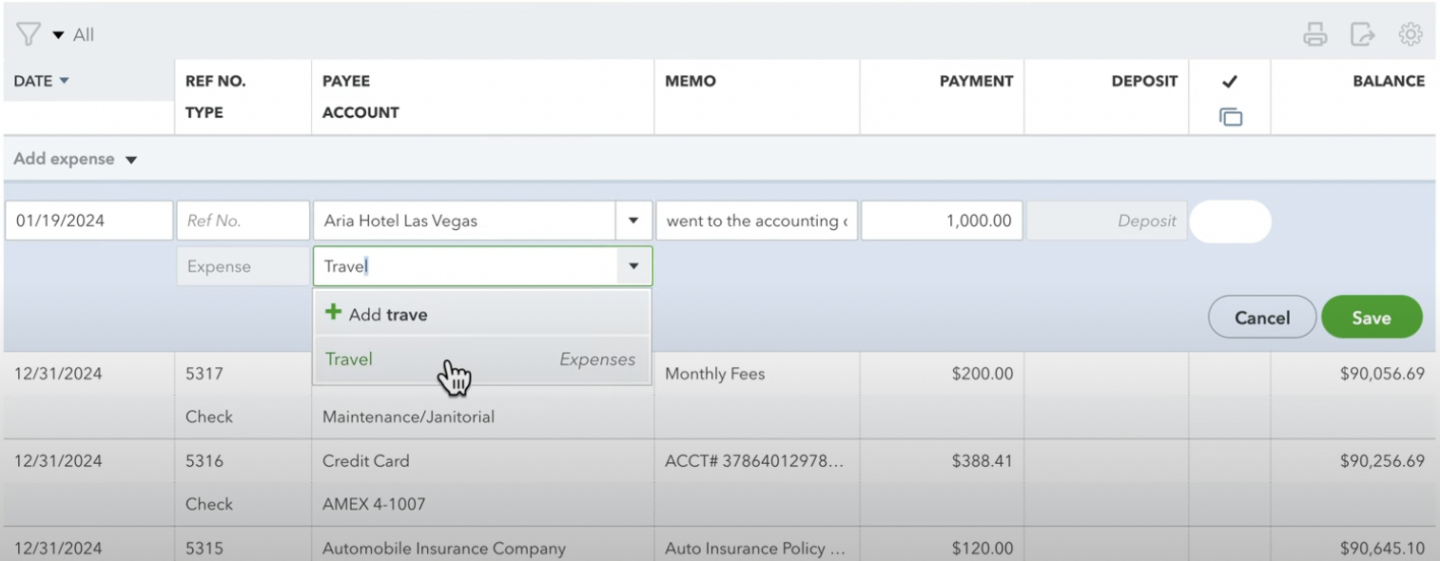
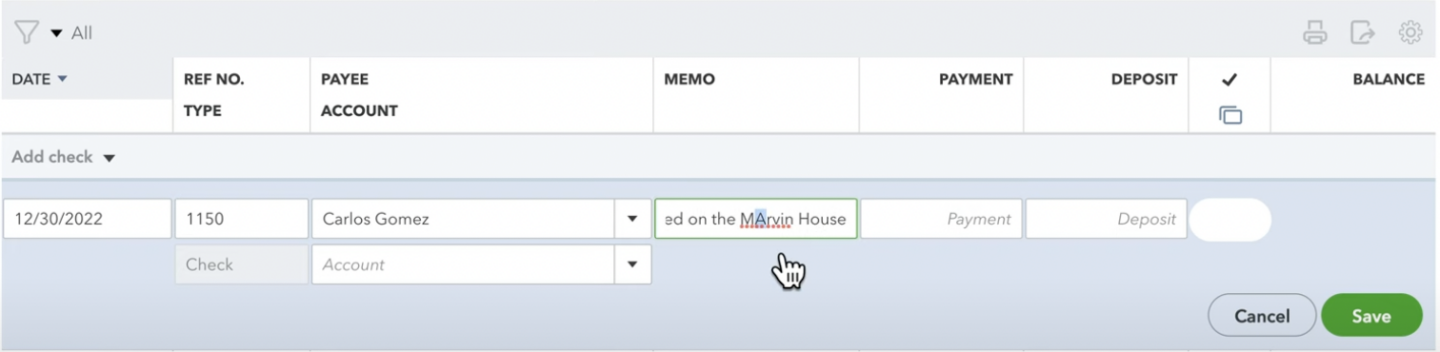
- Optionally, include a memo for additional context or notes about the transaction. You can type it between the “payee” and “payment”

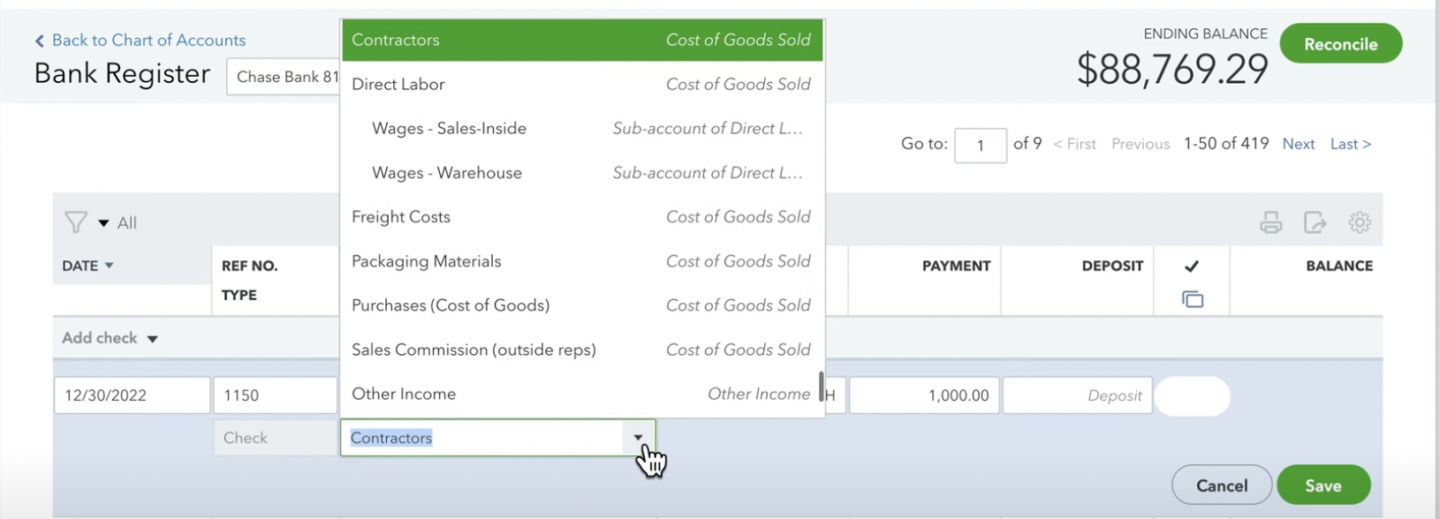
- Choose the appropriate category for each transaction. If necessary, new categories can be created on the fly to accurately reflect the nature of each expense.
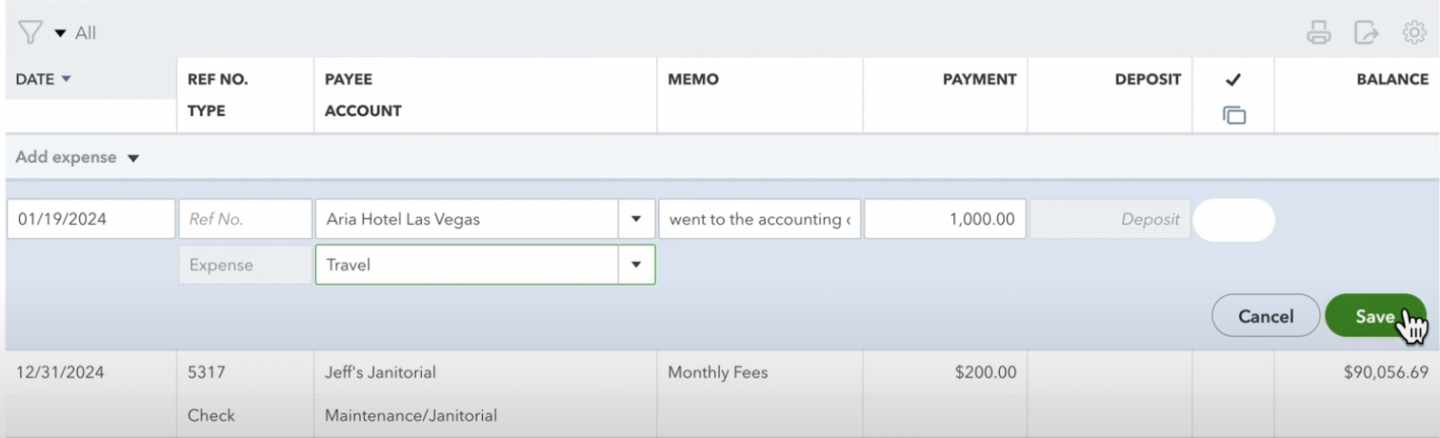
6. Save Transactions: After completing the entry for a transaction, save it to update the register. QuickBooks will automatically prepare the interface for the next transaction entry.
7. Proceed with All Entries: Repeat the aforementioned steps for each transaction on your statement, covering all types of transactions such as deposits, expenses, withdrawals, and checks.
Processing Checks
If you need to process the checks that you issued here is the step-by-step guide:
1. Specific Details for Checks: For entries involving checks, ensure to use the “Check” type instead of “Add expenses” and include relevant details like the check number for proper tracking and payment.
2. Assign Payee: Assign the Payee of the transaction
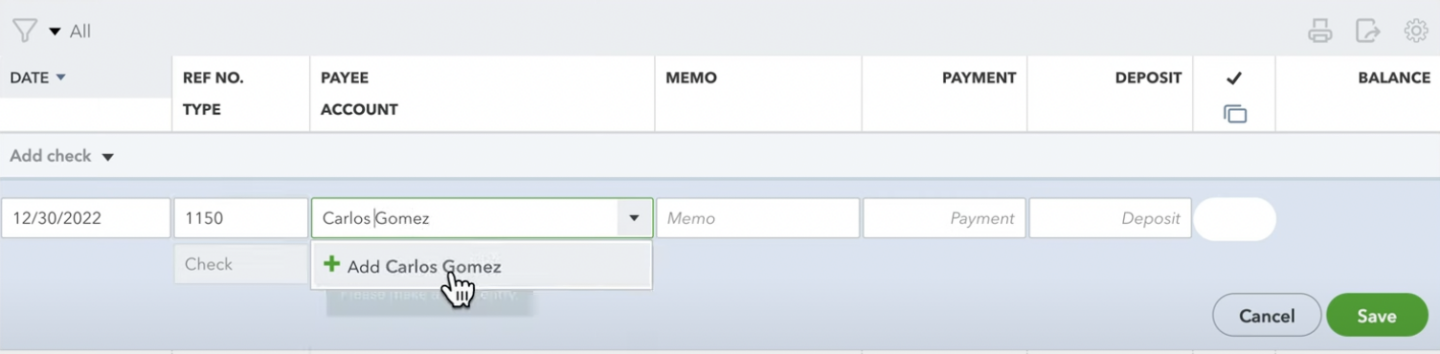
3. Assign Account: Place on what type of account you want to place.
4. Include Memo: Include additional information to specify the details of the transaction.
5. Save Check: When you are sure about all the details, click save.
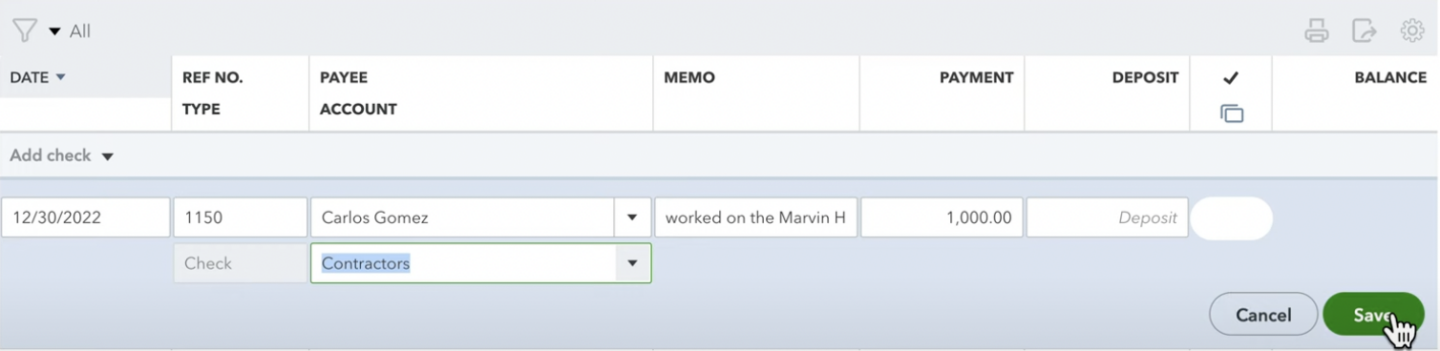
And there you go, you have successfully created and categorized checks within QuickBooks Online.
Way #4: Categorize Credit Card Transactions from Receipts
Categorizing transactions in QuickBooks when dealing with individual receipts involves a straightforward process that ensures each expense is properly accounted for.
Here’s a general overview of how to categorize a single transaction based on a receipt:
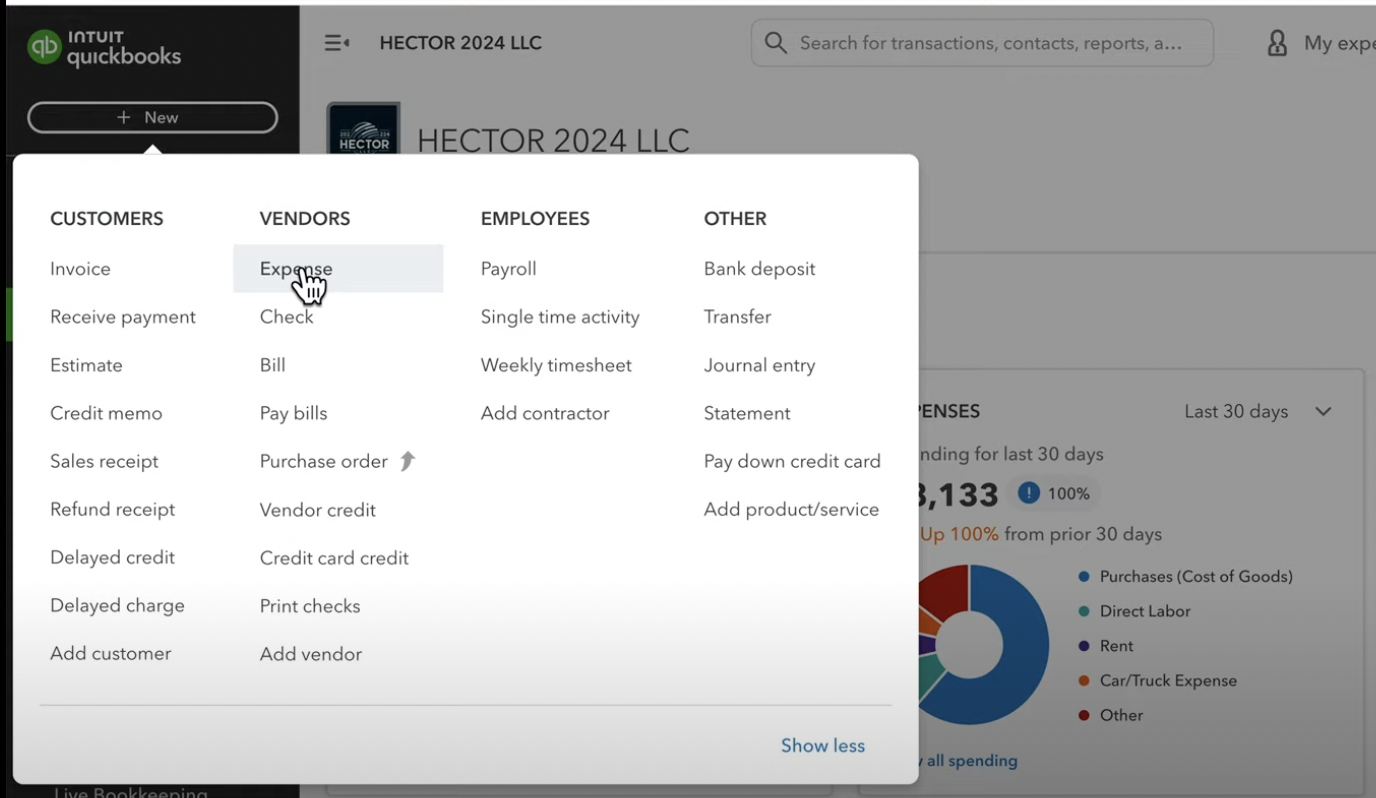
1. Initiate the Entry: Start by clicking on the “New” button located on the left navigation bar in QuickBooks. This is your gateway to entering new transactions.
2. Select “Expense”: From the options presented, click on “Expense” to begin recording a new expenditure. This step is crucial for ensuring the transaction is categorized correctly.
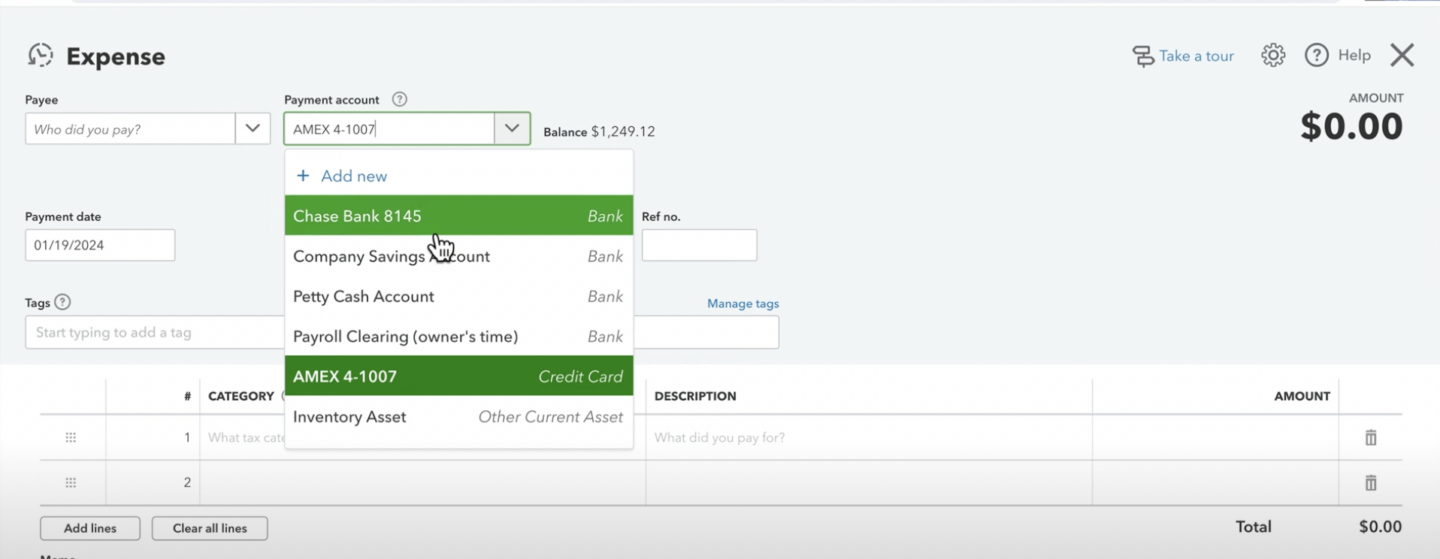
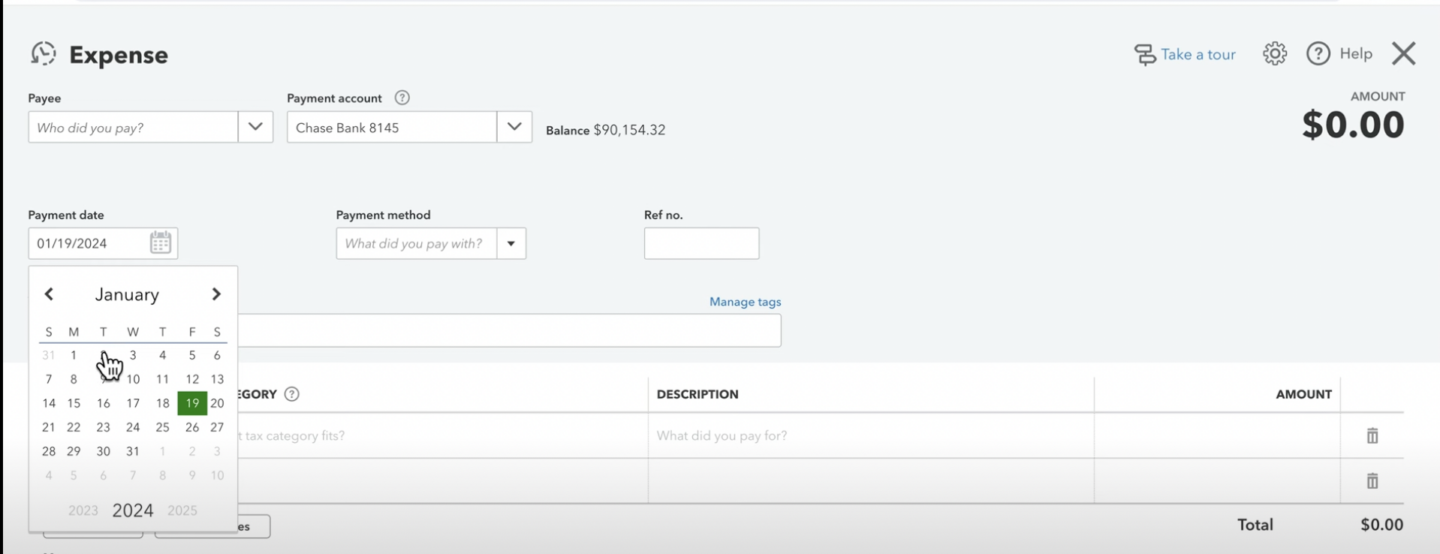
3. Choose the Payment Account: Based on the receipt, determine whether the payment was made through a bank account or a credit card and select the corresponding account in QuickBooks. This detail is usually evident from the payment method indicated on the receipt.
4. Enter Payment date: Refer to the receipt to fill in the date of the transaction.
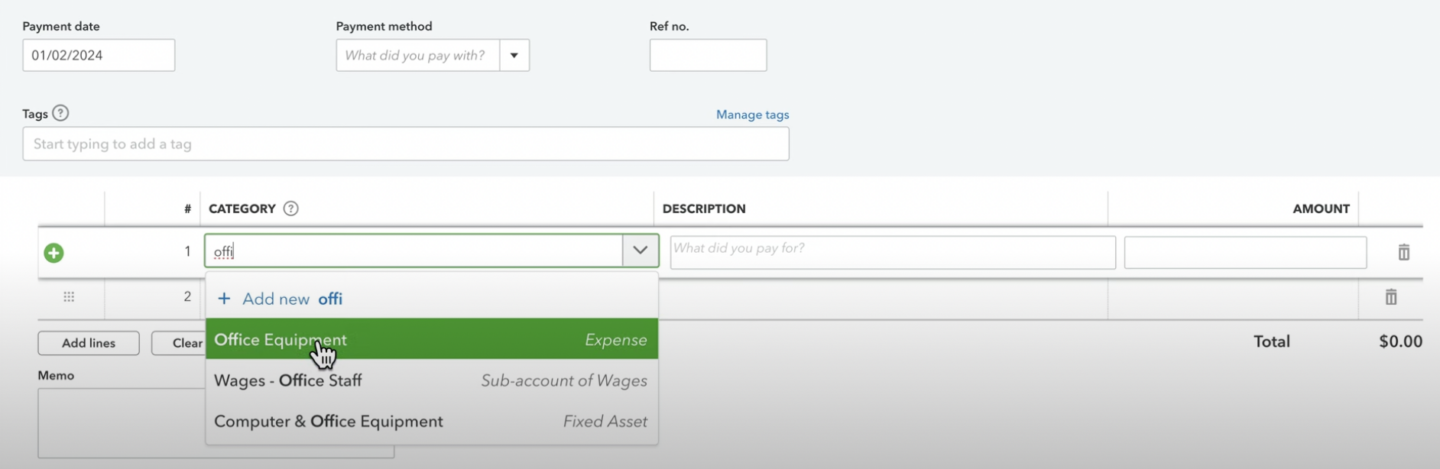
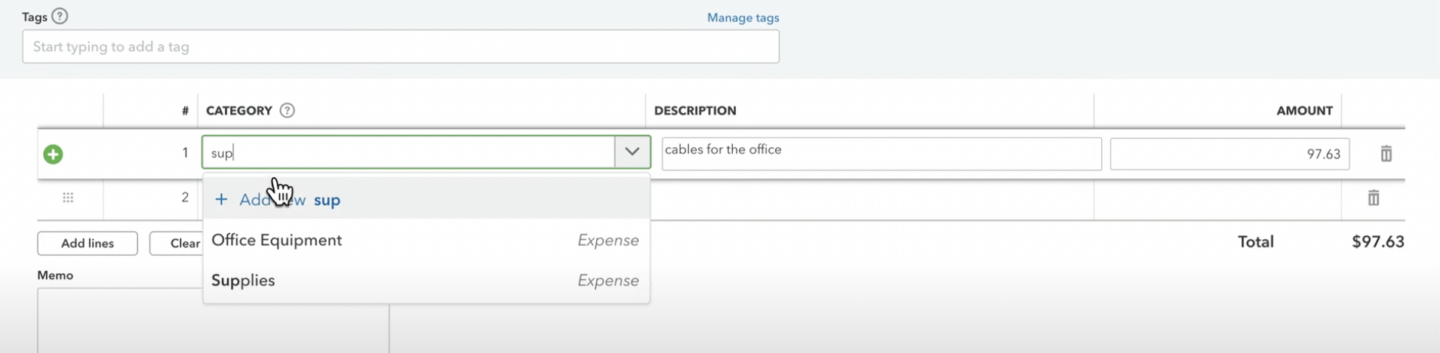
5. Select the Category: Using the drop-down menu, explore the options available in your chart of accounts to categorize your transaction accurately. If you’re entering office-related expenses and the most fitting category available is something like “Office Equipment,” select it.
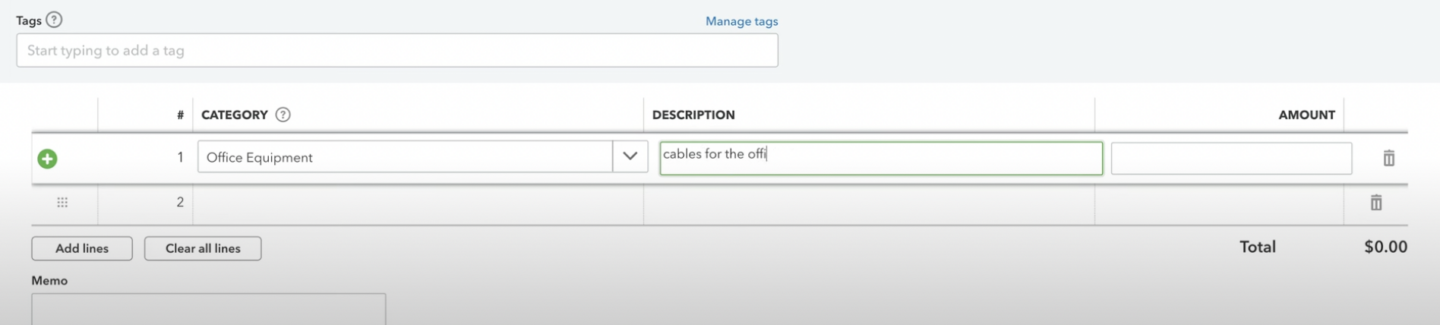
6. Add Description: Input a brief description of the purchase, such as “cables for the office.” Make sure this description matches the information on the receipt.
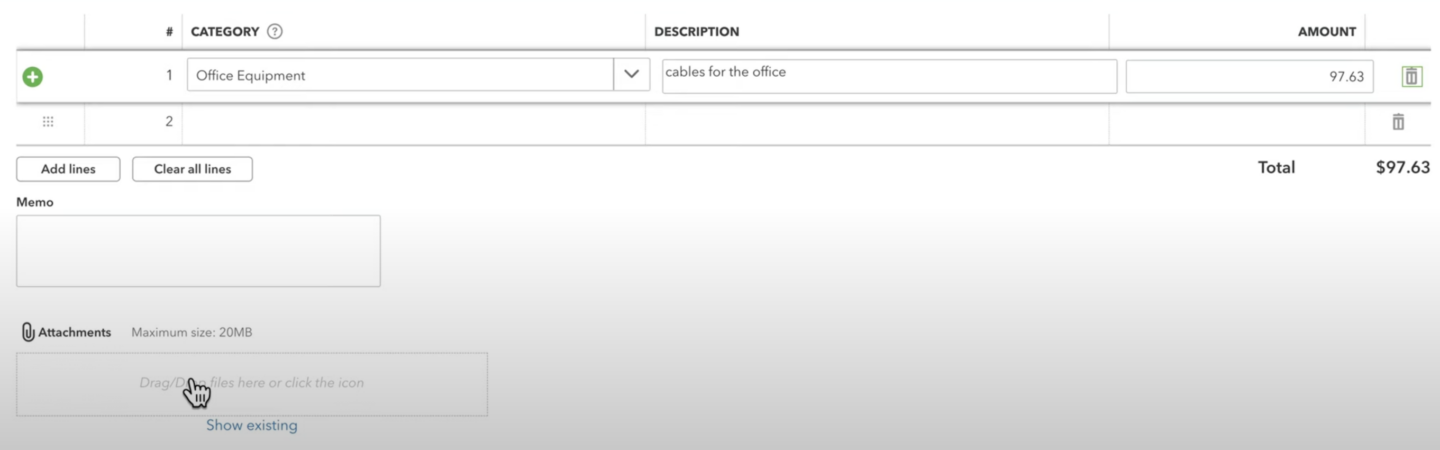
7. Add Amount: Input the exact amount spent on the purchase. Ensure this amount matches the figure indicated on the receipt..

8. Optional Attachment: QuickBooks allows you to attach a digital copy of the receipt to the transaction. This is done by scanning or taking a picture of the receipt and uploading it into QuickBooks through a simple drag-and-drop interface.
Creating New Categories
In case you need to create a new transaction category, here is the step-by-step guide:
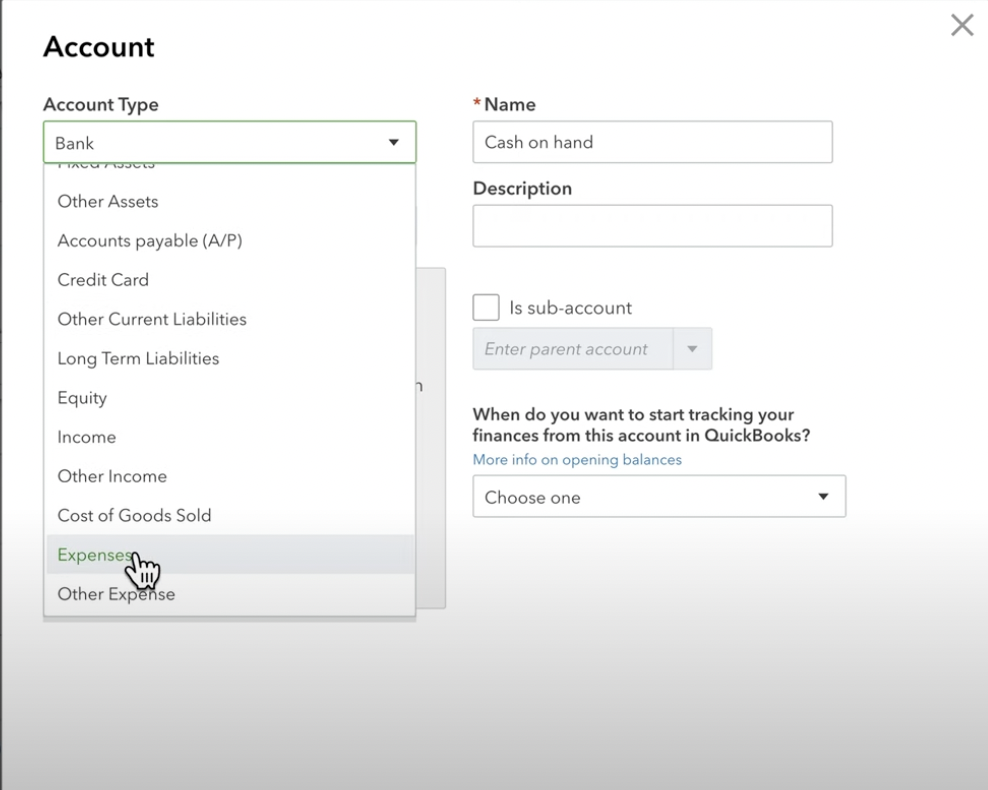
1. Creating New Categories: If the exact category you need doesn’t exist in your chart of accounts, you can create a new category on the spot. This involves selecting “Add New” from the category drop-down menu and specifying the details of the new account, such as naming it “Office Supplies” and choosing an account type relevant to expenses.
2. Add Account Type: Click on the account type “Expenses.” Ask for advice on a CPA when you are unsure.
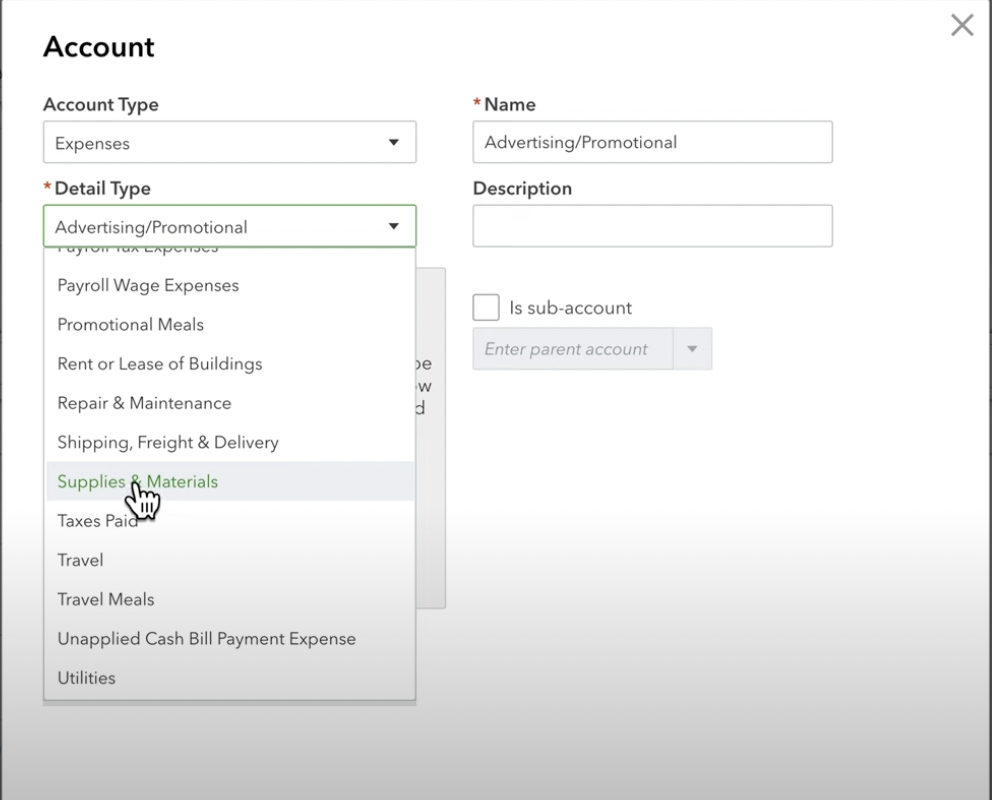
3. Add Detail Type: Many details are available to choose from. Be specific as much as possible.
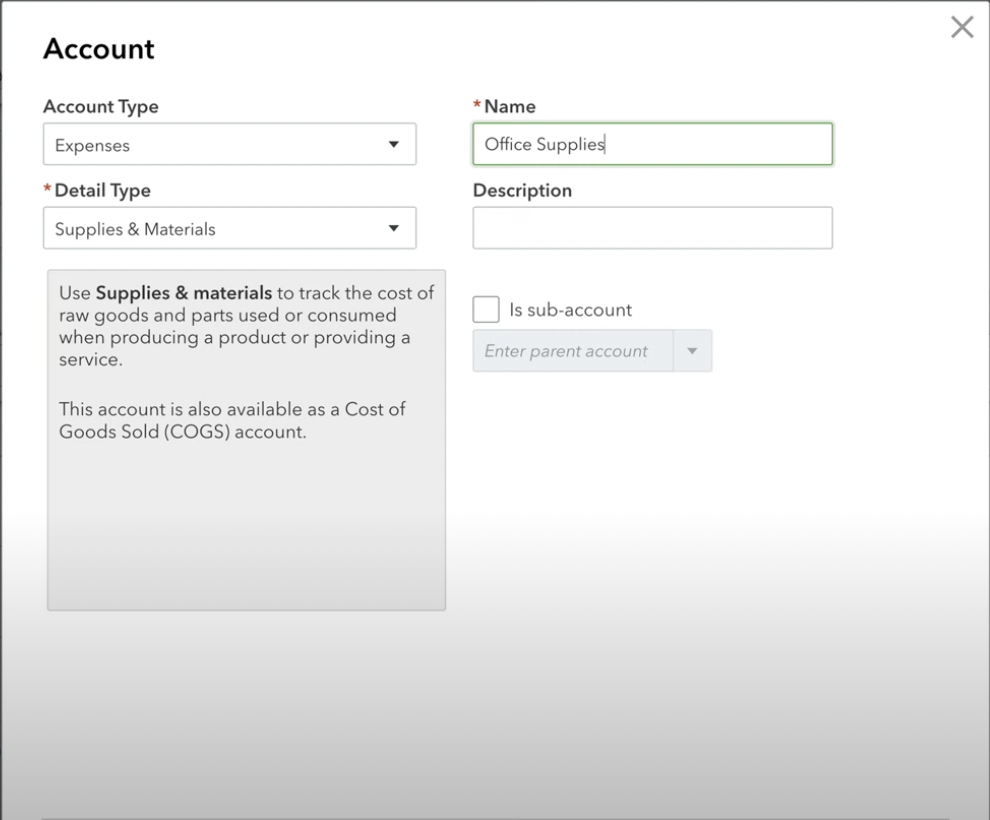
4. Add Name: Decide on the name of your category. Make sure it is related to the details that you placed to avoid getting confused.
5. Save and Close: When you are about the details that yo have placed, click “Save and Close” in the bottom right.
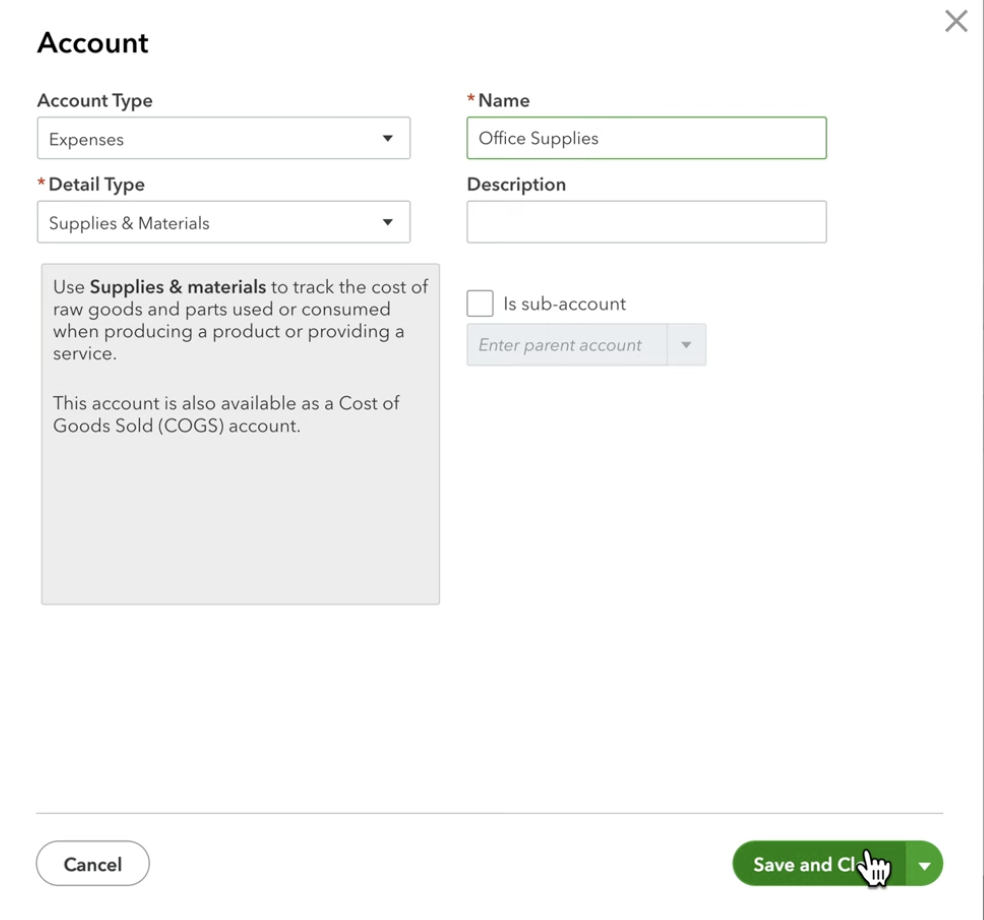
However, we highly recommend discussing with your CPA regarding creating transaction categories within your QuickBooks account as you don’t want to have too many categories otherwise your income and expense statement will be mess and hard to read.
2 Types of Credit Card Transactions Categorization in QuickBooks
For managing credit card transactions in QuickBooks, two primary methods stand out for their efficiency and applicability to different types of expenses.
The first method, Individual Categorization, simplifies the process for transactions that align with a single financial category.
The second method, Split Categorization, is made for transactions that span multiple categories, reflecting the diverse ways a single purchase can serve a business.
Way #1: Individual Categorization
Individual Categorization is a streamlined approach to managing financial transactions within QuickBooks, ideal for expenses that align with a single business activity or need.
This method simplifies the recording process by assigning each transaction to one specific category, reflecting its singular purpose within the business operations.
It is particularly effective for straightforward purchases or payments, such as monthly utility bills, office supplies, or direct service fees, where each transaction represents a distinct expense type without overlap.
The primary advantage of this approach is its simplicity and the clarity it provides in financial tracking, making it easier for businesses to monitor their expenditures and understand their spending patterns across different categories.
Way #2 Split Categorization
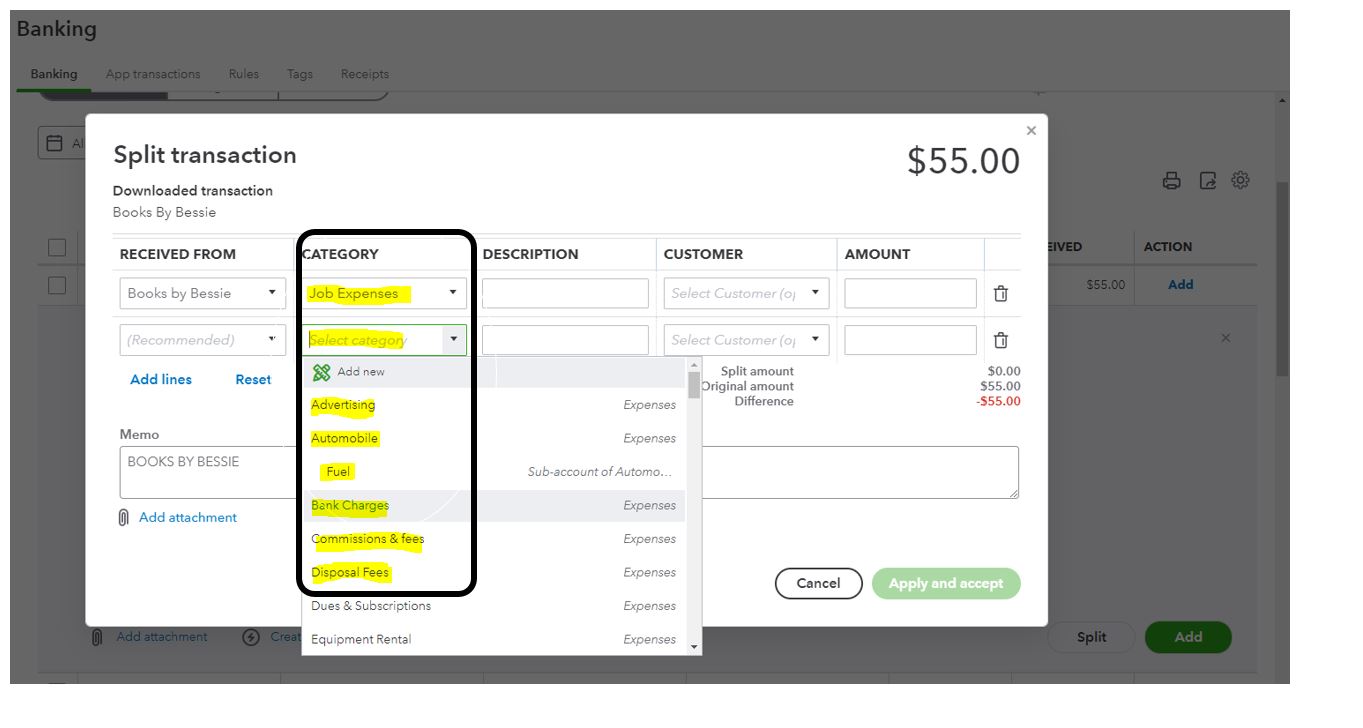
Split Categorization, on the other hand, caters to the more complex financial transactions that serve multiple purposes within a business.
This method is essential when a single transaction encompasses expenses that fall into different categories, requiring a more nuanced approach to accurately reflect the diversity of the expenditure.
For example, a purchase at a retail store might include both office equipment and supplies, necessitating the allocation of costs across these two distinct categories.
Split Categorization allows businesses to precisely divide a transaction among several categories, offering a detailed and accurate reflection of how resources are utilized across different aspects of the business.
This method enhances the accuracy of financial reports, providing deeper insights into the allocation of funds and aiding in more informed budgeting and financial analysis.
Put it into practice
Inconsistent labels make dashboards lie
When every bookkeeper categorizes coffee shops differently, reporting breaks. Automated categorization keeps names and buckets aligned as transaction volume grows.
How to Categorize Transactions with DocuClipper
If you do not have access to QuickBooks or any accounting software, since they are a bit expensive and complicated for the average user. DocuClipper has the best features when you are categorizing your business expenses.
DocuClipper is an OCR bank statement converter that focuses on converting PDF bank statements into CSV, XLS, and QBO. It also has a user-friendly interface for categorizing bank transactions that provide visual insights that help understand cash flow. It can also categorize credit card statements
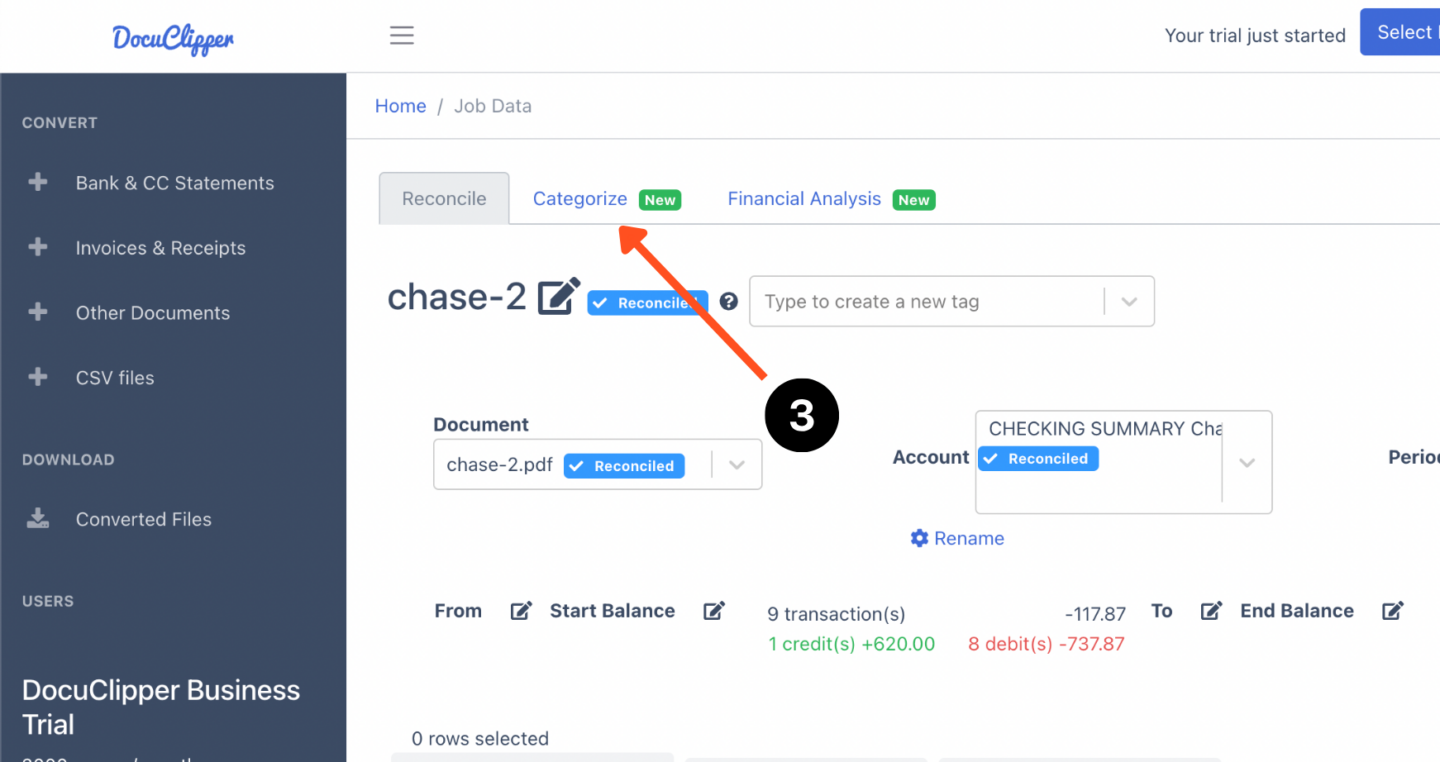
Step 1: Convert PDF Bank Statements
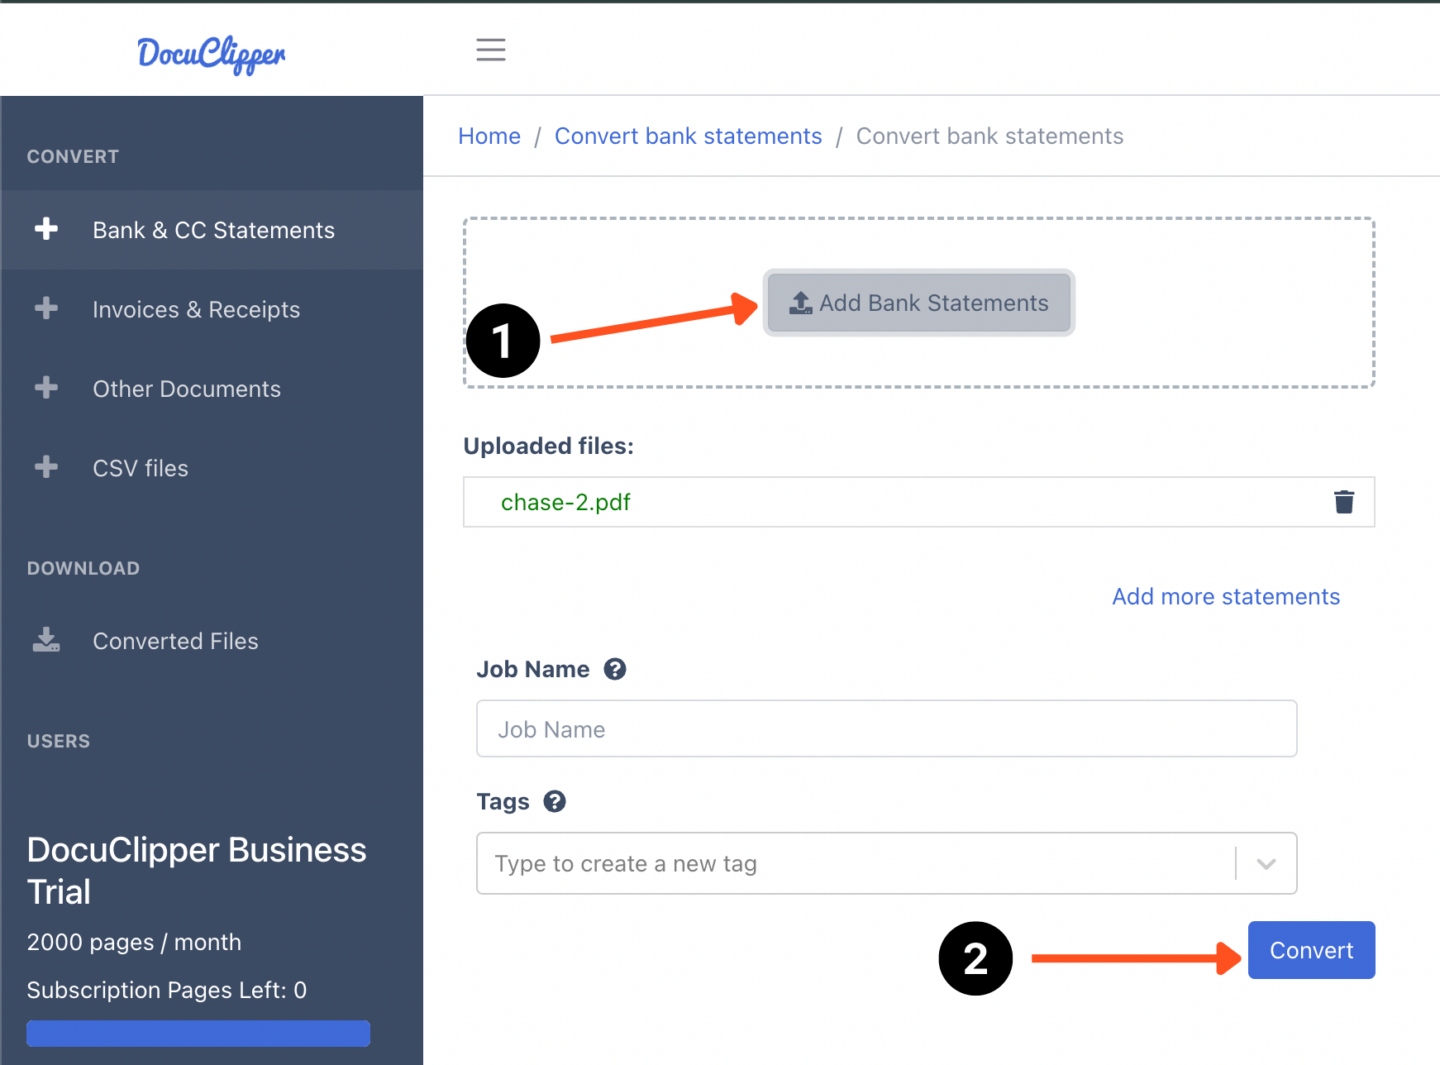
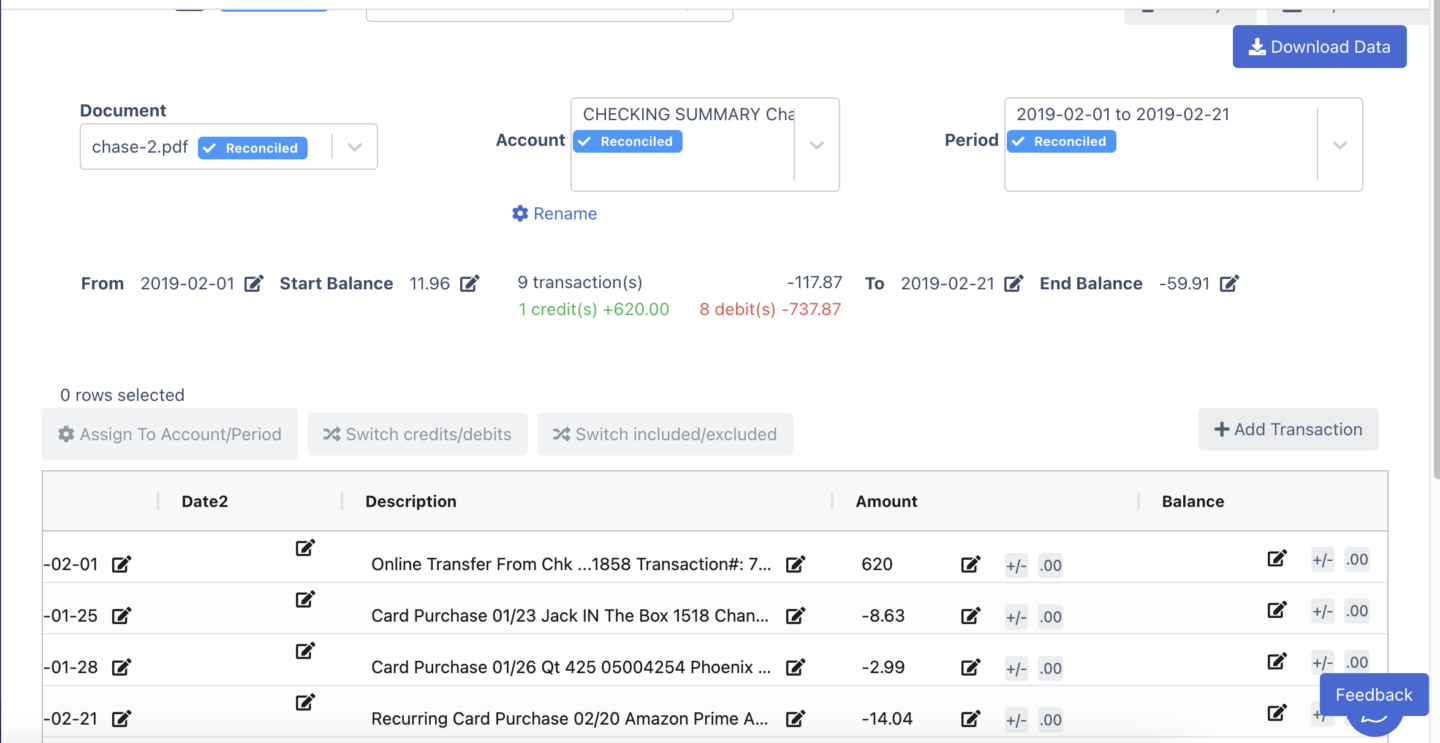
Start by uploading your PDF bank statements into DocuClipper and let the system process your bank statements. This takes just a few seconds.
During this process, you can also check out the auto-reconciliation feature to see the status of your bank statement to double-check if all the transactions were processed correctly.
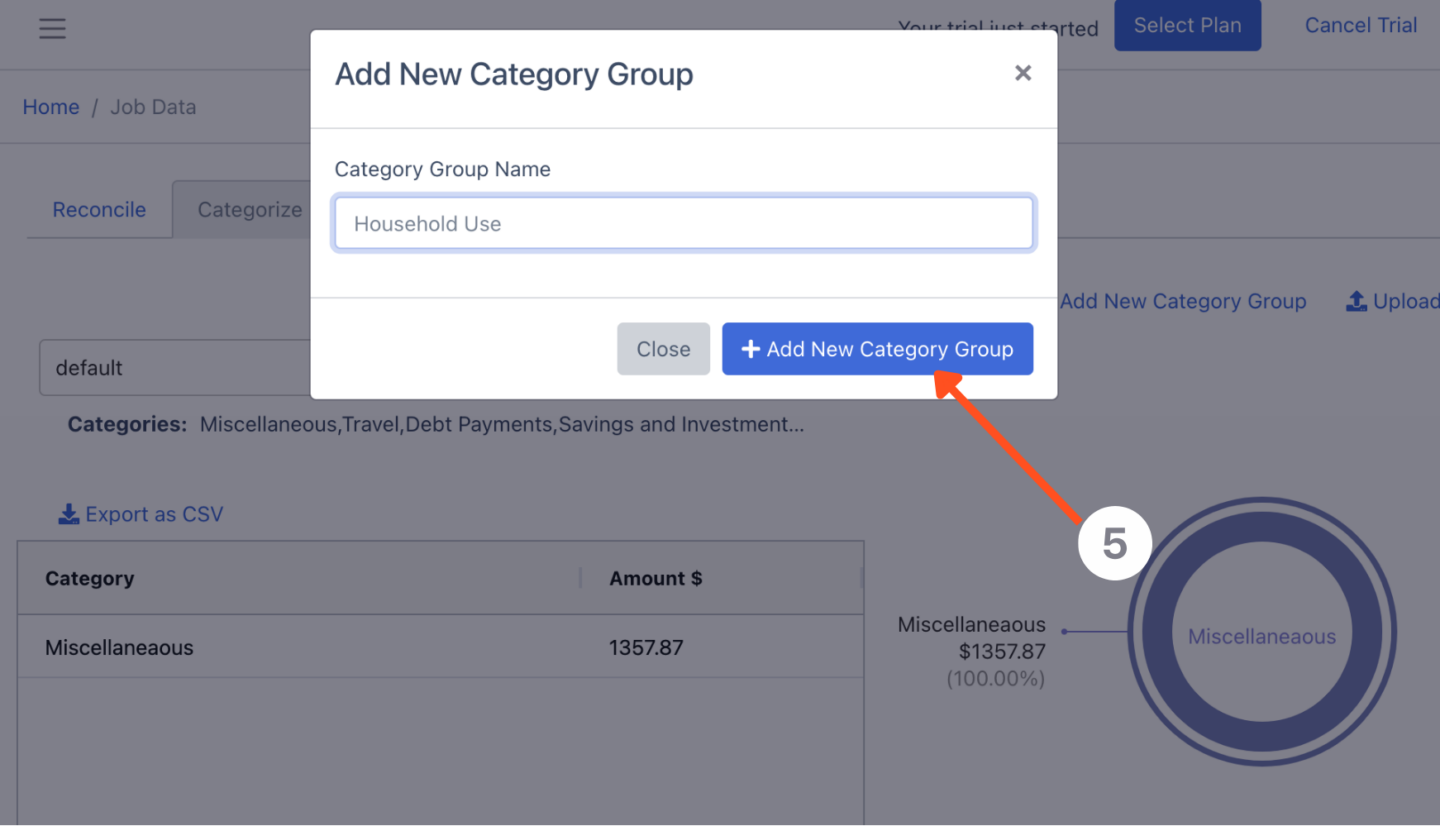
Step 2: Create Transaction Category Group
Once your bank statements are processed, then at the top you select “Categorize”. In the categorization section, you can see the rough draft of the categorization sequence, most likely all will still be unrecognized.
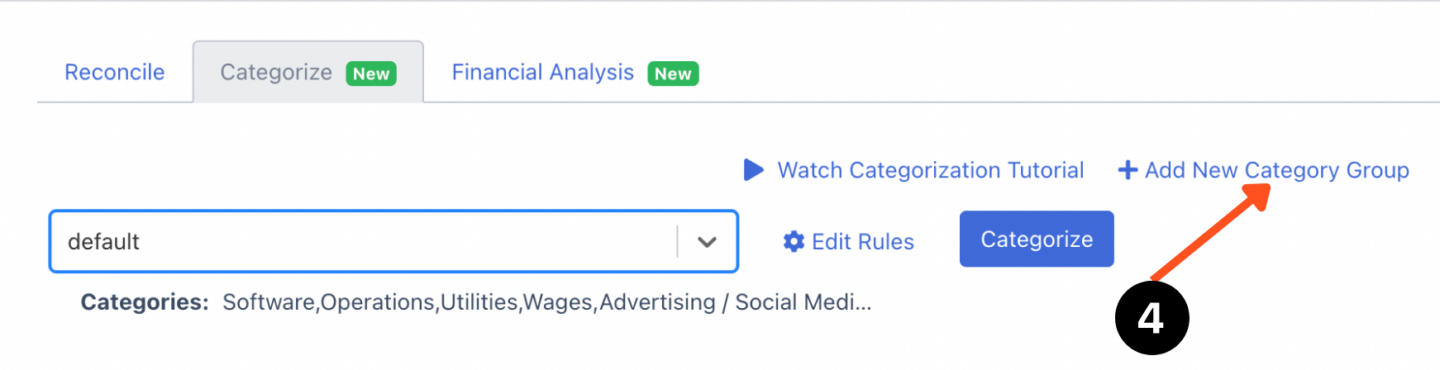
First, you have to create a category group. Here set up different groups for categorizing your transactions. You could have one for business expenses, personal spending, investments, different clients, use cases, etc.
Or if you’re categorizing bank transactions for your clients, group categories are a perfect way to separate transaction categories for every one of your clients to categorize their transactions quickly and easily.
This step makes it easier to organize to work with many different clients.
Step 3: Create Transaction Categories
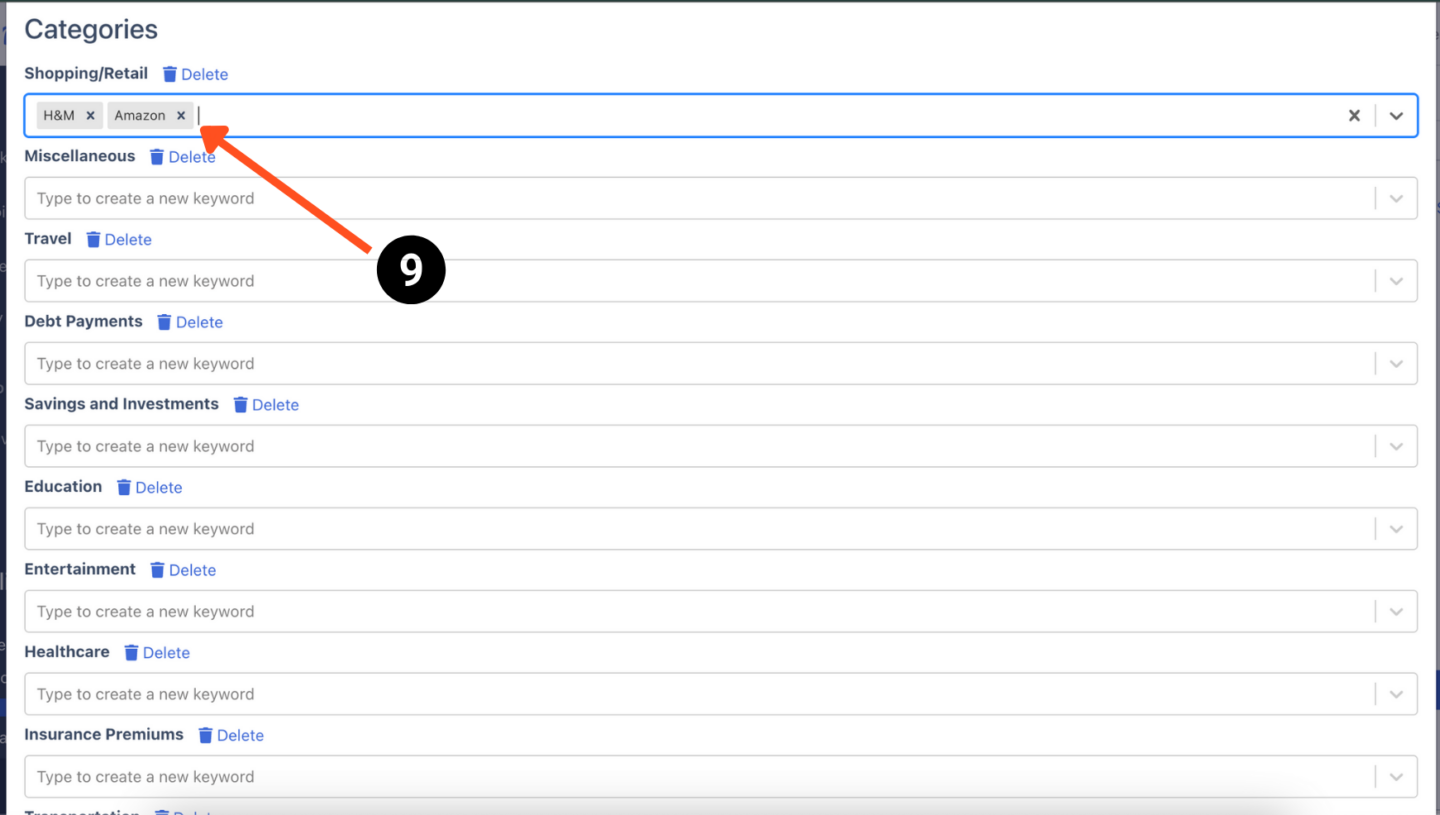
Once you have made your category group, you can start making categories by clicking on the “edit rules”. In this section, you can start customizing the categories and the keywords that should reflect them.

Now, create specific categories within those groups based on your transactions. If you’re categorizing business expenses, you might have categories for advertising, operations, taxes, and services.
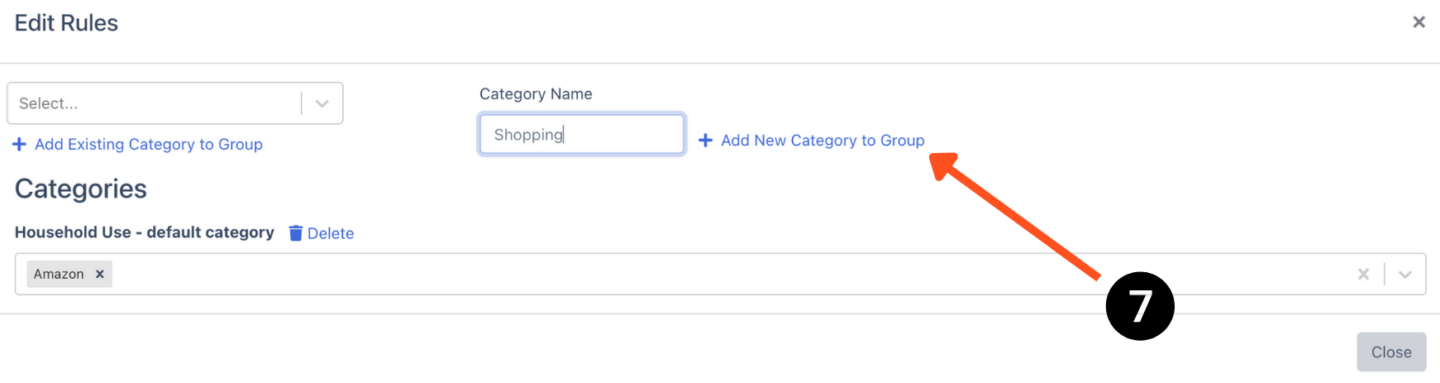
For personal or household expenses, categories could include groceries, car payments, and utilities. This helps in breaking down your spending or income into more detailed segments.
Again if you’re categorizing your bank transactions for tax purposes we recommend that you consult with a qualified CPA to help you set up the right business transaction categories.
Step 4: Assign Keywords to Each Category
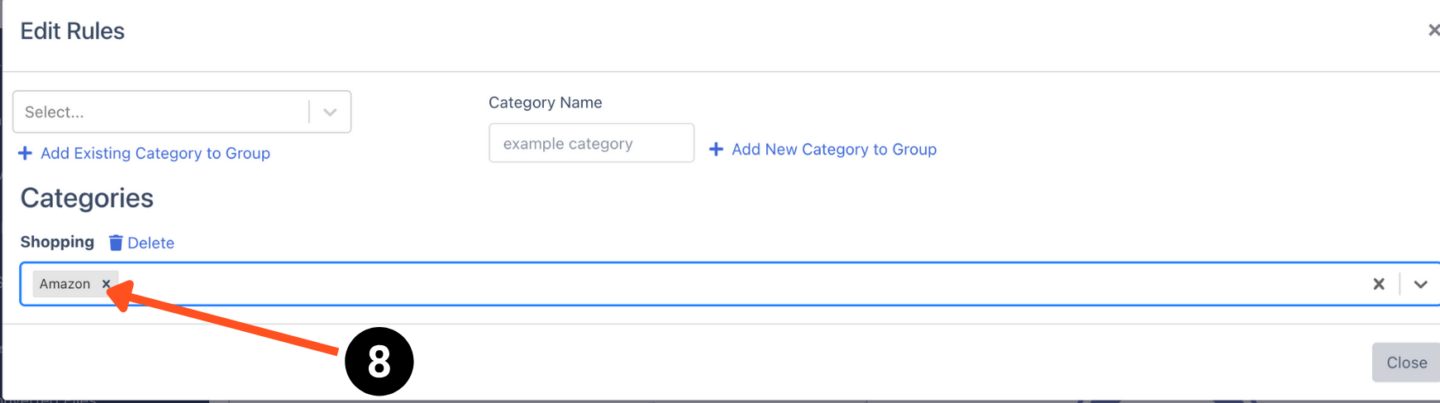
To ensure transactions are categorized correctly, assign specific keywords to each category. For example, purchases from “Walmart,” “Tesco,” or “Best Buy” could be tagged under groceries, while “McDonald’s,” “KFC,” and “Taco Bell” could go under fast food.
You can customize this to fit your needs, assigning specific suppliers or clients to categories if you’re running a business.
DocuClipper gets access to these keywords within the description. It is better to be more specific with your keywords to avoid confusion.
When you regularly transact with a vendor or person, they often use a pattern or order where you can extract it that way.
Generic keywords often lead to confusion.
For example, you can have entries like “electricity” which is intended for utilities but you purchased from “electricity-fast catering services”.
It is better to write the vendor and the purpose of the transaction to make it certain.
There is also a default feature available in DocuClipper that has preassigned categories for many transactions out there. Though it may be less accurate, it is a great start when you are still trying it out.
Step 5: Export Your Categorized Transactions to CSV
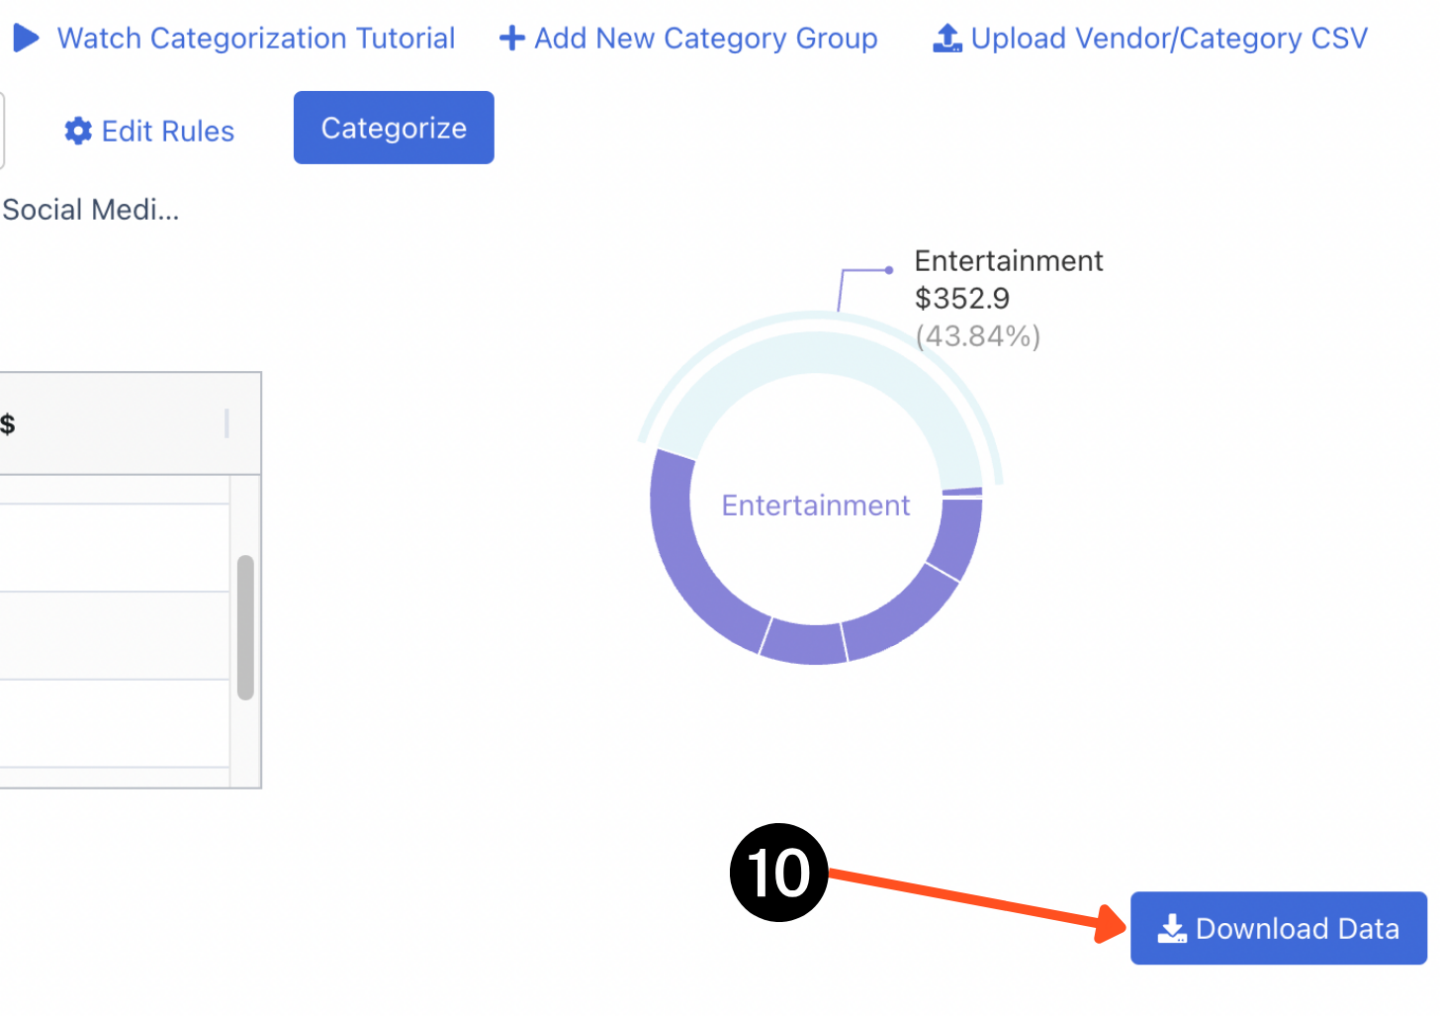
Once you have categorized your transactions and assigned them to their respective categories within DocuClipper, you gain access to valuable insights through graphs and analytics. Click on “Download Data” to export the CSV file of the categories.

These insights can pinpoint the areas where your spending is concentrated, providing an opportunity to identify potential savings or to adjust your personal or business budget accordingly.
Why Is It Important to Categorize Transactions in QuickBooks?
Categorizing transactions in QuickBooks is fundamental for maintaining accurate and organized financial records for your business. This process helps in several key areas:
- Financial Analysis and Reporting: Proper categorization ensures that financial reports, such as profit and loss statements and balance sheets, accurately reflect the company’s financial status. It allows business owners and accountants to quickly assess financial health, identify trends, and make informed decisions.
- Tax Preparation: Categorizing transactions correctly simplifies tax preparation by clearly delineating deductible expenses and taxable income. This can potentially lead to tax savings and makes it easier to comply with tax regulations, reducing the risk of errors during tax filing.
- Budgeting and Forecasting: With transactions neatly categorized, businesses can more effectively create budgets and forecasts. Understanding where money is spent and how income is generated provides valuable insights for future planning and financial management.
- Expense Tracking: Categorization helps track expenses accurately, making it possible to identify areas of unnecessary spending or potential savings. It also aids in monitoring cash flow, ensuring that the business can meet its financial obligations on time.
- Regulatory Compliance: Keeping organized records through transaction categorization is crucial for compliance with accounting standards and regulations. It ensures that financial records are prepared correctly, which is important for audits and legal compliance.
What is Transaction Categorization?
Transaction categorization is the process of assigning each financial transaction to a specific category within the accounting system. This classification is based on the nature of the transaction, such as sales revenue, payroll expenses, utilities, or office supplies.
Categorization turns raw financial data into organized, actionable information by grouping similar transactions. This not only simplifies financial management and reporting but also provides deep insights into the business’s operational and financial performance.
Conclusion
The importance of categorizing transactions in QuickBooks cannot be overstated. It is a critical aspect of financial management that supports accurate reporting, efficient tax preparation, and effective budgeting, and ensures compliance with regulatory standards.
By implementing thorough transaction categorization, businesses can gain a clear understanding of their financial position, identify growth opportunities, and make strategic decisions with confidence.
In essence, proper transaction categorization lays the foundation for sound financial health and operational efficiency.
FAQs about Categorize Credit Card Transactions in QuickBooks
Understanding how credit card transactions are categorized, as well as the accounting implications of credit card use, is essential for effective financial management. Below are some frequently asked questions about categorizing credit card transactions:
How are credit card transactions categorized?
Credit card transactions are meticulously categorized based on the specific nature of each transaction, such as “Office Supplies” for materials purchased or “Sales Revenue” for income received through sales.
This categorization is crucial for businesses as it helps in the detailed tracking of financial activities, enabling more precise budgeting, financial analysis, and reporting.
What is credit card expense in accounting?
In the realm of accounting, credit card expenses encompass all purchases or fees that are charged to a credit card, which are then recorded as business expenses within the financial statements.
These transactions directly impact the company’s net income as they are subtracted from revenues to calculate profitability.
Is a credit card debt a liability or expense?
Credit card debt stands as a liability within the framework of accounting principles, not an expense. This distinction is important because liabilities represent amounts owed to creditors (in this case, the credit card company), which need to be paid back, whereas expenses are outflows of resources related to operational activities.
Is a credit card an asset or an expense?
A credit card itself is neither classified as an asset nor an expense within the accounting structure. Instead, it serves as a method of payment, a financial tool that facilitates transactions. The use of a credit card can lead to the generation of expenses (for the purchase of goods or services) or the accumulation of liabilities (the balance owed on the card).
Related Articles:
Next step
Make month-end categorization predictable
Pair extraction with labeling so reviewers approve patterns instead of retyping descriptions. Same output, every month.