
Transaction Tagging
Apply custom tags to bank transactions manually, or auto-apply them with If/Then rules on description and amount, then filter, report, and export by tag.
Last updated
The Transaction Tagging feature lets you organize bank transactions using custom tags. Apply tags manually to individual transactions, or create automated If/Then rules that tag transactions by description or amount. Find it in Analyze → Transaction Tagging.
Manual Tagging
Adding Tags to Transactions
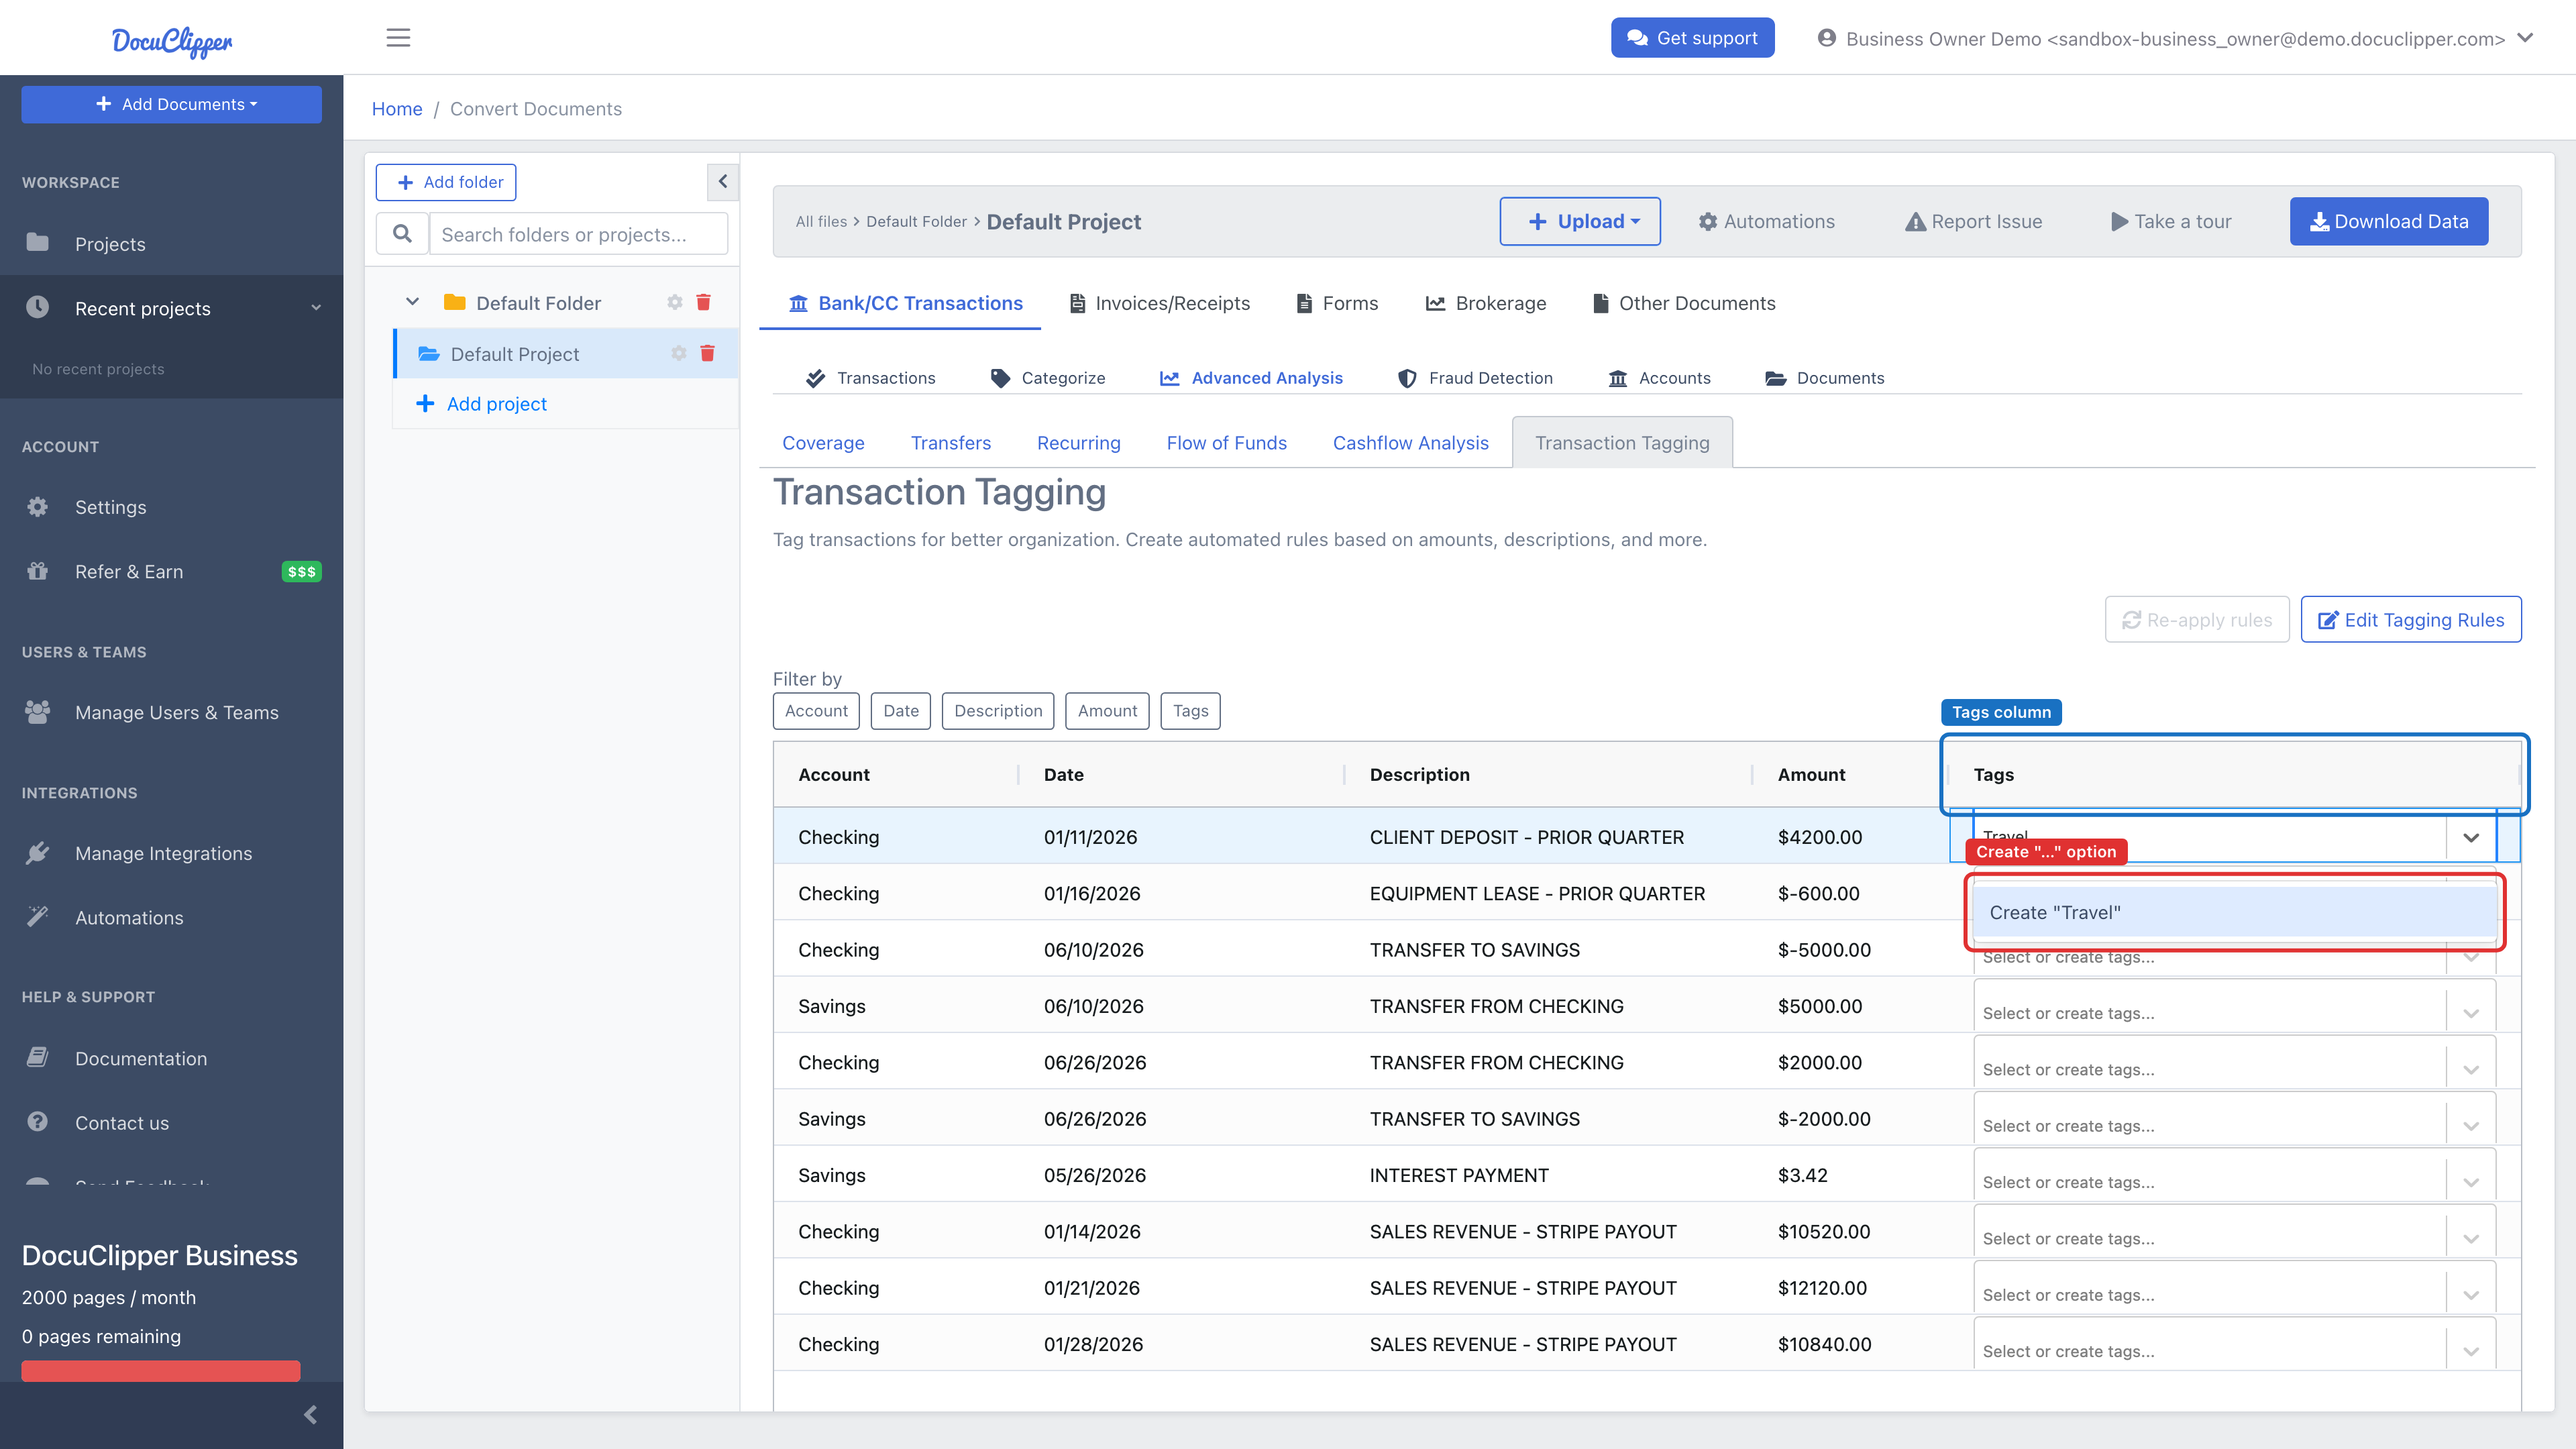
Step 1: Open the Transaction Tagging tab and find the "Tags" column in the transaction table
Step 2: Click the Tags field for any transaction row (it reads "Select or create tags...")
Step 3: Choose an existing tag from the dropdown, or type a new name
Step 4: For a new tag, click the Create "your tag" option that appears
Step 5: The tag saves immediately - there's no separate Save button
Managing Tags
- Multiple Tags: You can apply multiple tags to a single transaction
- Remove Tags: Click the "×" next to any tag to remove it
- Reuse Tags: Once created, tags become available for all transactions
- Instant Save: All tag changes are saved automatically
Automated Tagging Rules
DocuClipper can apply tags automatically using If/Then rules - for example, "If description contains 'AMEX' then tag as Card Payment." You define conditions on a transaction's description and amount, and the rule tags every matching transaction without manual work.
Creating a rule
Open a project's Advanced Analysis tab and select the Transaction Tagging sub-tab. Click Edit Tagging Rules (top right) to open the Edit Transaction Tagging Rules modal, then click Add new rule.
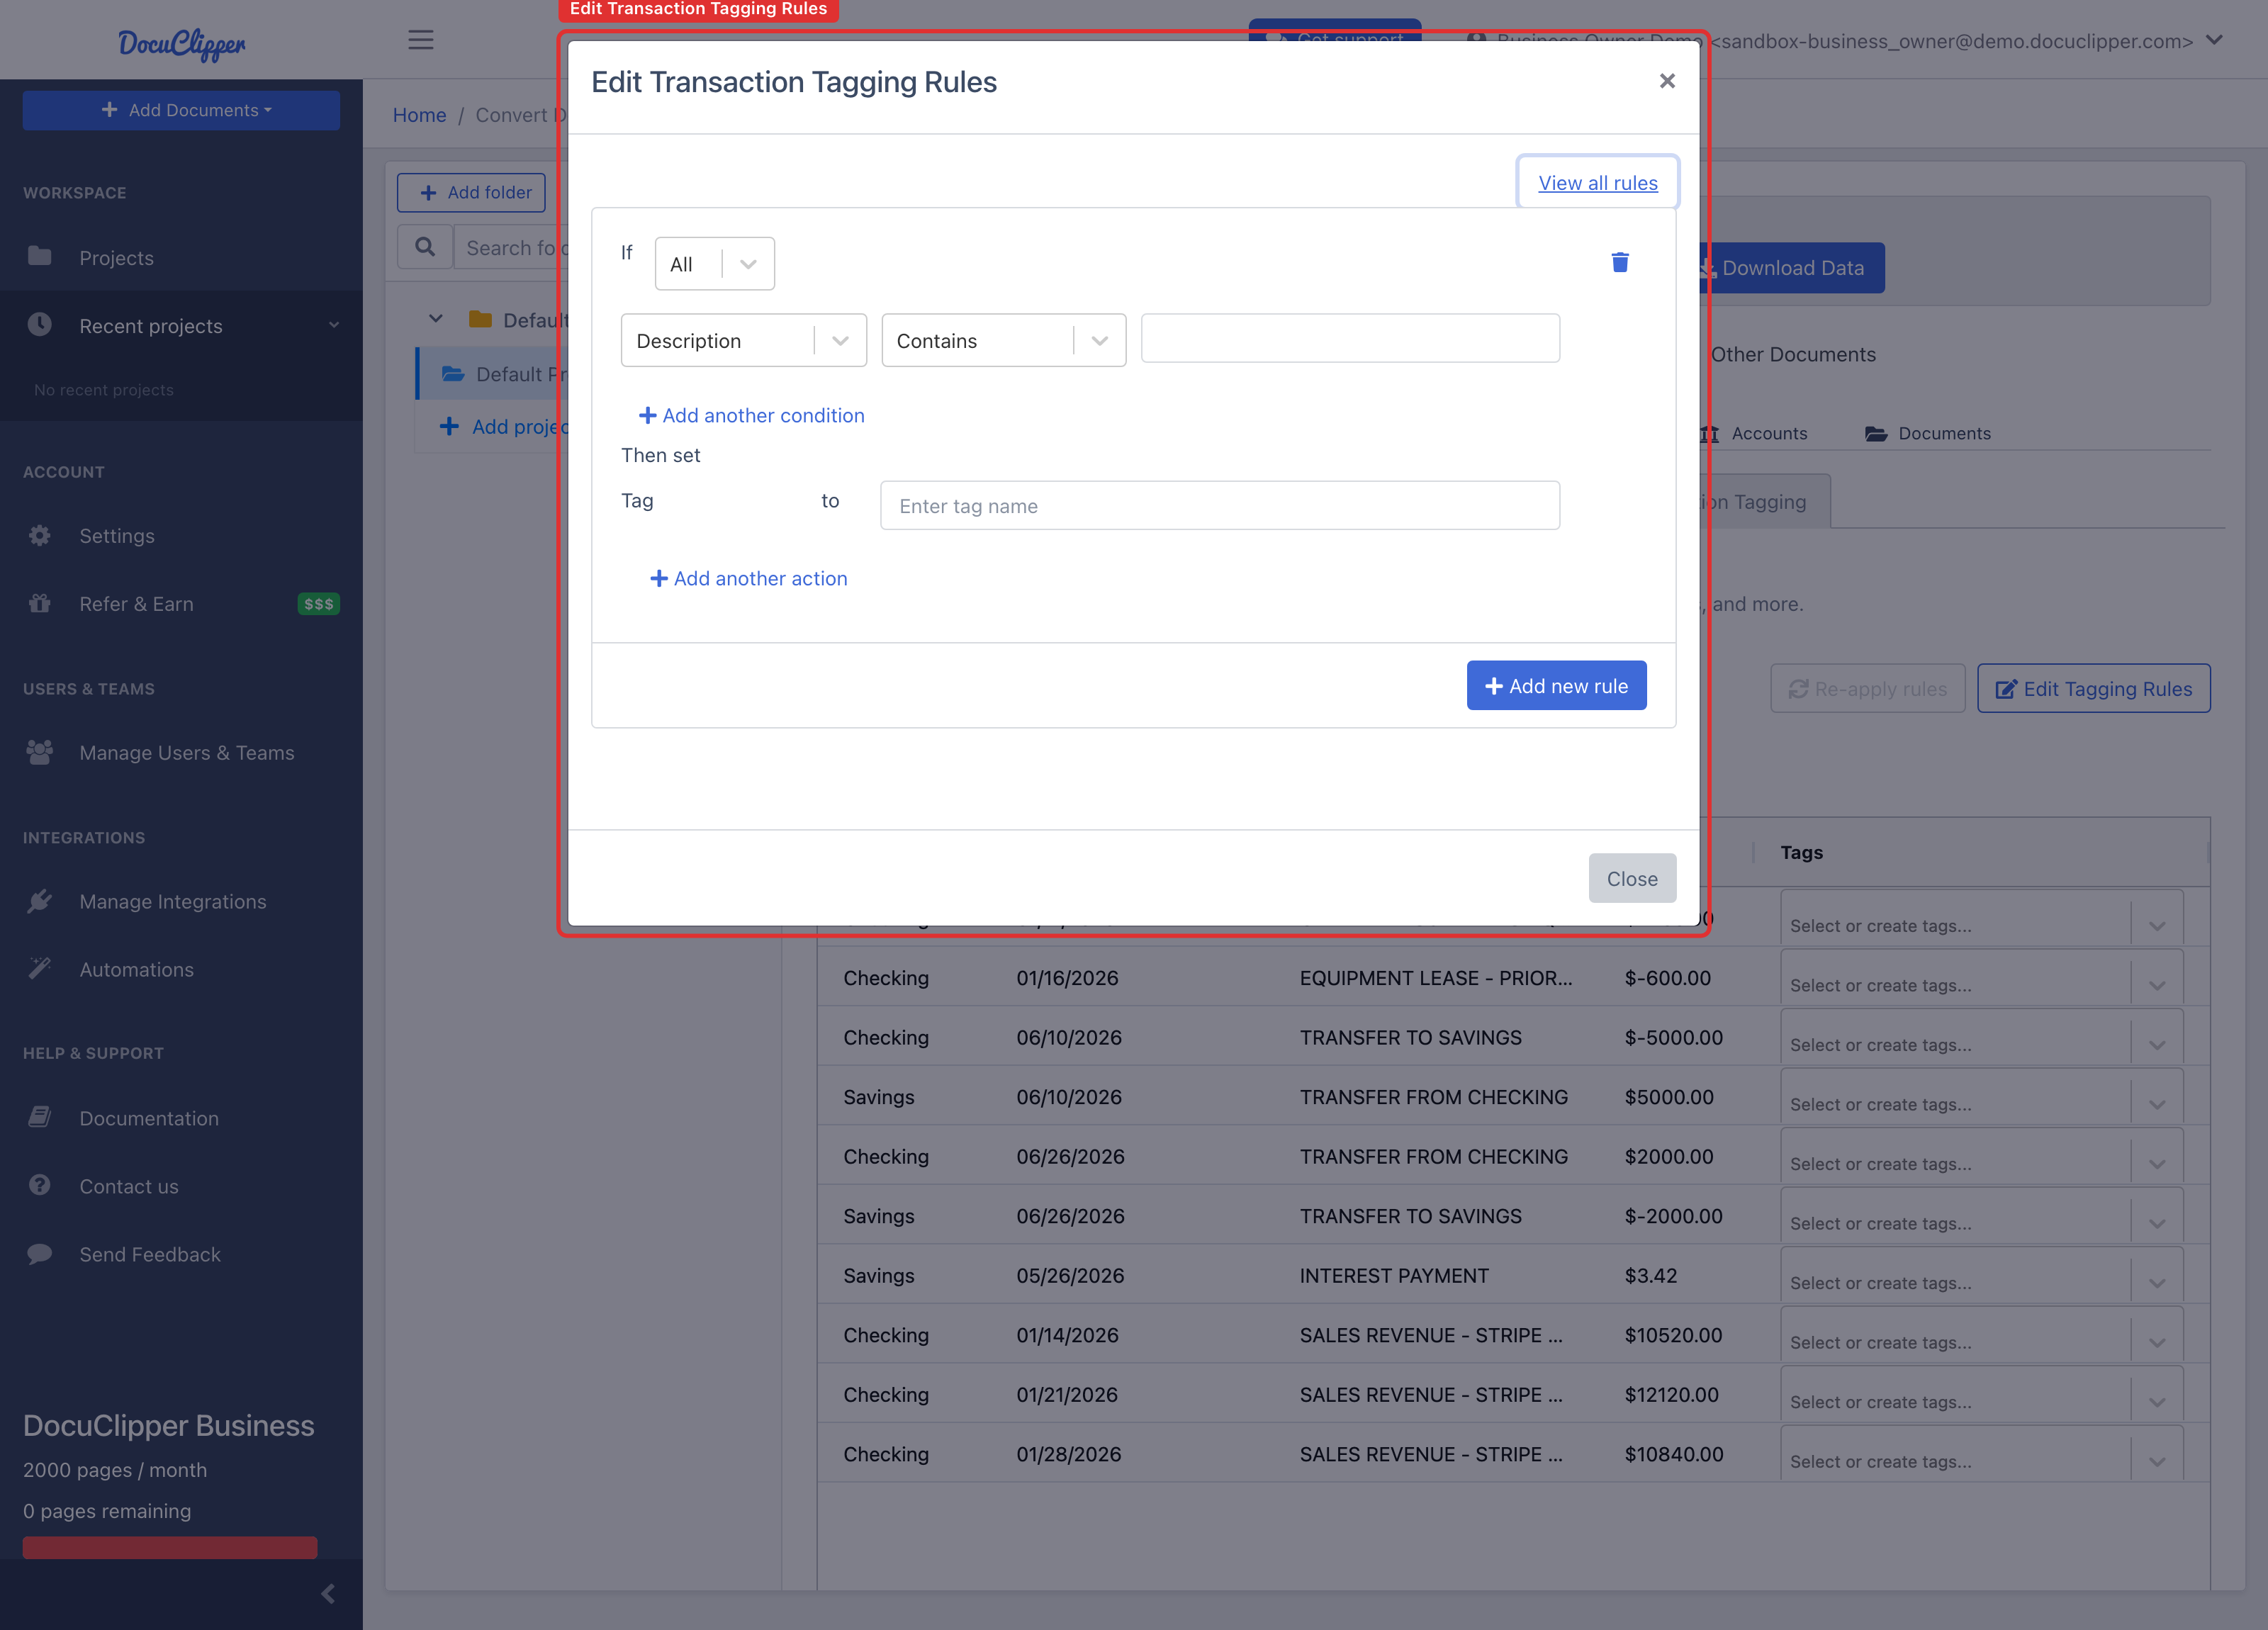
Each rule has two parts:
- If - one or more conditions the transaction must satisfy.
- Then - one or more tags to apply when the conditions match.
Require all conditions to match (logical AND) or any condition to match (logical OR). Add more conditions with Add another condition and more tag actions with Add another action.
What you can match on
Tagging rules evaluate exactly two facts - the transaction's description and its amount:
| Field | Type | Operators that apply |
|---|---|---|
| Description | Text | Contains, Not Contains |
| Amount | Number | Greater Than, Less Than, Equals |
Description matches are case-insensitive substring matches, which covers most payee-name variants (Contains WIRE catches WIRE TRANSFER, Incoming Wire, and wire ref 8842).
The field dropdown may also list Date, Balance, and Account - but the engine only evaluates description and amount, so conditions on those other fields silently never match anything. Stick to description and amount. For the same reason, use Greater Than / Less Than (not the "or Equal" variants) for amount thresholds.
Rules apply retroactively
Rules run across the transactions already in the project, not just new ones. After you add or edit rules, click Re-apply rules (next to Edit Tagging Rules) to re-run every rule across all transactions. New transactions from later conversions or integrations get tagged automatically. This makes back-testing easy: write a rule, re-apply, see the historical hits, refine, and re-apply again.
Example Use Case
Financial Investigation Scenario: flag every wire transfer over $10,000 for review.
Create a rule:
- Logic: All
- Condition 1: Description Contains
WIRE - Condition 2: Amount Greater Than
10000 - Then set: tag
large-wire
Save it, then click Re-apply rules. Every transaction that satisfies both conditions now carries the large-wire tag - filter the table by that tag for an instant review queue and export it to Excel for your workpaper. You can layer rules (a second rule tagging CASH over $5,000 as cash-activity), and a single transaction can carry multiple tags from multiple rules.
Categories vs. tags
Categories are part of DocuClipper's transaction categorization system (income vs. expense, vendor classes, accounting buckets) and feed reports like Cashflow Analysis. Tags are free-form labels you control; they don't drive financial reports - they organize transactions for review, filtering, and export. A transaction can have one category and many tags. Use categories for accounting; use tags for workflow, investigation, and ad-hoc reporting.
Common Use Cases
- Amount-based tagging: Flag transactions above or below certain thresholds
- Vendor identification: Tag transactions from specific companies or payees
- Expense categorization: Automatically categorize recurring expenses
- Investigation markers: Flag suspicious patterns or unusual activity
- Workflow management: Track review status or approval stages
Filtering and Exporting by Tags
Filter:
- Open the Filter by panel above the transaction table
- In the Tags filter, select the tag you want to filter by
- The table updates to show only transactions carrying that tag
- Clear the Tags filter to return to the full list
Export: with the Tags filter active, export as usual - the export respects the active filter, so you get only the tagged subset in Excel, CSV, or any supported output format.
FAQs
How do I create an automated tagging rule?
Open the Advanced Analysis tab, select the Transaction Tagging sub-tab, click Edit Tagging Rules in the top right, then Add new rule. Define one or more If conditions on description or amount, choose the tag to apply in the Then set section, and save.
Can I tag transactions by amount?
Yes. Amount supports Greater Than, Less Than, and Equals - combine it with Description matches for precise rules (for example, description contains WIRE and amount greater than 10000). Tagging rules only evaluate description and amount, so they can't match on date, balance, or account.
Do tagging rules apply retroactively?
Yes. Rules run against every existing transaction in the project, not just new uploads. Use the Re-apply rules button to re-run them after changing rules.
Can I export tagged transactions to Excel?
Yes. Filter the transaction table by tag, then export - the export respects the filter and includes only the tagged transactions.
What's the difference between categories and tags?
Categories classify transactions for financial reporting (income, expense, vendor class) and feed reports like Cashflow Analysis. Tags are free-form labels you define for workflow, review, and filtering. A transaction has one category and any number of tags.
Related
- How DocuClipper Transaction Categorization Works
- Cashflow Analysis
- Understanding Supported Output Formats
This feature helps organize transactions for analysis, compliance, and investigation purposes.