Importing bank and credit card statement transactions is straightforward when you set up bank feeds on your accounting software or if you can download a file directly from the bank’s website.
However, in many instances, you may need to import bank credit card statements and the transactions into QuickBooks online or desktop from a few years ago or maybe you only have PDF or scanned copies of the statements with transactions.
In such cases, you might need to convert PDF to QBO, which can be done using a DocuClipper.
Also, we have more guides on how to import bank statements into different software:
- Import bank statements into Sage
- Import bank statements into Xero
- Import bank statements into NetSuite
Step 1: Select the Statements
Click on “Bank and credit card statements”.

Drag and drop one or more statements. DocuClipper OCR Bank and credit card statement works with any text or scanned bank statement and it’s the best PDF to QBO converter.
It uses Optical character recognition technology to be able to read scanned statements. You can process multiple statements at the same time.
Click on convert.

Step 2: Transactions are Extracted Automatically
DocuClipper Bank Statement converter extracts all the bank and credit card transactions, creating a comprehensive bank extract that includes other data like balances, dates, account numbers, etc.
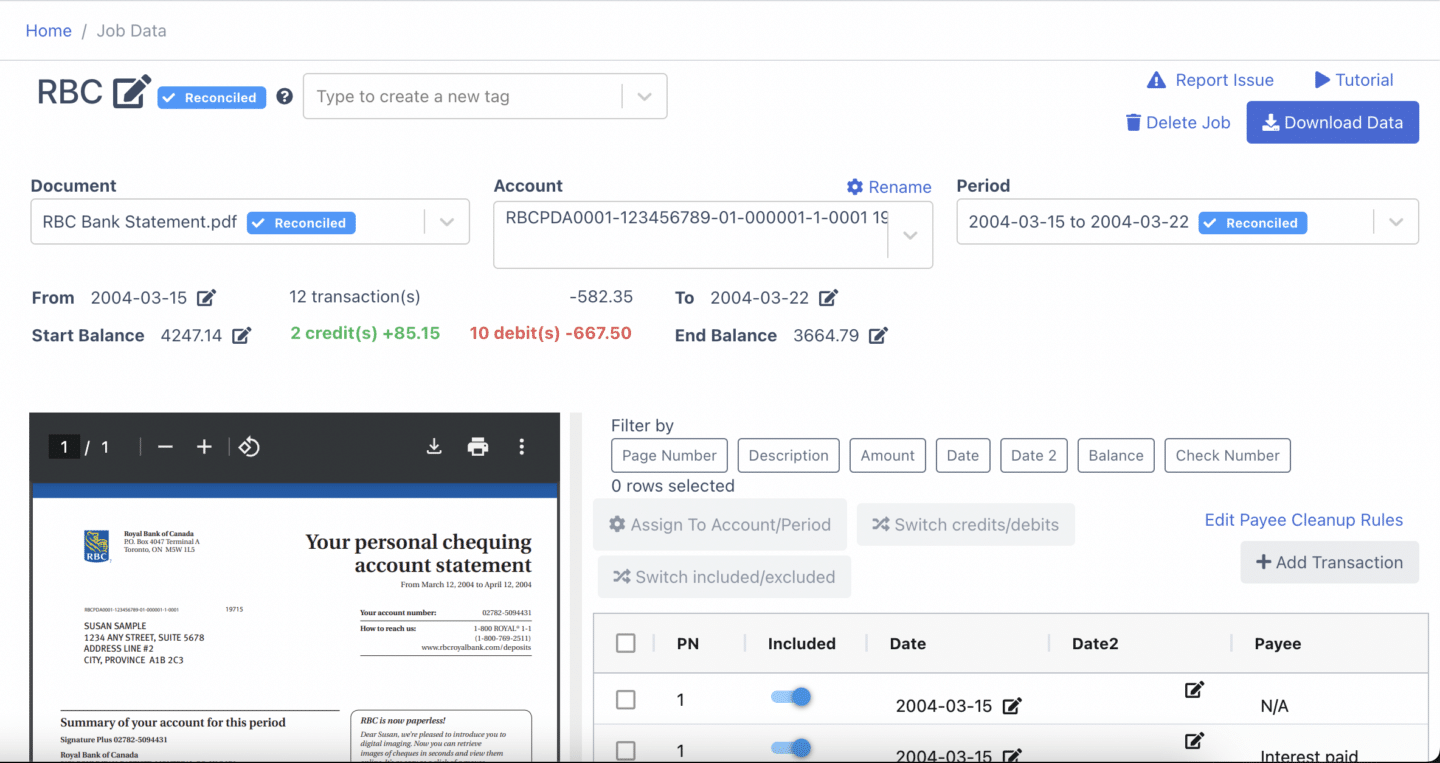
Step 3: Reconcile the Statements
The next step is to reconcile bank statements.
DocuClipper bank statement OCR for bank statement reconciliation compares transaction totals to summary information on the statement. If everything checks out, the statement is identified as reconciled, saving you time and manual review. You can see the reconciliation status on the summary table (top right of the page).
Here’s a video showing how to reconcile the statements:
Step 4: Download a Web Connect File
Click on “Download Data”. Select QuickBooks Web Connect. Select the bank. Select if the statement is from a bank account or credit card. Optionally enter the routing, account numbers, and currency. Click on “Download QuickBooks Web Connect” and the file will be downloaded to your computer
For more information, DocuClipper can also convert CSV to QBO. Read more on how to convert CSV to QBO.

Depending on the QuickBooks version you’re using the steps will differ.
- Step 5.1 is for importing bank and credit card transactions into QuickBooks online.
- Step 5.2 is for importing bank and credit card transactions into Quickbooks desktop
Step 5.1: Import Bank and Credit Card Transactions in the Web Connect File Into QuickBooks Online
To import bank and credit card transactions into QuickBooks online, login into QuickBooks Online to import a Web Connect file and click on ‘Banking’.

If you have the account already created, select that account. Click on the down arrow next to the “Link Account” button, look for the ‘Upload from file’ button and click on it.

Look for the ‘Browse’ button.

Click on it to browse for the QuickBooks Web Connect file. Then click ‘Open’ and ‘Next’.

Review that QuickBooks Web Connect file you are going to import: filename, Account ID, Account Type, and Date range.

If everything looks good and this is the correct QuickBooks Web Connect file, select the QuickBooks account you want to import your data into. Then click ‘Next’.

Then click ‘Let’s go!‘.

Click ‘For Review’. You can see four transactions are imported. The Description is actually the Payee name from the QuickBooks Web Connect file. The Payee column is empty because this is Vendor records in QuickBooks to match.
Now you have to categorize the transactions and match them to Vendors or Payees.
Whether you’re categorizing bank or credit card transactions in QuickBooks you need to ensure that you categorize the transactions correctly.
To do that click on the transaction.

And then select Vendor records and Category, which is expense or income account.

Click ‘Add’ to add the transaction to the register. Continue for all transactions.

Let’s say you realized, that it is an incorrect imported QuickBooks Web Connect file or something wrong with a file, and you don’t want those transactions to be here. So, select all transactions.

Then select ‘Batch actions’ and click ‘Exclude Selected’.

Go to ‘Excluded’.

Select all of them again and then select ‘Batch actions’ and click ‘Delete’.

And the transactions are deleted from QuickBooks Online.

Step #5.2: Import the Bank or Credit Card Transactions in the Web Connect file into QuickBooks Desktop
Once you have the Web Connect file follow these steps to import the bank and credit card transactions into QuickBooks Desktop.
Before importing, make sure that the account you need to import into doesn’t have the yellow strike icon. Click ‘Lists’ – ‘Charts of Accounts’.

If you have the icon, it means the account is online linked to direct download. You need to disconnect first to import a Web Connect file.

To disconnect, right-click – ‘Edit Account’.

Then click on ‘Bank Feed Settings’ and ‘Deactivate All Online Services’ first if needed. Check there is no yellow icon after the change. After disconnecting the account from online services, you can import a Web Connect file.

To import a Web Connect file, select ‘File’ – ‘Utilities’ – ‘Import’ – ‘Web Connect Files’, select created Web Connect file.

And select an existing account to import transactions. Check bank label, Account Type, Account number to select the correct Account in QuickBooks. Then click the ‘Continue’ button.

Now your data is imported.

Click on ‘Transaction List’ to review transactions. Assign Vendor Records and expense/income accounts before adding transactions to the register.

‘Downloaded as’ column shows Payee names from the Web Connect file. And the ‘Payee’ column is empty. It shows Vendor Records. When you choose a Vendor Record, for the Payee from the Web Connect file, QuickBooks will remember your choice for the next QuickBooks Web Connect import.

Click ‘Show Bank Memo’ to see the description to the ‘Bank Memo’ column.

Once Vendor Records and Account are set, you can add transactions to the register. The rename rule creation dialog will show up after to use for the next time.

As QuickBooks Desktop is being phase out, we recommend you to read our other articles on QuickBooks online:
Handling Import Errors
Unable to Verify the Financial Institution
If you get the error “QuickBooks is unable to verify the Financial Institution information for this download” you need to select another “Bank” when downloding the file:
- If the bank has multiple entries, select the one that says “WebConnect”.
- If the bank isn’t listed, you can select any other bank like “Wells Fargo” and the transactions will get imported correctly into QuickBooks Desktop.
When Importing, QuickBooks Doesn’t Show an Existing Account
When importing, if QuickBooks doesn’t show an existing account, make sure you enter the right Routing and Account numbers when downloading the Web Connect file:

Frequently Asked Questions About How to Import Bank and Credit Card Statements and Transactions Into QuickBooks Online and Desktop
Can DocuClipper import PDF bank statements into QuickBooks Desktop?
Yes, DocuClipper can import digital and scanned statements from any bank into QuickBooks Desktop.
Can DocuClipper import credit card statements into QuickBooks Desktop?
Yes, DocuClipper can import any bank or credit card statement into QuickBooks Desktop.
Can DocuClipper import scanned bank statements?
Yes, DocuClipper uses Optical Character Recognition (OCR) technology to import any scanned bank statement into QuickBooks Desktop.
Can DocuClipper convert several statements at the same time?
Yes, DocuClipper can convert as many statements as you want in a single job.
Can you import credit card transactions from Excel into Quickbooks desktop?
Yes, you can import credit card transactions from Excel into QuickBooks Desktop, however converting the Excel file to QBO format first using a tool like DocuClipper is recommended for a smoother import experience.
How do I import a CSV credit card transaction into Quickbooks desktop?
The best practice is to convert the CSV credit card transaction file to QBO format before importing it into QuickBooks Desktop. Using a purpose-built converter tool like DocuClipper streamlines this process. Follow these steps:
- Export credit card transaction history from your financial institution as a CSV file.
- Upload the CSV file into DocuClipper. It will instantly convert it into a properly formatted QBO file.
- Open QuickBooks Desktop and go to File > Utilities > Import > Web Connect Files. Select the QBO file.
- Map the columns in the import wizard, choose the account to import into, and click Import.
- The credit card transactions from the CSV file will now import smoothly into your QuickBooks register as a QBO file.
How to bulk upload credit card transactions in QuickBooks Desktop?
To bulk upload many credit card transactions, export statement as CSV and use DocuClipper to convert to QBO format. QBO integrates smoothly into QuickBooks Desktop. Review data, keep file under 350KB. Go to File > Utilities > Import > Web Connect Files and import QBO file.
How do I handle credit card transactions in Quickbooks desktop?
In QuickBooks Desktop, set up credit card accounts under Chart of Accounts. Enter balances. Download CSV/Excel files from the card issuer and use DocuClipper to convert to QBO format for best import experience. Then import QBO file and code transactions.
Can I import CSV file into QuickBooks desktop?
Yes, you can import CSV files into QuickBooks Desktop, however, it is recommended to first use a tool like DocuClipper to convert the CSV file to QBO format. QBO files integrate directly into QuickBooks reducing formatting issues and import errors.
Can I import credit card transactions into QuickBooks Online?
Yes, you can import credit card transactions into QuickBooks Online manually by downloading them from your bank, converting the file if necessary, and uploading it to QuickBooks. This method is useful for importing historical data or when direct bank feeds are unavailable, ensuring your financial records are comprehensive and up-to-date.
Can you import credit card transactions from Excel into QuickBooks?
Yes, you can import credit card transactions from Excel into QuickBooks. However, it's recommended to convert Excel files into QBO format using DocuClipper for a smoother and more error-free import process, ensuring optimal compatibility and data accuracy within QuickBooks.
How do I handle credit card transactions in QuickBooks Online?
Handle credit card transactions in QuickBooks Online by connecting your credit card account for automatic downloads or manually importing transaction data. Once imported, categorize, match, and add transactions to your books. Regularly reconcile the credit card account, comparing QuickBooks data with your credit card statements to ensure accuracy and completeness in your financial tracking and reporting.
How do I add credit card transactions to QuickBooks?
To add credit card transactions to QuickBooks, navigate to the "Transactions" or "Banking" section, and either connect your credit card for automatic transaction downloads or manually import transactions using a downloaded QBO, CSV, or Excel file from your bank. Once transactions are imported, review, categorize, and approve them to be added to your books, ensuring accurate financial tracking and reporting in QuickBooks.
How do I batch enter credit card charges in Quickbooks online?
To batch enter credit card charges in QuickBooks Online, utilize the "Bank Feed" feature to import transactions in bulk. If your credit card charges are in PDF format, use DocuClipper to convert them into a compatible format like QBO, CSV, or Excel. Then, upload the file to QuickBooks, review, categorize, and approve the transactions in batch, ensuring all charges are accurately recorded and categorized in your financial tracking.
How do you record credit card transactions in accounting?
To record credit card transactions in accounting, create a credit card account in your ledger, and record transactions as they occur. Each transaction should be entered as a credit to the credit card account and a debit to the relevant expense or asset account. Ensure to reconcile the credit card account regularly by comparing statement balances with your ledger, maintaining accurate and verifiable financial records.
Can I import transactions into QuickBooks desktop?
Yes, you can import transactions into QuickBooks Desktop. To do this, download your transaction history from your bank's website in a QuickBooks-compatible format (QBO, CSV, or Excel). In QuickBooks, go to 'File,' then 'Utilities,' and select 'Import.' Choose 'Web Connect Files' and select your downloaded transaction file. Review and categorize the transactions before adding them to your register to ensure accuracy and completeness.
How to import bank transactions CSV file into QuickBooks Desktop?
To import a CSV file into QuickBooks Desktop, go to 'File,' select 'Utilities' and 'Import,' then choose 'Excel Files.' Browse and select your CSV file to upload. However, for a smoother experience, it's advisable to convert your CSV file to QBO format using tools like DocuClipper. This ensures optimal compatibility and minimizes the chances of errors during the import process, enhancing the efficiency of your financial management tasks.
What software imports transactions into QuickBooks desktop?
The best software to import transactions into QuickBooks Desktop is one that converts PDF or CSV files to QBO format, such as DocuClipper. Utilizing DocuClipper minimizes errors, ensuring transactions are imported seamlessly and accurately. This tool automates the conversion process, saving time and effort, and enhancing the reliability of your financial data within QuickBooks Desktop.
Can I import transactions from Excel to QuickBooks desktop?
Yes, you can import transactions from Excel to QuickBooks Desktop. Go to 'File,' select 'Utilities,' then 'Import,' and choose 'Excel Files.' Open your Excel file and follow the prompts. For optimal integration, it's better to convert your Excel file to QBO format before importing. This conversion ensures a more seamless and error-free import, enhancing the accuracy and reliability of your financial data in QuickBooks Desktop.
Can I convert CSV file to QBO?
Yes, you can convert a CSV file to QBO for a more seamless import into QuickBooks Desktop. Tools like DocuClipper allow for quick and accurate conversion from CSV to QBO, ensuring your financial data is correctly formatted and compatible with QuickBooks. This process minimizes errors and streamlines the import process, allowing for efficient and reliable management of your financial transactions in QuickBooks Desktop.
Can I import bank transactions into QuickBooks online?
Yes, you can import bank transactions into QuickBooks Online. Go to the Banking menu or Transactions menu. Then connect your bank or credit card account. QuickBooks will automatically download your recent transactions. You can categorize, match, and accept transactions to keep your accounts up to date. For detailed steps, visit the official QuickBooks support page. This feature saves time and ensures OCR accuracy in your financial records.
How do I import CSV bank transactions into QuickBooks online?
Yes, you can. But to import CSV bank transactions into QuickBooks Online, it's more efficient to use a tool like DocuClipper. Here’s how:
- Convert your CSV file to QBO format using DocuClipper.
- In QuickBooks Online, go to the Banking menu.
- Click the Link account, select Upload from file.
- Upload the converted QBO file.
This method ensures compatibility and a seamless import process, enhancing accuracy and saving time. For step-by-step instructions, visit the DocuClipper website.
Can I add bank transactions manually to QuickBooks online?
Yes, you can manually add bank transactions to QuickBooks Online. Follow these steps:
- Go to the Banking menu and select the Add Transaction button.
- Enter the transaction details including date, description, and amount.
- Choose the appropriate account for the transaction.
- Click Save to add the transaction.
Manually adding transactions ensures your financial data is complete and accurate, even if not all transactions are imported automatically. For more assistance, refer to QuickBooks Online support.
Can I convert a CSV file to IIF or QBO?
Yes, you can convert a CSV file to IIF or QBO for seamless integration with accounting software like QuickBooks. Utilize specialized conversion tools or software like DocuClipper to easily transform your CSV files into the desired format. This process ensures your files are compatible and ready for import, enhancing efficiency and accuracy in managing your financial data. Always refer to the chosen tool's guidelines for optimal conversion results.
Does QuickBooks import CSV?
Yes, QuickBooks does import CSV files, but it may present challenges like formatting errors and compatibility issues. These can cause discrepancies in your financial data. To avoid these issues, it's more efficient to convert your CSV files to QBO format before importing. Using a conversion tool ensures the file is fully compatible with QuickBooks, allowing for a smoother, error-free import process. This step enhances the accuracy and reliability of your financial records in QuickBooks.
Related Articles
- How to Import Invoices Into QuickBooks
- How to Read a Bank Statement and Actually Understanding It
- 10 Best Bank Statement Extraction Software