
Invoice Approval Workflow
Submit invoices for approval, approve or reject them, resubmit after a rejection, and track status on the invoice list — plus how to set up approval rules that route invoices to the right approvers.
Last updated
Overview
DocuClipper’s invoice approval workflow lets you submit invoices for approval and have designated approvers approve or reject them. Approval rules decide who must approve based on amount, vendor, customer, account, category, or description, and whether all listed approvers or any one of them is enough. This article covers both the user actions — submitting, approving, rejecting, and viewing history — and how to configure the rules that route invoices.
Who can access this? Approval-rule configuration requires a contract admin account. Standard team members can view and edit invoices, and can approve or reject invoices they’re assigned to, but cannot configure approval rules.
Submitting an invoice for approval
- Open the invoice from the Invoices list (click the row).
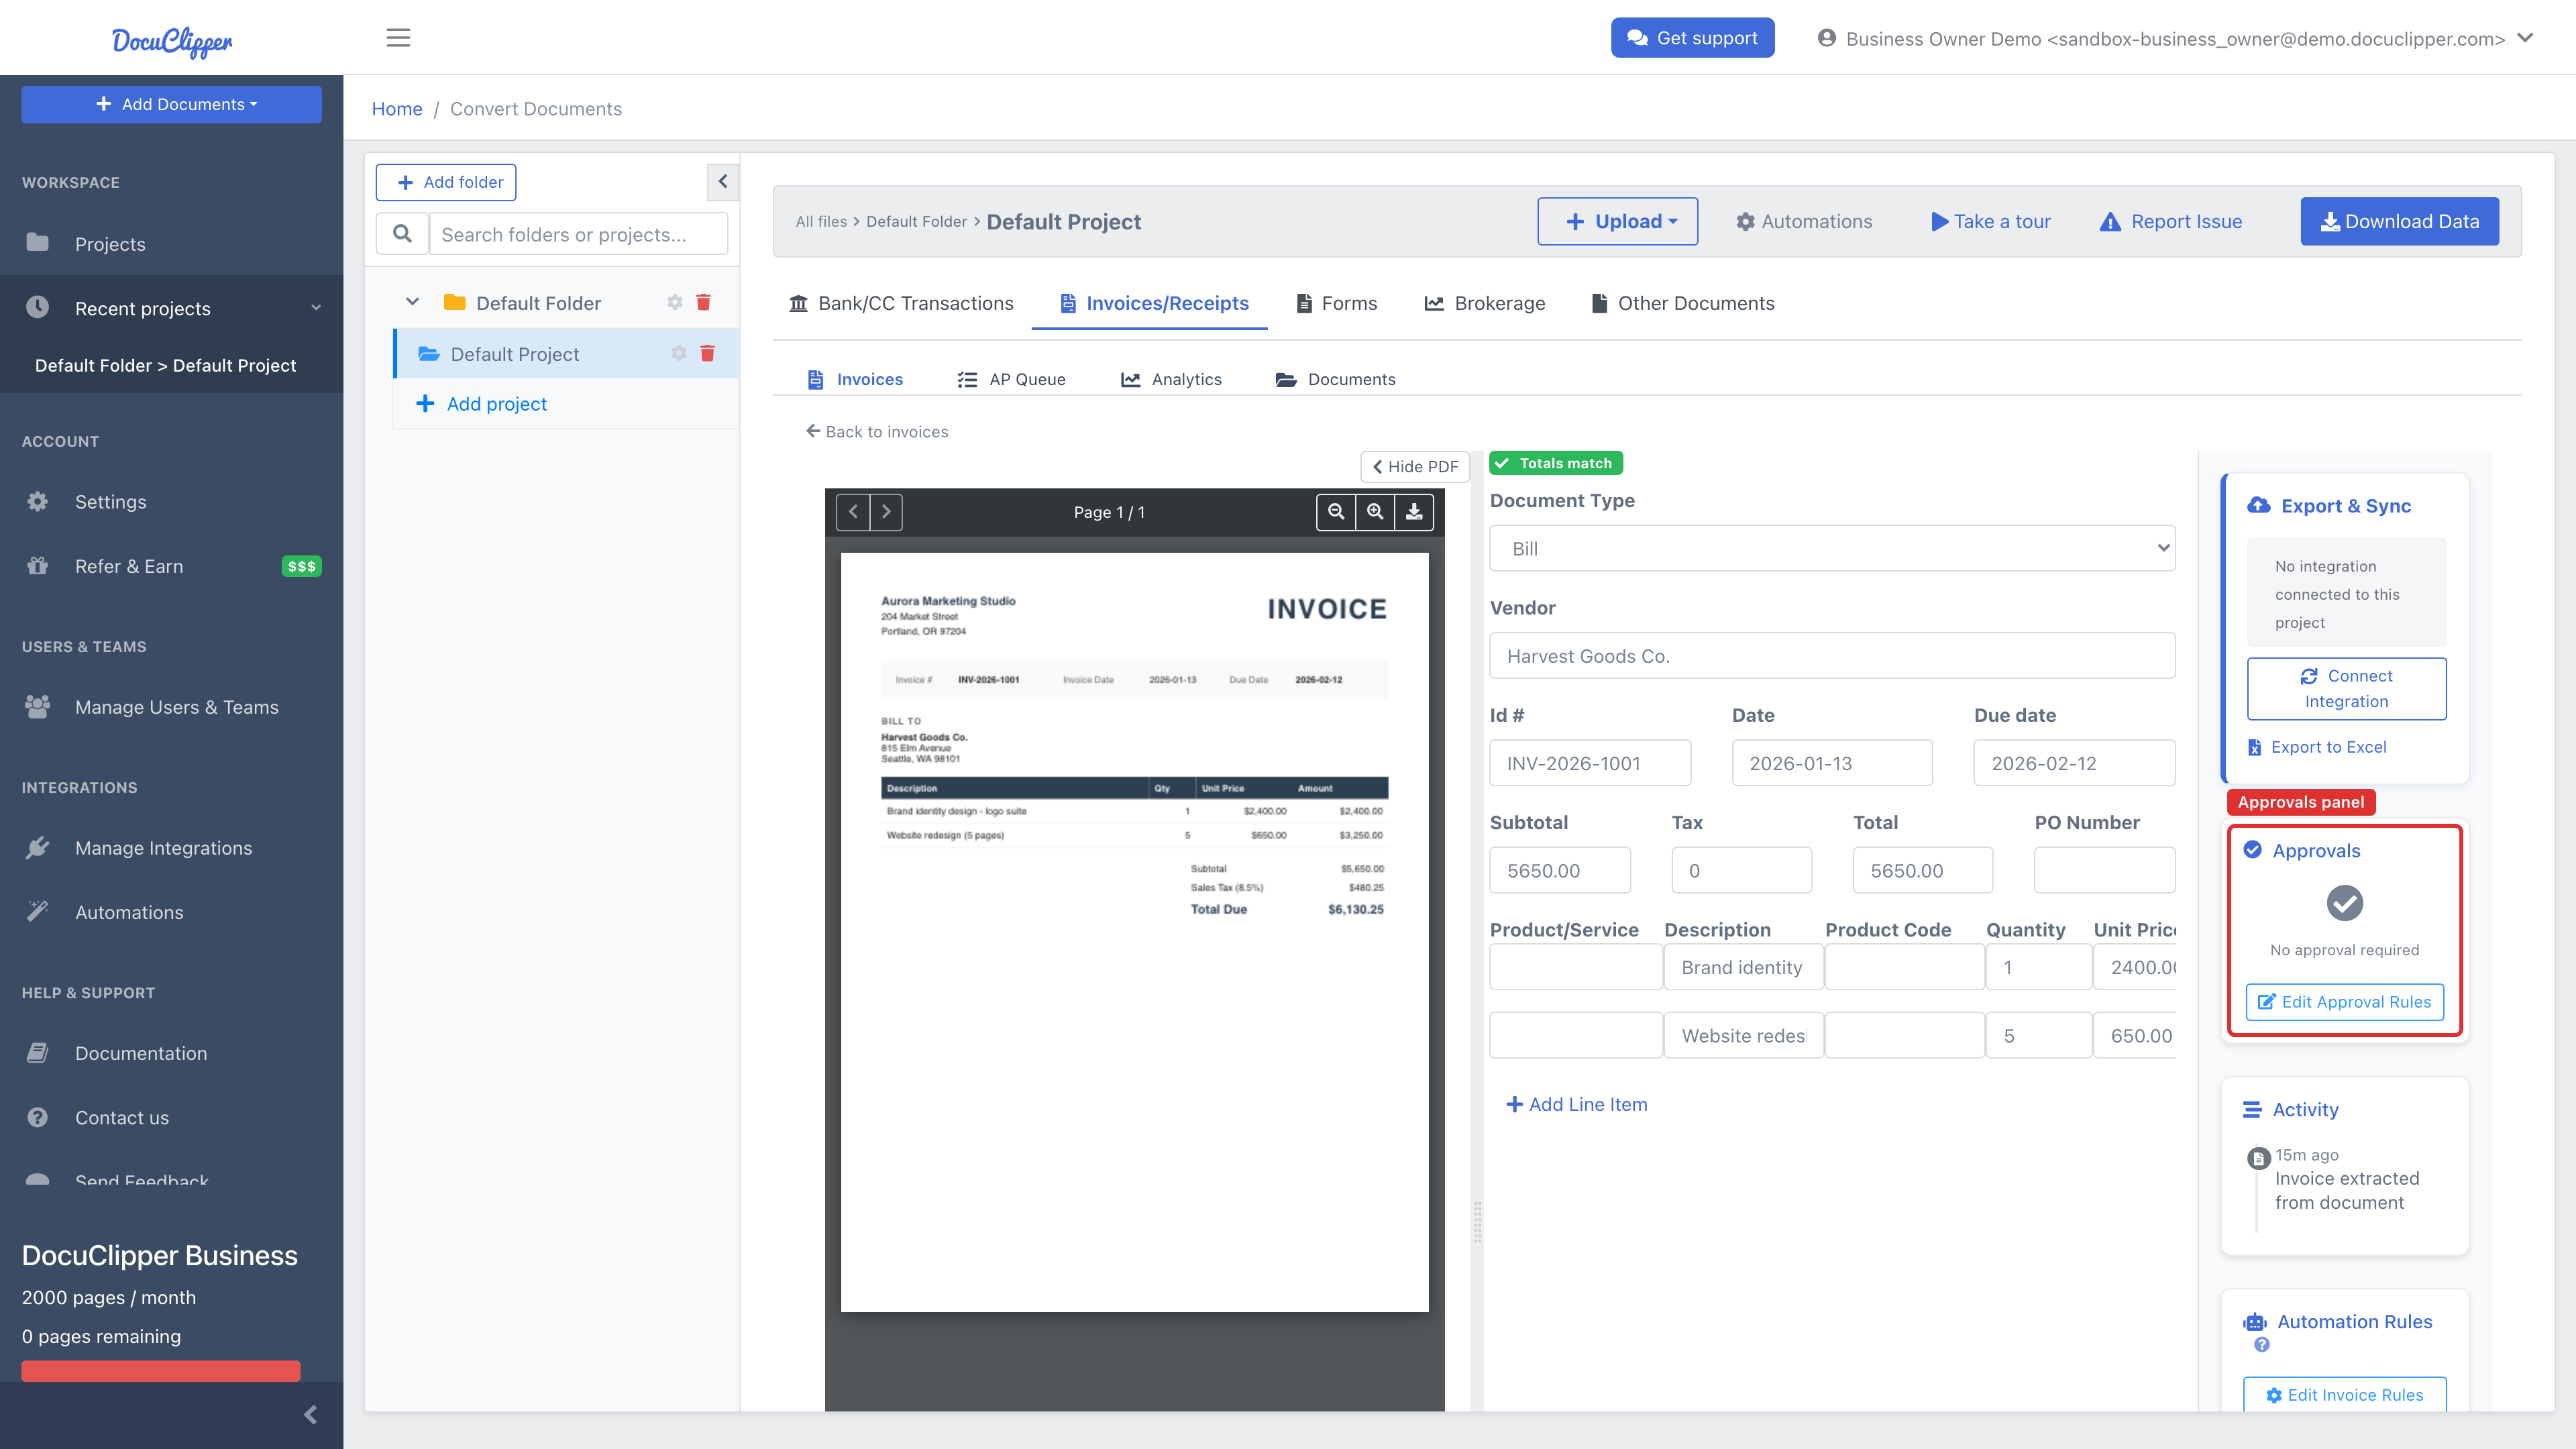
- In the right-hand Approvals panel, review the invoice.
- When the invoice is ready (fields and document type are correct), click Submit for Approval.
- DocuClipper evaluates your approval rules and notifies the required approvers. The status becomes pending until the rule’s requirements are met.
Approving or rejecting an invoice
If you are an approver for an invoice (based on the rules):
- Open the invoice. To find invoices waiting on you, use the Needs approval preset on the invoices list, or filter the Approval column to Pending.
- In the Approvals panel you’ll see the current status, a progress bar, and an Approvers list showing each required approver, their status, and which rule assigned them.
- Optionally type an Approval comment.
- Click Approve or Reject.
- When multiple approvers are required, the invoice stays pending until the rule’s requirements are met — every approver approves, or any one does, depending on the rule.
Resubmitting after a rejection
If an invoice is rejected, fix whatever caused it, then click Resubmit for Approval in the Approvals panel to start the workflow again.
Viewing approval history
In the Approvals panel, open history to see past actions: who submitted, who approved or rejected, any comments, and when. Useful for auditing and follow-up.
Status and progress
- Pending – Waiting for one or more approvers.
- Approved – The rule’s approval requirements were met.
- Rejected – An approver rejected the invoice (it can be resubmitted).
- The progress bar and Approvers list show how many of the required approvers have acted.
Setting up approval rules
Approval rules automatically route invoices to specific approvers based on customizable conditions. They’re managed per contract. Open any invoice, then in the Approvals panel on the right click Edit Approval Rules to add, edit, enable, or disable them.
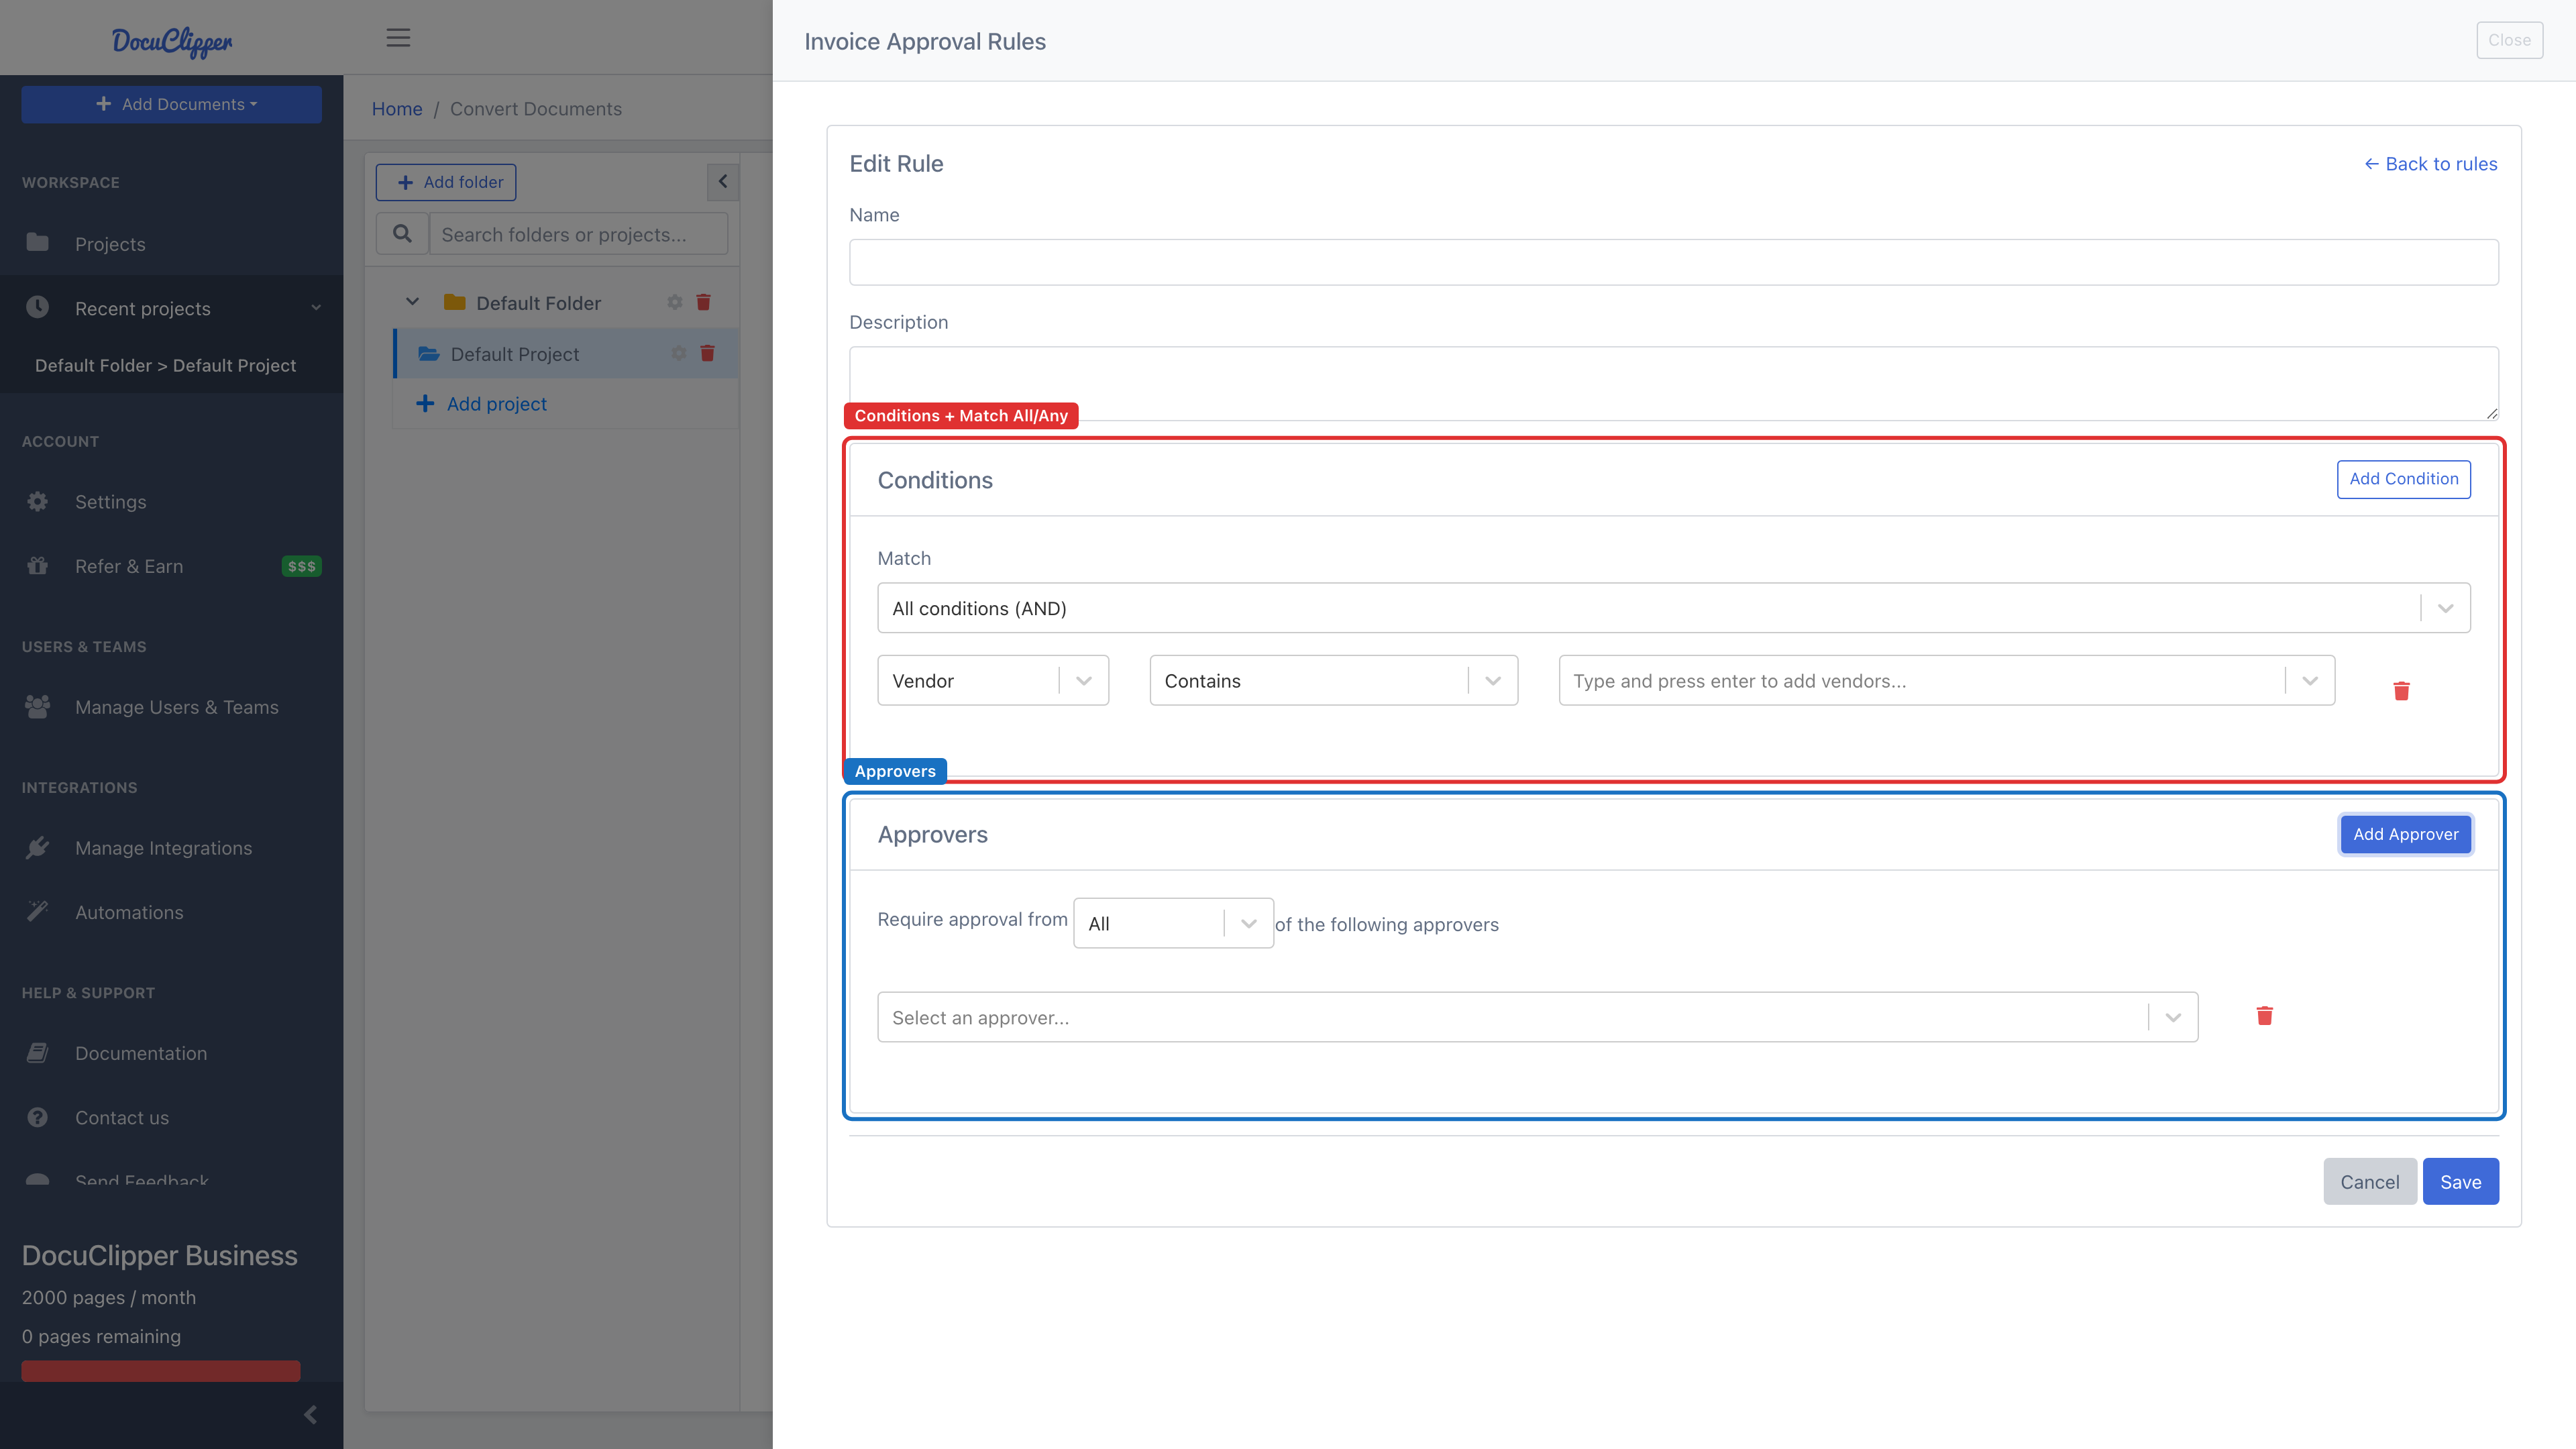
Each approval rule has three parts: conditions (when the rule applies), approvers (who must sign off), and operators (how conditions and approvers are combined).
Conditions
You can set conditions on any of these fields:
- Vendor – Match vendor names or keywords.
- Customer – Match customer names (for receivables / sales invoices).
- Amount – Compare invoice totals (greater than, greater than or equal, less than, less than or equal, equals, not equals).
- Account – Match the payment account.
- Category – Match invoice categories.
- Description – Search for specific terms in the invoice description.
Text fields (Vendor, Customer, Account, Category, Description) use contains any, does not contain any, equals, or not equals. Amount uses the numeric comparisons above. (Unlike invoice categorization rules, approval rules can also match on Amount and use these numeric operators.)
Combine multiple conditions with:
- Match All (AND) – All conditions must be true.
- Match Any (OR) – At least one condition must be true.
For example, a rule could trigger when Amount is greater than $10,000 AND Vendor contains “AWS” or “Amazon”.
Approvers
Approvers can be:
- Individual users – Specific people with system access.
- Teams – Groups of users managed through team settings.
Combine multiple approvers with:
- Require All (AND) – Every listed approver must approve.
- Require Any (OR) – Approval from any listed approver is sufficient.
You can also store a default approver (or a default approval rule) directly on a vendor in the vendor master, so that vendor’s bills route the right way without adding a separate rule for it.
How rules are processed
When an invoice is submitted:
- The system evaluates all active rules.
- If a rule’s conditions match, its approvers are notified by email and the invoice is marked pending.
- The invoice remains pending until the required approvals are received.
- Multiple rules can apply to the same invoice.
- If no rule matches, the invoice is auto-approved (nothing to route).
- A single rejection is final — one approver rejecting sets the invoice to Rejected.
Once an invoice is fully approved, DocuClipper syncs it to your connected QuickBooks or Xero company automatically.
Managing rules
- Rules can be enabled or disabled without deletion.
- Rules are evaluated in real time; changes don’t affect already-submitted invoices.
- Deleted rules are removed from future processing but don’t affect historical data.
Example scenarios
- High-value purchases — IF amount > $50,000 THEN require approval from Finance Director AND Department Head.
- IT spend — IF category contains “Hardware” OR “Software” AND amount > $5,000 THEN require approval from IT Manager OR CTO.
- Strategic vendor — IF vendor contains “Strategic Partner Inc” THEN require approval from any Procurement Team member.
Best practices
- Start with broader rules and add more specific ones as needed.
- Use descriptive names and descriptions for rules.
- Review and update rules periodically.
- Test new rules with sample invoices before activating.
- Consider team-based approvals for better coverage during absences.
Related articles
- The AP queue (invoice workflow)
- Setting up invoice rules – Automatic categorization rules (separate from approval rules).
- Adding, removing, and reactivating users – So the right people can be assigned as approvers.