
Editing Invoice Data
Edit extracted invoice fields, change document type, manage line items, and run invoice rules on the invoice detail page in DocuClipper.
Last updated
Overview
After DocuClipper extracts data from an invoice or receipt PDF, you can edit the extracted fields, change the document type, add or remove line items, and run invoice rules to auto-fill categories or products. This article describes how to edit invoice data on the invoice detail page.
Opening the invoice detail page
From the Invoices list, click a row to open that invoice. The PDF sits on the left and the editable form on the right, under an Export & Sync bar and a row of tabs - Details, Matching, Approvals, Activity, and Rules. The form itself runs document type, vendor/customer and the header fields, then a Line Items section.
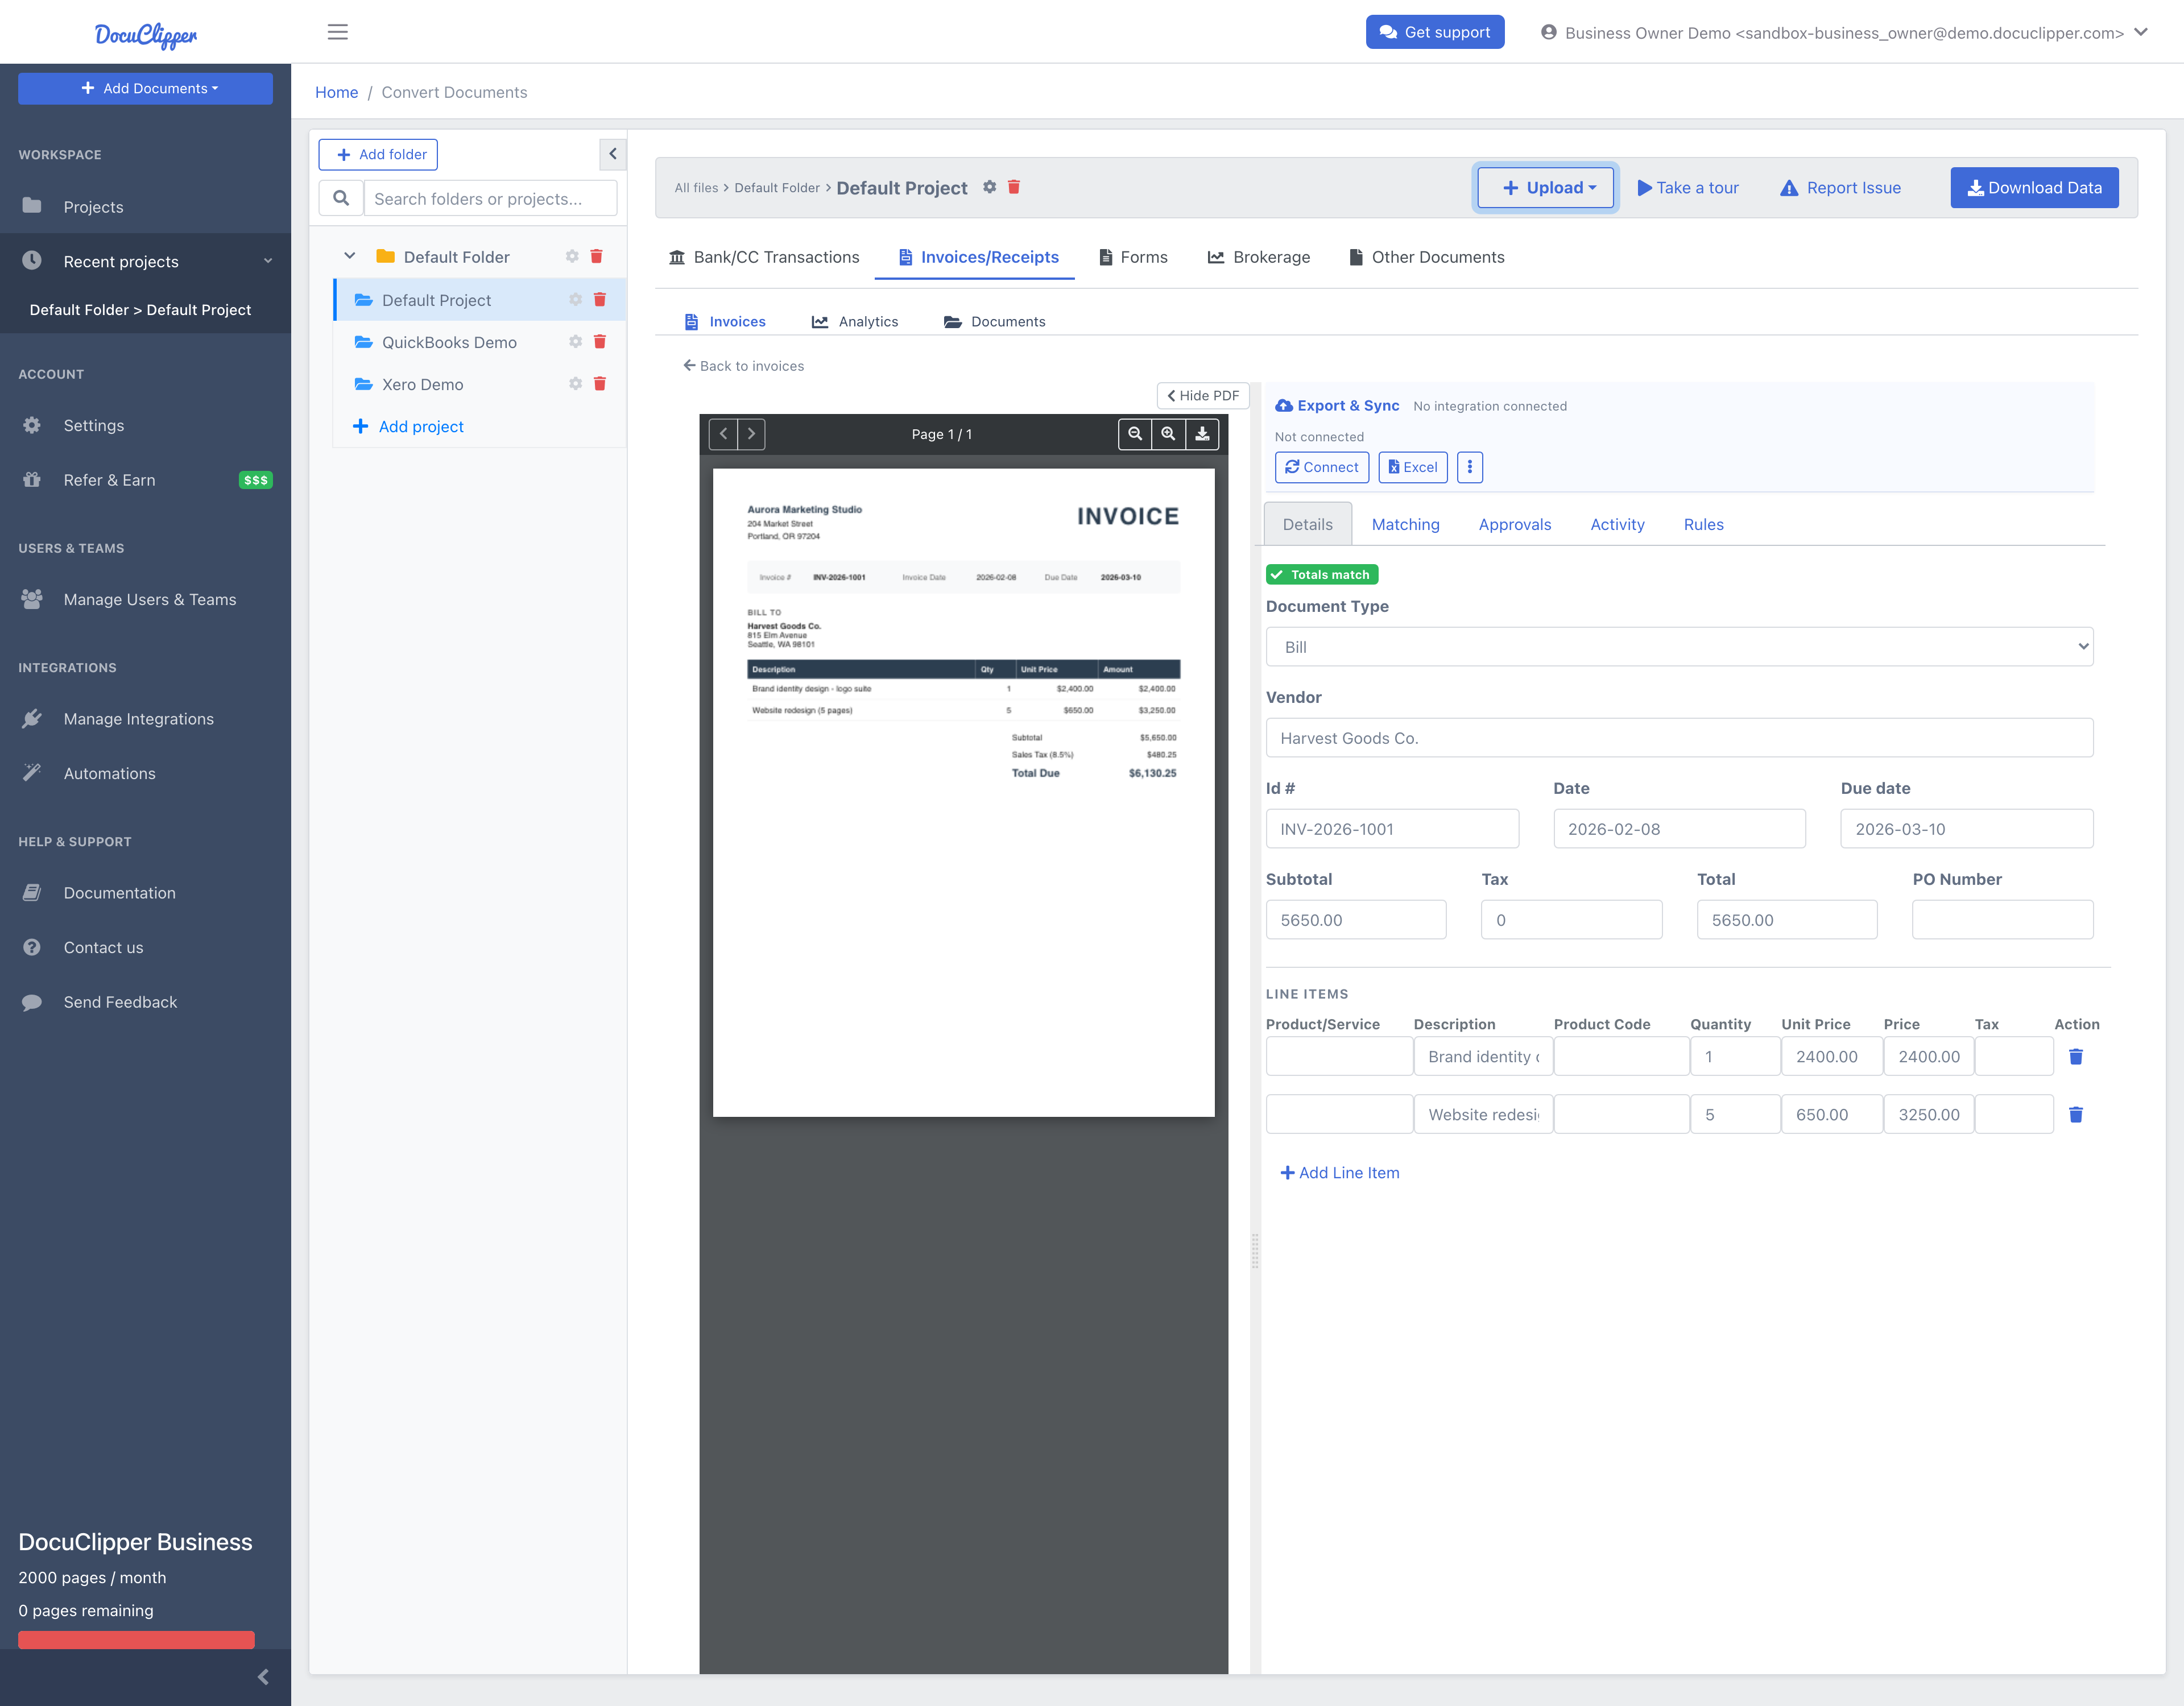
Document type
At the top of the form, Document Type tells DocuClipper how to treat the invoice when exporting:
- For QuickBooks: Bill or Expense (payables), or Invoice (receivables).
- For Xero: Bill (ACCPAY) or Sales Invoice (ACCREC).
- For Excel: Bills/Payables or Invoices/Receipts.
Changing document type can change which fields are shown (e.g. Vendor vs Customer) and may trigger invoice rules to run again (e.g. to set categories or products).
Vendor and customer
Edit the Vendor (for bills/expenses/payables) or Customer (for invoices/receivables) as needed. You can type a new name and, when exporting to QuickBooks or Xero, create a new vendor/customer in the accounting app if it doesn’t exist.
Header fields
Depending on document type and export target, you can edit fields such as:
- Invoice number
- Invoice date
- Due date
- Total / currency
Click in the field and change the value. Changes are saved as you go.
The Export & Sync panel tells you when an invoice is missing something an export needs, whether or not you have connected QuickBooks or Xero. With no integration connected, it shows an amber Missing Fields badge beside "No integration connected", followed by the list, for example Missing: Vendor, Date, Invoice #, Total. These fields appear in every Excel, CSV, and IIF export, so fill them in before you download. Line categories are only listed when QuickBooks or Xero is connected, because only those systems require one.
If QuickBooks or Xero is blocking an invoice because its lines have no category, the panel suggests setting a default category once under Project settings → Invoices. That single setting covers every uncategorized line in the project, so you don't have to code each line by hand.
When the project is connected to QuickBooks or Xero, an edit to an already-synced invoice re-syncs automatically - DocuClipper updates the existing record by id, so editing never creates a duplicate. One exception: if the invoice's totals don't add up, automatic sync is paused and the Export & Sync panel shows an "automatic sync is paused" notice with a Sync anyway button, so you can push it if the reconciliation check is wrong. See QuickBooks & Xero two-way sync.
Line items
Line items are the individual rows on the invoice (description, quantity, rate, amount, and for payables often a category, or for receivables a product/service).
- Edit – Click a line to edit description, amount, category, or product/service. Changes persist to the invoice as you go.
- Add line item – Click Add Line Item to add a new row.
- Delete line item – Remove a line you don’t need (you can’t delete the last remaining line).
For QuickBooks/Xero, line items usually need a category (expense/bill) or product/service (invoice) before syncing.
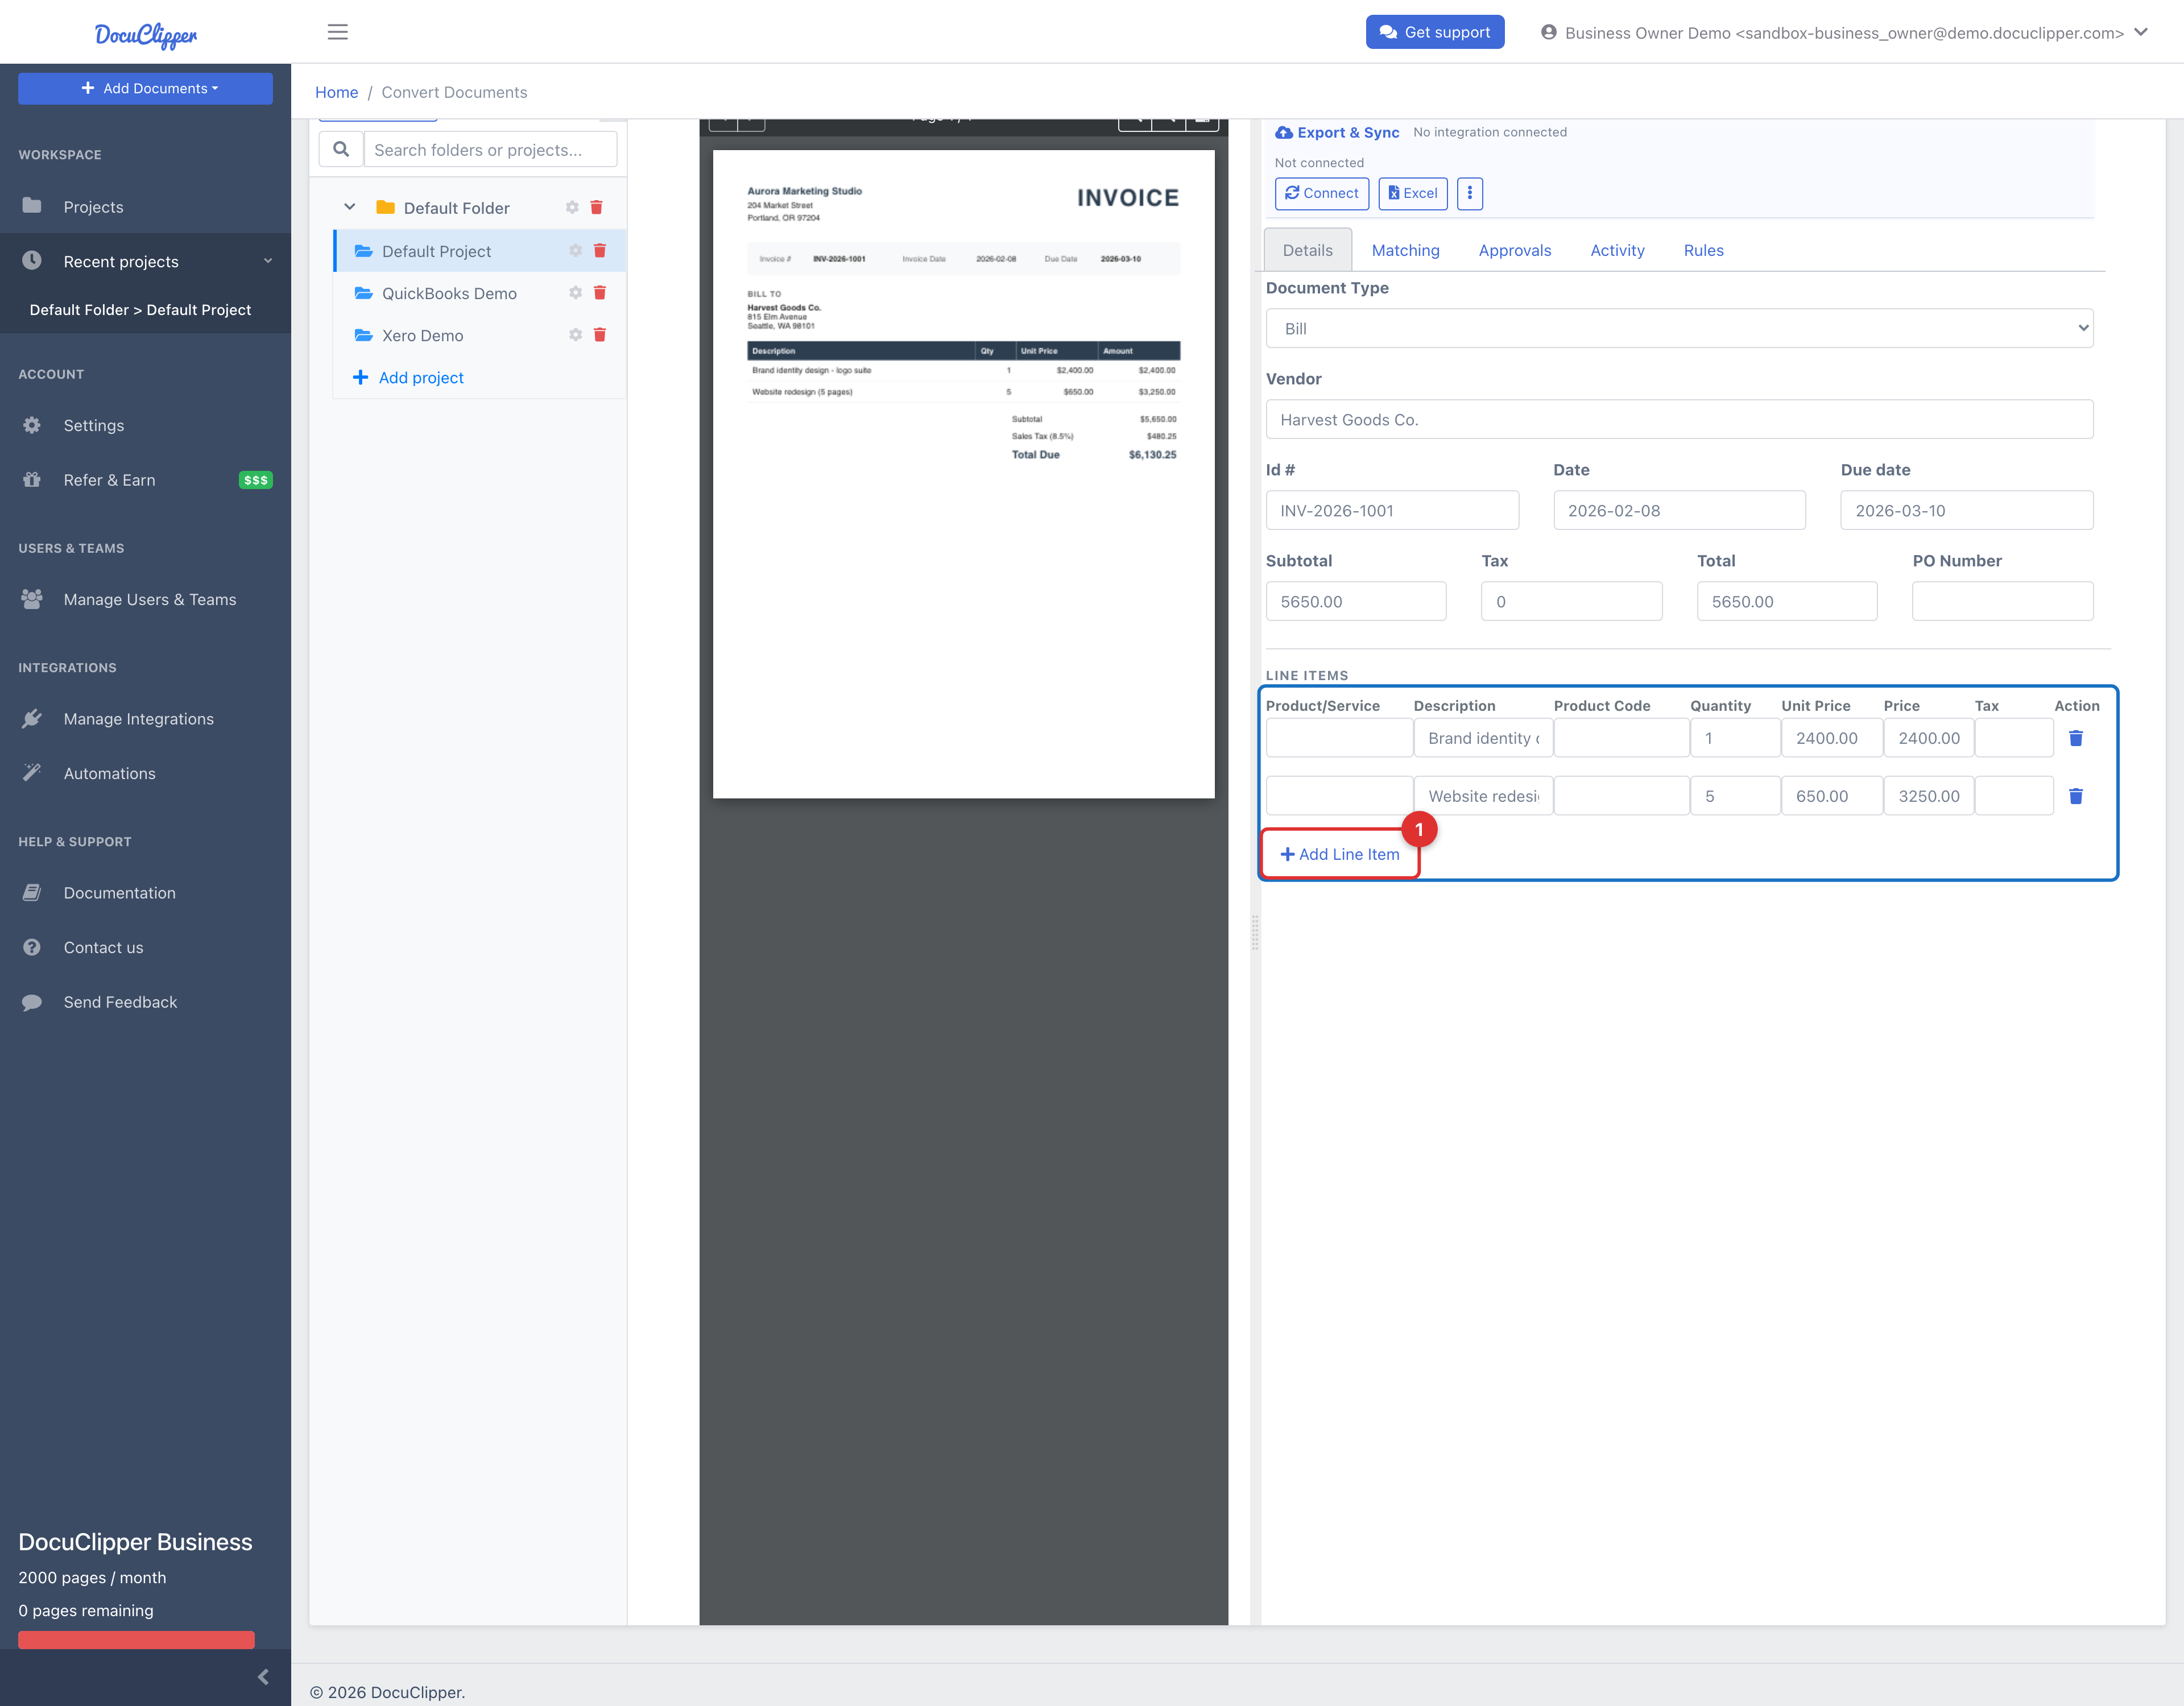
Coding bills to Products & Services instead of Categories
A QuickBooks sales invoice always codes its lines to a Product/Service - that's the only thing QuickBooks accepts on an invoice line. A bill can go either way, so DocuClipper lets you choose. Next to the Line Items heading you'll see:
Map to: ( ) Category ( ) Product/Service
- Category (the default) posts each line to an expense account - QuickBooks calls this the Category details section of a bill.
- Product/Service posts each line to an item from your Products & Services list - QuickBooks calls this Item details. This is what you want if you track construction cost codes, job-costing codes, or parts as items rather than as expense accounts.
The setting is per project, not per invoice: switch it once and every bill in that project uses it, including future ones. Purchase orders follow the same setting.
The QuickBooks setup this requires
QuickBooks will only accept an item on a bill if that item is marked for purchase. In QuickBooks, open the product or service and tick "I purchase this product/service from a vendor", which assigns it an expense account. Items set up for sales only have no expense account, and QuickBooks rejects the whole bill with:
Business Validation Error: There is no account associated with the item "{name}". Is it marked for purchase, and has an account associated with it?
DocuClipper only offers purchasable items in the Product/Service dropdown on a bill, so if your cost codes don't appear there, that checkbox is the reason. Tick it in QuickBooks and they show up immediately - nothing to re-sync on the DocuClipper side.
Apply a value to all line items (bulk-apply)
Multi-line invoices often need the same category, product/service, or tax code on every row. After you set one of these on a single line, DocuClipper shows an Apply to all line items prompt - click it to copy that value to every line at once instead of editing them one by one. You can do this per export target (QuickBooks, Xero, or Excel), and it only touches the classification field you applied, leaving descriptions and amounts alone.
If the invoice has already been synced, the bulk-apply pushes the updated classification back to QuickBooks or Xero automatically - see QuickBooks & Xero two-way sync.
Invoice rules (Automation Rules)
Invoice rules automatically set category (for bills/expenses) or product/service (for invoices) based on vendor, customer, or line description.
- In the Automation Rules panel of the sidebar, click Edit Invoice Rules to open the rules editor: add conditions (e.g. Vendor contains “X”) and set the category or product/service to apply.
- After saving rules, they can run when you change document type or when you trigger “Run rules” (if the UI offers it). Rules apply to the current invoice (and often to new invoices as they are processed).
See Setting up invoice rules for full details.
Bulk actions across invoices
Some actions are faster from the Invoices list than one invoice at a time. Select multiple invoices with the row checkboxes, then:
- Bulk approve / reject – Set the approval status on every selected invoice in one step (with an optional comment). Approving in bulk respects the approval workflow - you must be an approver for the invoices you act on.
- Bulk delete – Remove several invoices (or imported rows) at once.
What to do next
After editing:
- Sync to QuickBooks or Xero – When the project is connected, approved invoices sync automatically and your edits re-sync by id - there's no separate "Import" step to click. The Export & Sync panel shows the current state (Synced, Error, Missing Fields, or Not Synced) and offers Sync anyway if a totals check paused it (see How to import invoices and receipts into QuickBooks Online and Export invoices to Xero).
- Export to Excel – Choose Export to → Excel and click Download (see How to convert invoice and receipts to Excel).
- Match to bank transactions – Use Match to Bank Transactions in the sidebar (see Invoice to bank transaction matching guide).
- Match to purchase order – Use the PO matching option in the sidebar (see Invoice to purchase order matching guide).
- Submit for approval – Use the Approvals section (see Invoice approval workflow).
FAQs
Do I have to save my edits?
No. Changes to the header fields are saved as you go.
Will editing a synced invoice create a duplicate in QuickBooks or Xero?
No. DocuClipper updates the existing record by id, so an edit re-syncs in place. See QuickBooks & Xero two-way sync.
Why does the Export & Sync panel say automatic sync is paused?
The invoice's totals don't add up, so DocuClipper holds the sync rather than pushing figures that don't reconcile. If the check is wrong, use Sync anyway to push it regardless.
What does Document Type change?
How the invoice is treated on export - Bill or Expense versus Invoice for QuickBooks, Bill (ACCPAY) versus Sales Invoice (ACCREC) for Xero. It also changes which fields appear (Vendor versus Customer) and can re-run invoice rules.
Can I create a new vendor in my accounting system from here?
Yes. Type a new vendor or customer name, and when you export to QuickBooks or Xero it can be created there if it doesn't already exist.
What are the tabs on the invoice detail page?
Details (the extracted fields), Matching (POs and bank transactions), Approvals, Activity, and Rules.
Related articles
- Using the Invoices list – Tabs, columns, and opening an invoice.
- Setting up invoice rules – Automate categories and products.
- Downloading invoices and receipts – Bulk download and custom columns.