
Categorize Invoice Line Items with Your QuickBooks Desktop Accounts
Save your QuickBooks Desktop Chart of Accounts once and DocuClipper codes every invoice line item to the right expense account automatically, gives you a dropdown of your real accounts in the invoice editor, and carries the account through to the IIF file.
Last updated
If you process supplier invoices for QuickBooks Desktop, the slow part is rarely the extraction — it is deciding which expense account every line belongs to, then retyping those account names one line at a time.
DocuClipper can do that for you. Save your QuickBooks Desktop Chart of Accounts once per project and DocuClipper will:
- Code each invoice line item automatically to the right account, by matching the line's description against keywords you attach to your accounts.
- Turn the Category field in the invoice editor into a dropdown of your real QuickBooks accounts, so corrections are a pick from a list instead of retyped text.
- Carry the account through to the IIF file, so each line posts to the account you chose when you import into QuickBooks.
You can save your vendor and customer lists the same way, which turns the Vendor field into a dropdown of your real QuickBooks names too — see Import your QuickBooks Desktop vendors and customers.
This is the same categorization engine that codes bank statement transactions — within a project, the same categories, the same keywords, the same screen for managing them. The only difference is what gets matched: for a bank statement it is the transaction description, for an invoice it is the line item's description.
One thing to know up front: saving your Chart of Accounts creates the categories, but it does not code anything on its own. DocuClipper categorizes by matching text, so an account only starts coding lines once you give it keywords. There is no AI guessing accounts for you.
Before you start
- A DocuClipper project with at least one extracted invoice or receipt.
- Your QuickBooks Desktop Chart of Accounts. If you have not exported it yet, see How to export your Chart of Accounts from QuickBooks Desktop.
- The project must not be connected to QuickBooks Online or Xero. Connected projects read their categories live from that provider instead — see When this does not apply below.
Step 1. Save your Chart of Accounts
- Open your project, open Project Settings, and click the QuickBooks Desktop tab.
- Under Import from QuickBooks Desktop at the top, upload the
.iiffile from File → Utilities → Export → Lists to IIF Files and click Import lists. If you ticked Vendor List and Customer List in QuickBooks, the same upload fills those too — see Import your QuickBooks Desktop vendors and customers. - To save the chart on its own instead, use the QuickBooks Desktop: Chart of Accounts section below: paste the
!ACCNTblock, or one account name per line, and click Save Chart of Accounts.
DocuClipper creates a categorization group named QuickBooks Desktop Accounts with one category per account. You only do this once per project, and again whenever your Chart of Accounts changes in QuickBooks.
The chart belongs to the project. If you run several QuickBooks company files, give each one its own project: the categories offered on an invoice are that project's accounts only, so one client's chart never appears on another client's invoice. What you teach the categories — the keywords in the next step — is reusable, so an account name that exists in two clients' charts keeps the keywords you already gave it.
Step 2. Add keywords to the accounts you want coded automatically
Open any invoice and click Edit categories, above the line items on the right. (If the project has no categories yet the button reads Set up categories.) You can also reach the same editor from Categorize → Edit Categories — it is one set of categories either way, shared with this project's bank statements.

Every account from your chart is listed as a category, with no keywords yet.
For each account you want DocuClipper to assign on its own, add the words that appear on your invoice lines:
| Account | Include keywords |
|---|---|
| Fish Department COGS | salmon, tilapia, shrimp |
| Produce COGS | romaine, tomato, avocado |
| Deli COGS | prosciutto, salami |
A line is coded to an account when its description contains any of that account's keywords. Use Exclude keywords on the same row when a word would otherwise pull the wrong lines in.
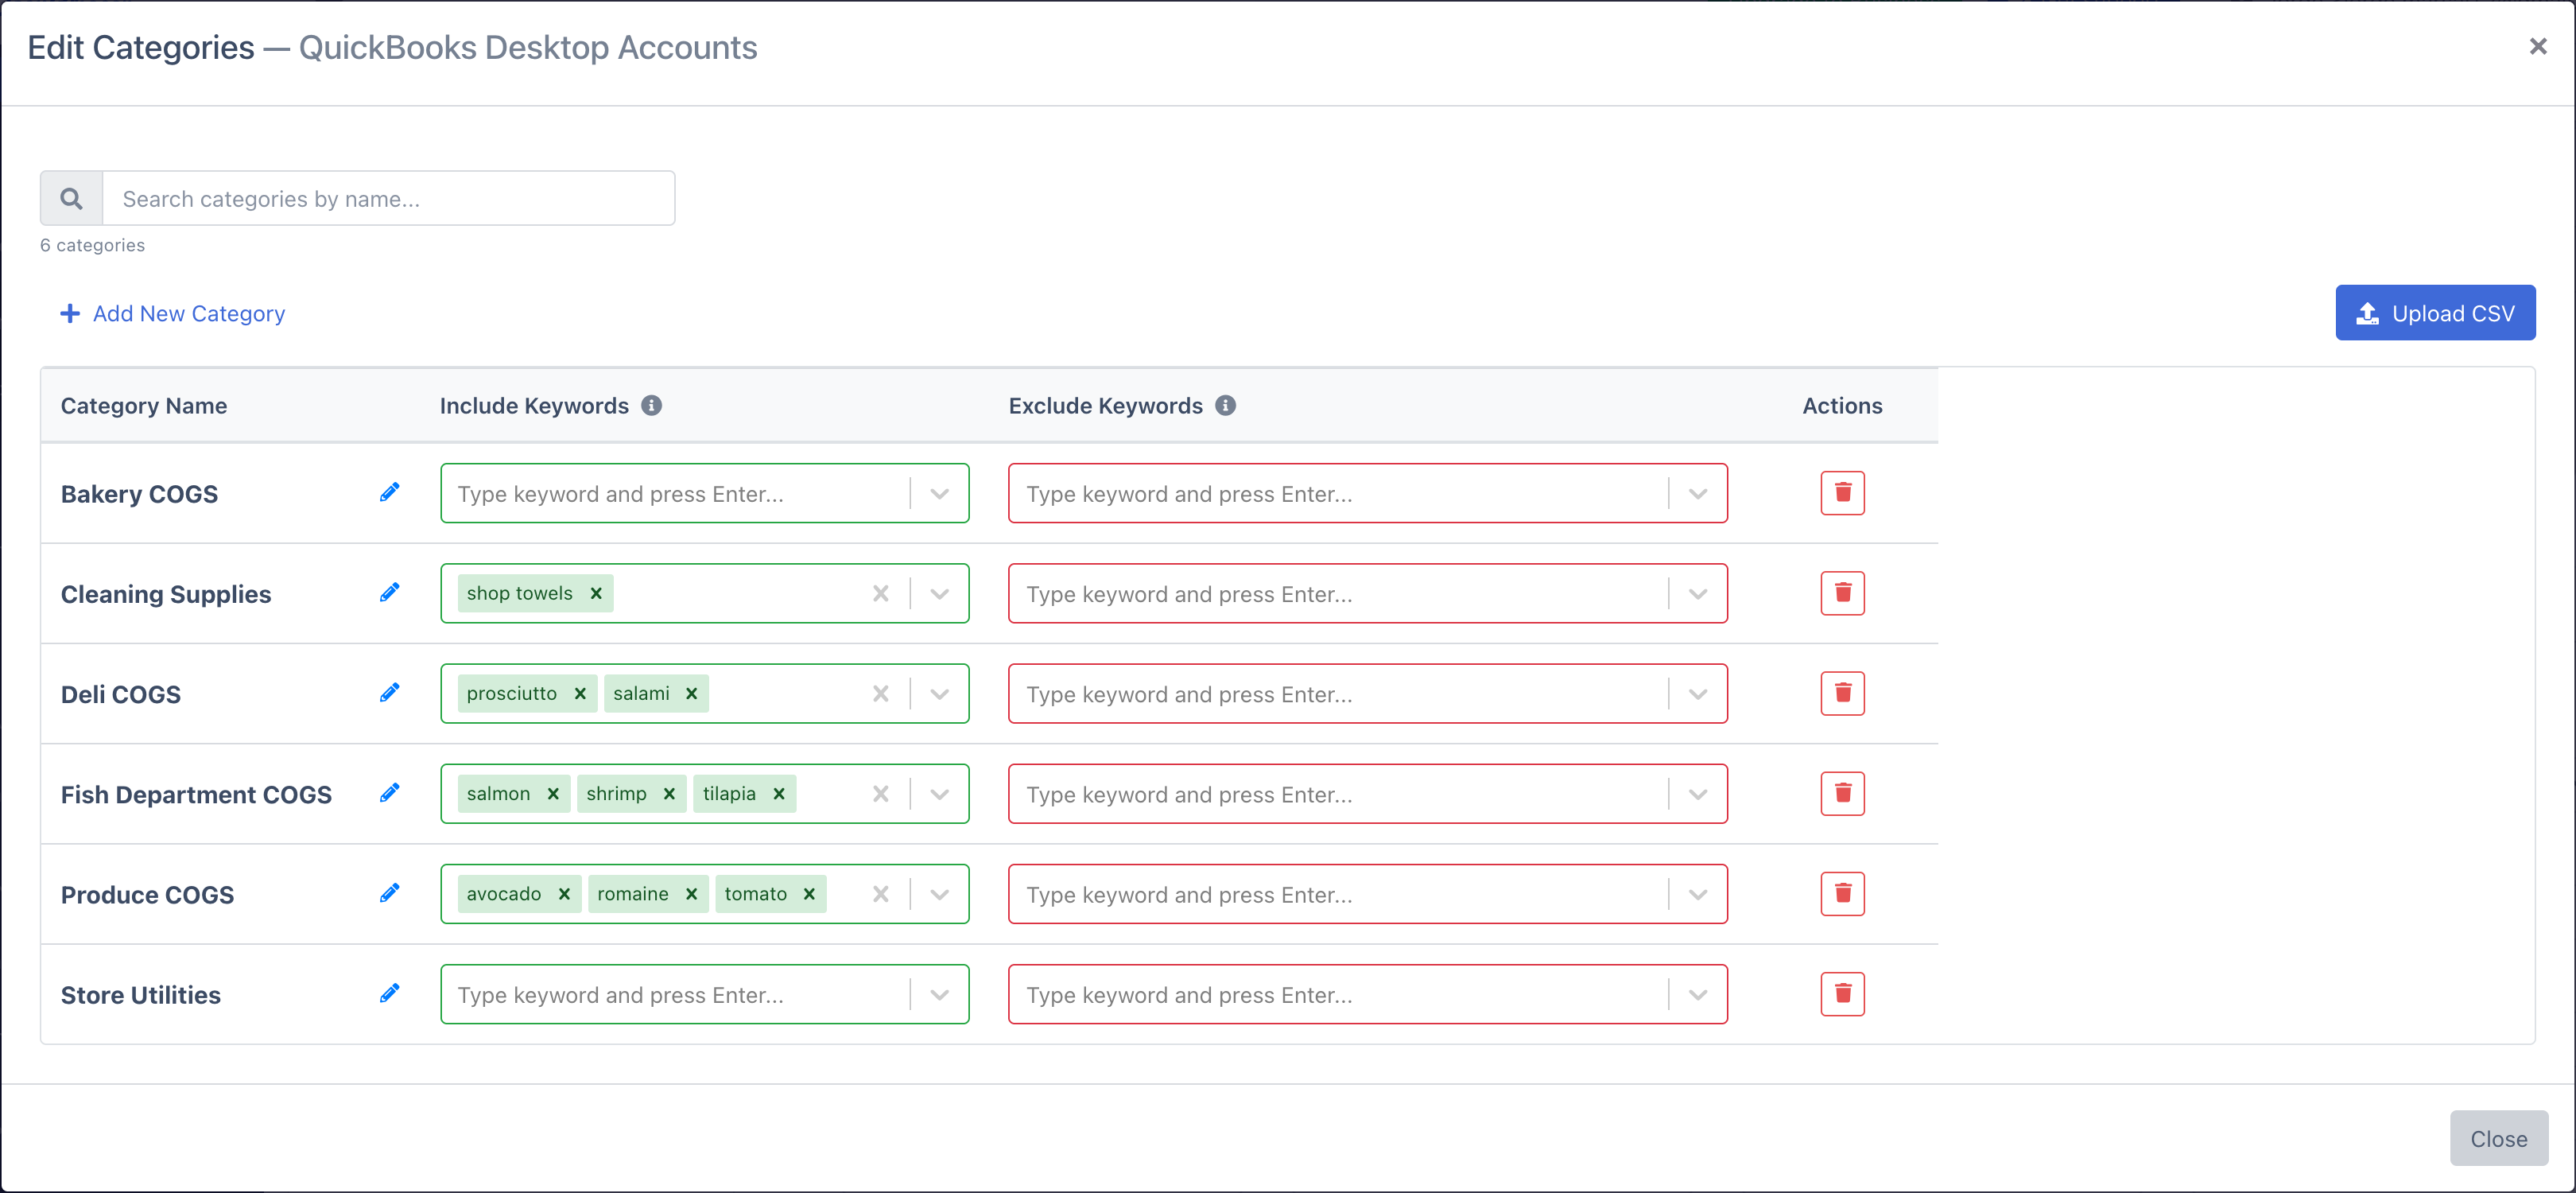
You do not have to do every account. Anything without keywords simply stays available in the dropdown for you to pick by hand.
When you close the editor, DocuClipper re-codes the invoice you came from straight away, so you can see the effect of a keyword without re-uploading anything. Lines you set by hand are never overwritten.
When two accounts both match, the more specific keyword wins — a line reading ATLANTIC SALMON FILLET goes to the account matching atlantic salmon rather than one matching just a. The winner does not change between runs.
Step 3. Upload your invoices
Upload and extract as usual. When extraction finishes, DocuClipper codes every line item it can, and the invoice editor shows the account on each line with an Automated Rule badge.
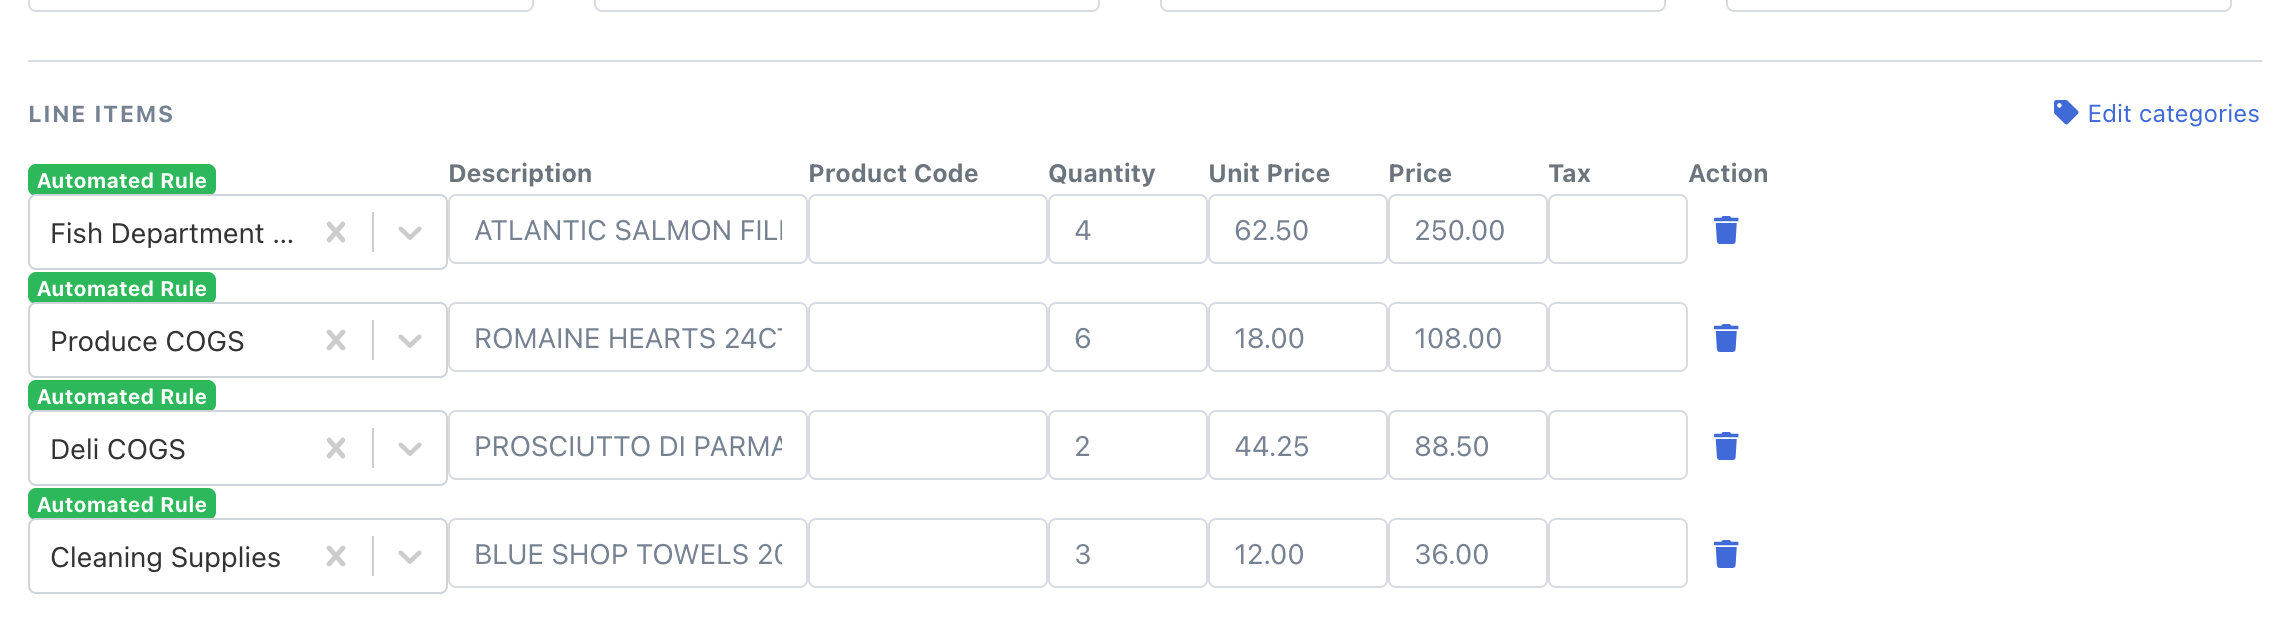
Lines that match nothing are left blank rather than guessed at, so a blank category always means "no keyword matched this line", never "DocuClipper picked something for you".
Step 4. Review and correct in the editor
Open any invoice. The Category column on each line item is now a dropdown listing your saved accounts.
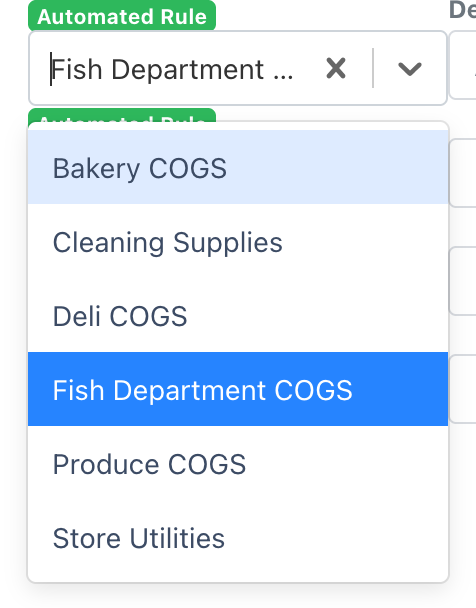
- Pick a different account from the list to override what was assigned.
- Start typing to filter a long chart of accounts.
- You can still type an account that is not in the list — the field accepts free text so nothing is blocked.
- Use Apply to all line items when one invoice books entirely to a single account.
Because the dropdown offers your real account names, corrections cannot introduce the spelling mistakes that cause Account Name does not exist on import.
Step 5. Export the IIF
Export as normal — see Import Invoices into QuickBooks Desktop (IIF). Each line item posts to the account shown on it in the editor, and DocuClipper checks every account name against your saved chart before you download, listing any that would not match.
Categories or rules — which to use
DocuClipper can code a line two ways, and they answer different questions.
| Matches on | Use it when | |
|---|---|---|
| Categories + keywords | What the line says — its description | The same words keep appearing across many suppliers: salmon, romaine, toner, freight |
| Invoice rules | Who the invoice is from — the vendor | A supplier always books the same way regardless of wording: "everything from Seabra Foods goes to Grocery COGS" |
Most people end up using both. Keywords do the broad work across your whole vendor list; rules handle the suppliers that are an exception to it. Rules can also set things a category cannot — a tax code, or a QuickBooks Online product/service.
Rules can also tidy the vendor name itself, which matters more for
QuickBooks Desktop than anywhere else: the name is what lands in the IIF, and
QuickBooks matches suppliers by name and creates a new record for any name it
does not already have. So an invoice extracted as SEABRA FOODS DISTRIB INC one
month and Seabra Foods Distribution the next quietly becomes two suppliers in
your books. A rule of "when the vendor contains Seabra → Seabra Foods
Distribution" keeps every export pointing at the one record you already use.
A rule can also be written against a line's description, which overlaps with keywords. If that is all your rule does, a keyword is simpler to maintain: it lives next to the account it codes to, and you can see every keyword for an account in one row.
What takes precedence
When several things could set the same line's account, this is the order:
- What you typed or picked in the editor always wins.
- An invoice rule you created ("always code lines from this vendor to this account") wins over automatic categorization. See Setting up invoice rules.
- Chart of Accounts categorization fills in whatever is still blank.
So adding a Chart of Accounts never changes coding you already did by hand or by rule — it only fills the gaps.
When this does not apply
- Projects connected to QuickBooks Online or Xero. Those read their account list live from the provider and code lines by the provider's internal account id, which is what keeps two-way sync working. The category dropdown there already comes from your connected company.
- Sales invoices (receivables). Line items on customer-facing invoices carry a product or service rather than an expense account.
- Documents not filed in a project. The Chart of Accounts is a project setting, so a document that was never assigned to a project has no chart to read. Move it into a project and it will code on the next run.
Troubleshooting
Nothing was categorized. The most common cause is accounts with no keywords — saving the chart creates the categories but does not fill them in. Open Edit Categories and confirm the accounts you expect have keywords on them.
Some lines were categorized and others were not. That is the expected result when only some line descriptions contain your keywords. Add the missing words to the relevant account, or set those lines by hand from the dropdown.
The category field is still a plain text box. That means the project has no Chart of Accounts saved and no category group chosen, or the document is not in a project. Save the chart under Project Settings → QuickBooks Desktop, or pick a group from Set up categories above the line items.
I want to use my own categories instead of my Chart of Accounts. Open Edit categories and pick a different group from the Group dropdown, or create one. The choice is saved on the project, so everyone working that project gets it.
A line went to the wrong account. Two accounts probably share a keyword. Either make the keyword more specific on the account you want, or add the conflicting word to the other account's Exclude keywords.
The dropdown is not offering an account I expect. The dropdown lists the chart saved on the project the document is filed in. Check the document is in the right project, and that the account is in that project's chart under Project Settings → QuickBooks Desktop.