
Import Bank Statement Transactions into NetSuite
Download PDF bank and credit card statements from DocuClipper as a NetSuite bank statement CSV, one file per account, and import them into NetSuite to match and reconcile.
Last updated
To get a PDF bank or credit card statement into NetSuite, convert it in DocuClipper, choose NetSuite as the Output Format in Download Data, and import the CSV with NetSuite's bank statement import into the matching bank or card account. DocuClipper writes the columns of NetSuite's CSV bank statement template, so there is nothing to rearrange.
DocuClipper does not connect to NetSuite directly. The hand-off is the CSV file, which you import into one NetSuite account at a time.
Before you start
- A DocuClipper project with the statement converted and reconciled. Check the reconciliation first: what you download is what NetSuite gets.
- In NetSuite, an account set up for bank statement imports with the CSV format, and a role that can import bank data. Your NetSuite administrator sets this up once per account.
Step 1: Download the NetSuite CSV
- Open the project that contains the statement.
- Above the transactions table, click Download Data.
- Under Output Format, choose NetSuite.
- Check the Columns line. The NetSuite file always has the same nine columns, listed below.
- If the project has more than one account (for example a checking account and a credit card), leave Download separate files for each account ticked. You get a zip with one CSV per account, so each file imports into its own NetSuite account. See DocuClipper exports data in a zip file.
- Click Download NetSuite CSV.
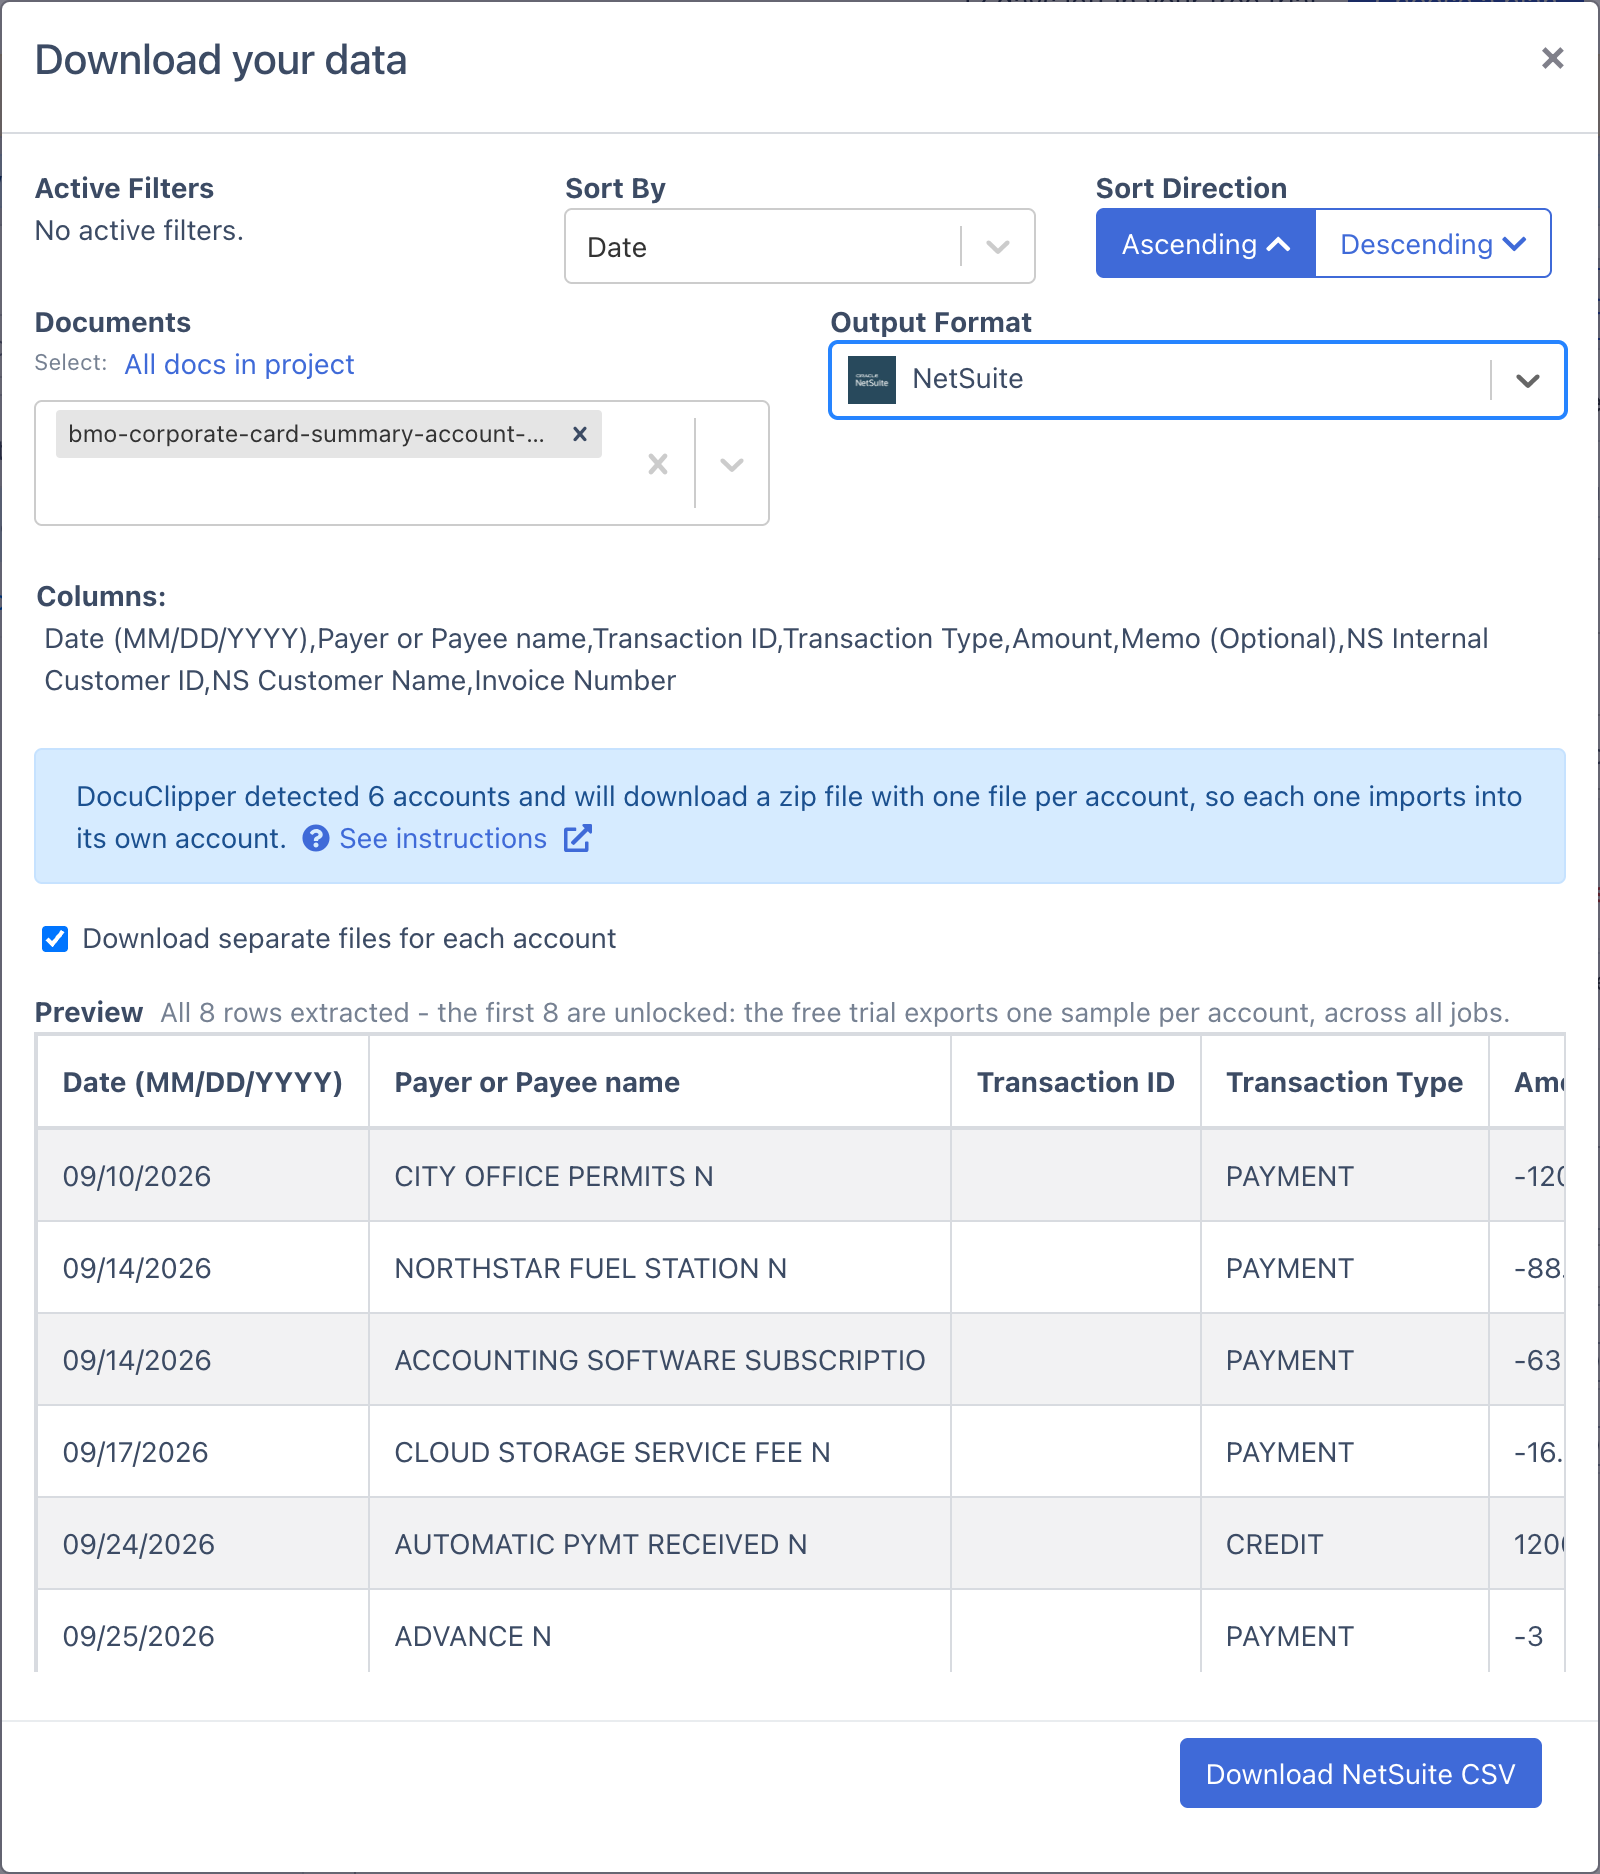
How the columns are filled
| Column | What DocuClipper writes |
|---|---|
Date (MM/DD/YYYY) | The transaction date, always as MM/DD/YYYY, whatever date format you use for other exports |
Payer or Payee name | A short payee name taken from the transaction description (up to 31 characters) |
Transaction ID | The check number, when the statement shows one; otherwise empty |
Transaction Type | CREDIT for money in, PAYMENT for money out |
Amount | Signed: money in is positive, money out is negative |
Memo (Optional) | The full transaction description from the statement |
NS Internal Customer ID | Empty, for you to fill in if you want NetSuite to match a deposit to a customer |
NS Customer Name | Empty, same as above |
Invoice Number | Empty, same as above |
The last three columns are part of NetSuite's template and are optional. Leave them empty to match transactions in NetSuite itself, or fill them in a spreadsheet before importing if you already know which customer and invoice a deposit pays.
Step 2: Import the file into NetSuite
- In NetSuite, open the bank statement import page (in most accounts, Transactions → Bank → Import Bank Statement).
- Choose the account the statement belongs to.
- Select the CSV file you downloaded (one file per account if you downloaded a zip; unzip it first).
- Submit the import, then match and reconcile the transactions in NetSuite.
Page names vary with your NetSuite version and the banking features turned on. If you don't see a bank statement import page, your NetSuite administrator can enable it for the account and your role.
Tips
- One account per file. NetSuite imports a statement file into the one account you pick. Keep Download separate files for each account ticked whenever a project holds more than one account, or the checking and card transactions all land in the same account.
- Re-importing a period. Importing the same file twice adds the transactions twice. Import each statement period once.
- Wrong date or amount. Correct it in the DocuClipper transactions table and download again; the next file carries the fix.
- A different layout. If your NetSuite account is set up for a different CSV layout, set Output Format to Excel, pick + Create New Export Format in the column-set dropdown, and save the columns, names and order it expects; reuse that format for every download. See Configuring custom columns.
FAQs
Can DocuClipper export bank statements to NetSuite?
Yes. Choose NetSuite as the Output Format in Download Data. DocuClipper writes a CSV in NetSuite's bank statement template layout (date, payer or payee, transaction ID, transaction type, amount, memo, and the optional customer and invoice columns), one file per account, which you import into the matching NetSuite account.
What date format does the NetSuite CSV use?
MM/DD/YYYY, always. The column header says so, and it does not change with the date format you use for other downloads.
How are deposits and withdrawals written?
Money in has the transaction type CREDIT and a positive amount. Money out has the transaction type PAYMENT and a negative amount.
Does the NetSuite CSV include categories?
No. NetSuite's bank statement template has no category column. You code and match the imported transactions inside NetSuite.
Can I import invoices into NetSuite too?
Yes, as vendor bills through NetSuite's CSV Import Assistant. See Import PDF Invoices into NetSuite as Vendor Bills.