How To Convert CSV To QBO With DocuClipper
Upload a CSV of bank transactions, map your columns, and download as a QBO file ready to import into QuickBooks Online. Step by step.
Last updated
Convert CSV to QBO free → Start now Upload a bank-transaction CSV, map columns to QuickBooks fields, and download a Web Connect (.qbo) file that imports directly into QuickBooks Online or Desktop. 14-day free trial, no credit card required.
To convert a CSV to QBO with DocuClipper, upload the CSV under Add Documents → Bank Transactions (CSV), map your columns to QBO fields, add the statement's start date, end date, start balance, and end balance to reconcile, then download as a QBO Web Connect file.
The full flow is three steps: import, map, review and download. QuickBooks Online imports the resulting .qbo file natively.
How do I convert a CSV file to QBO in DocuClipper?
The conversion takes three steps: import the CSV, map columns to QBO fields, then review and download a QBO Web Connect file.
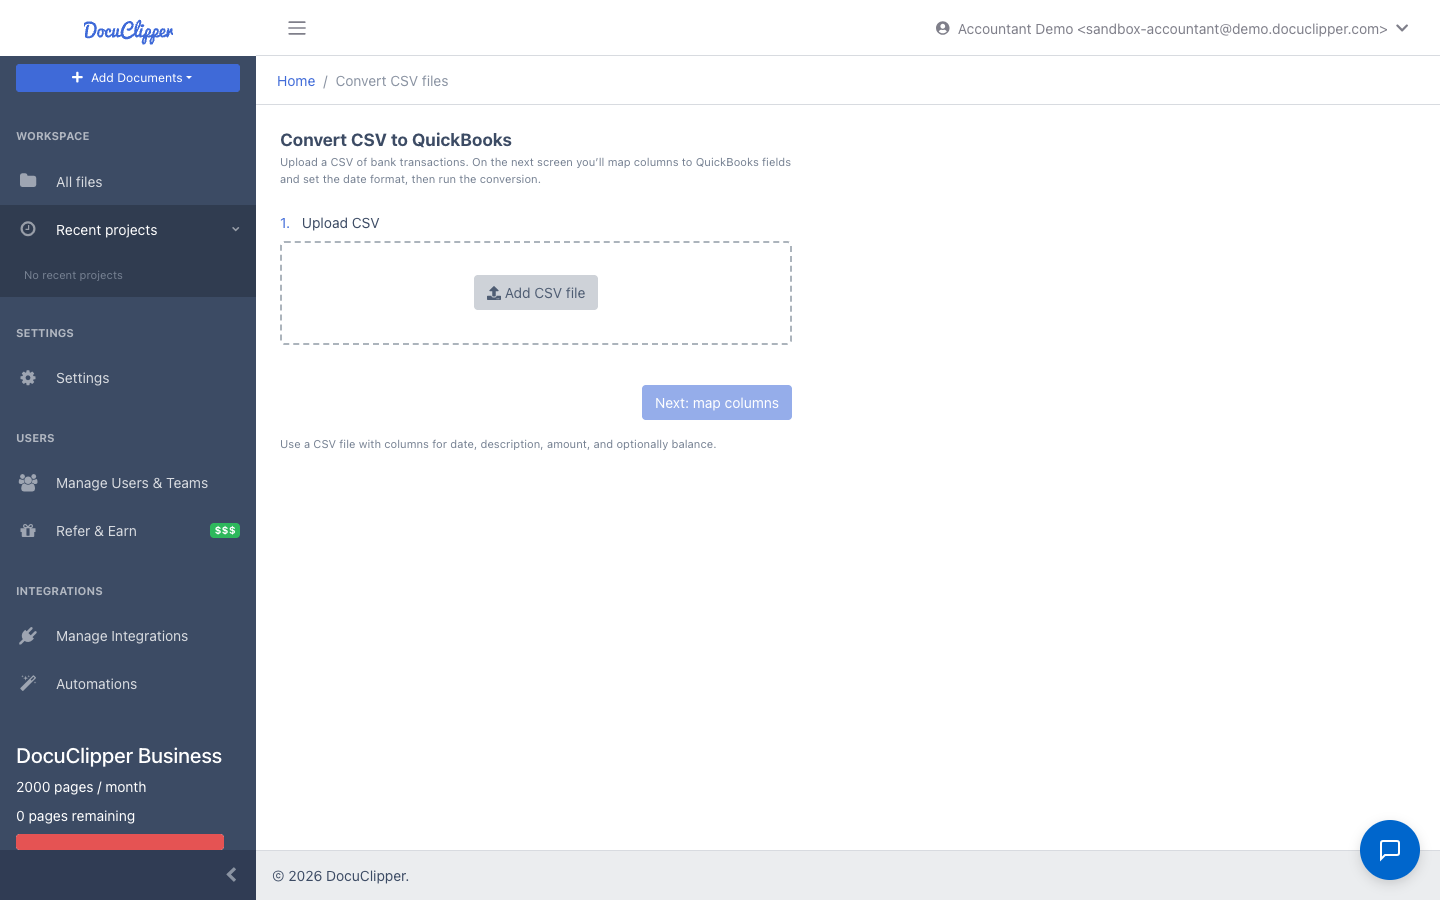
Step 1: Import Your CSV File
Upload your financial CSV file into the DocuClipper platform. Our converter supports a wide variety of CSV formats.
To import your CSV file:
- Click Add Documents in the left sidebar and choose Bank Transactions (CSV) from the dropdown.
- Drag and drop your CSV file into the upload area, or click to browse for it.
Step 2: Map Columns
Next, you’ll map your CSV columns to the corresponding QBO fields so the data is formatted properly.
To map columns:
- The first row of your CSV will contain column headings. Match these headings to the dropdown options in DocuClipper.
- For each column in the DocuClipper mapper, use the dropdown menu to select the right column header from your CSV.
- Repeat this process one by one until each CSV column heading is assigned to a QBO field in DocuClipper.
- For any date columns, be sure to adjust the date format to match your CSV date format.
- Once done, click on “Convert” button.
This column mapping matches your CSV data with the appropriate QBO fields so your information imports seamlessly into QuickBooks Online in the correct format. Our software will organize and map everything appropriately based on the column mappings you set up.
Note: The headings and dropdown menu text do not need to match exactly. The goal is to match the meaning of each column. For example:
- Map your “Date 1” column to the “Posting Date” field in DocuClipper.
- If you have a “Transaction Description” column, map it to the “Description” option in DocuClipper.
- Map your “Amount” column to the “Amount” field in DocuClipper.
Step 3: Review and Edit
After importing and mapping your CSV file, DocuClipper will process the data into the converter.
At this point, you will see the bank transactions show as “Not Reconciled” in DocuClipper. This is because some key information is missing, like the start date, end date, start balance, and end balance. The individual transaction credits and debits were imported from your CSV, but the full reconciliation data is needed.
First, to fix any “Unreconciled” transactions:
- Add the start date, end date, start balance, and end balance to fully reconcile all imported transactions. Without this info, transactions show as “Unreconciled”.
- Modify any transaction dates, amounts, and payees to match your source data for reconciliation.
You can also further edit and customize transactions:
- Add or remove individual transactions as needed.
- Assign accounts or periods so transactions import into the proper QBO accounts.
- Switch credits and debits if required.
- Adjust anything to get your data perfect before converting to QBO.
The review stage lets you customize the CSV data to your requirements before finalizing the QBO conversion.
Reconciling your transactions by adding the missing dates and balances will ensure your QBO download matches your original CSV transaction data. The review and edit stage lets you interact with your data before it’s finalized.
Step 4: Download Your QBO File
Once you are satisfied with your reviewed and edited transactions, you are ready to download the data in QBO format:
- Click on the “Download Data” button at the top right corner of DocuClipper.
- In the Output Format dropdown, select QBO (QuickBooks Online).
- Select your bank name from the list. If you cannot find your exact bank name, you can select Chase Web Connect as a generic option.
- Choose the account type – either Bank or Credit Card.
- Enter the Routing Number and Account Number for your account.
- Select the appropriate Currency.
- Finally, click the “Download QBO Web Connect” button.
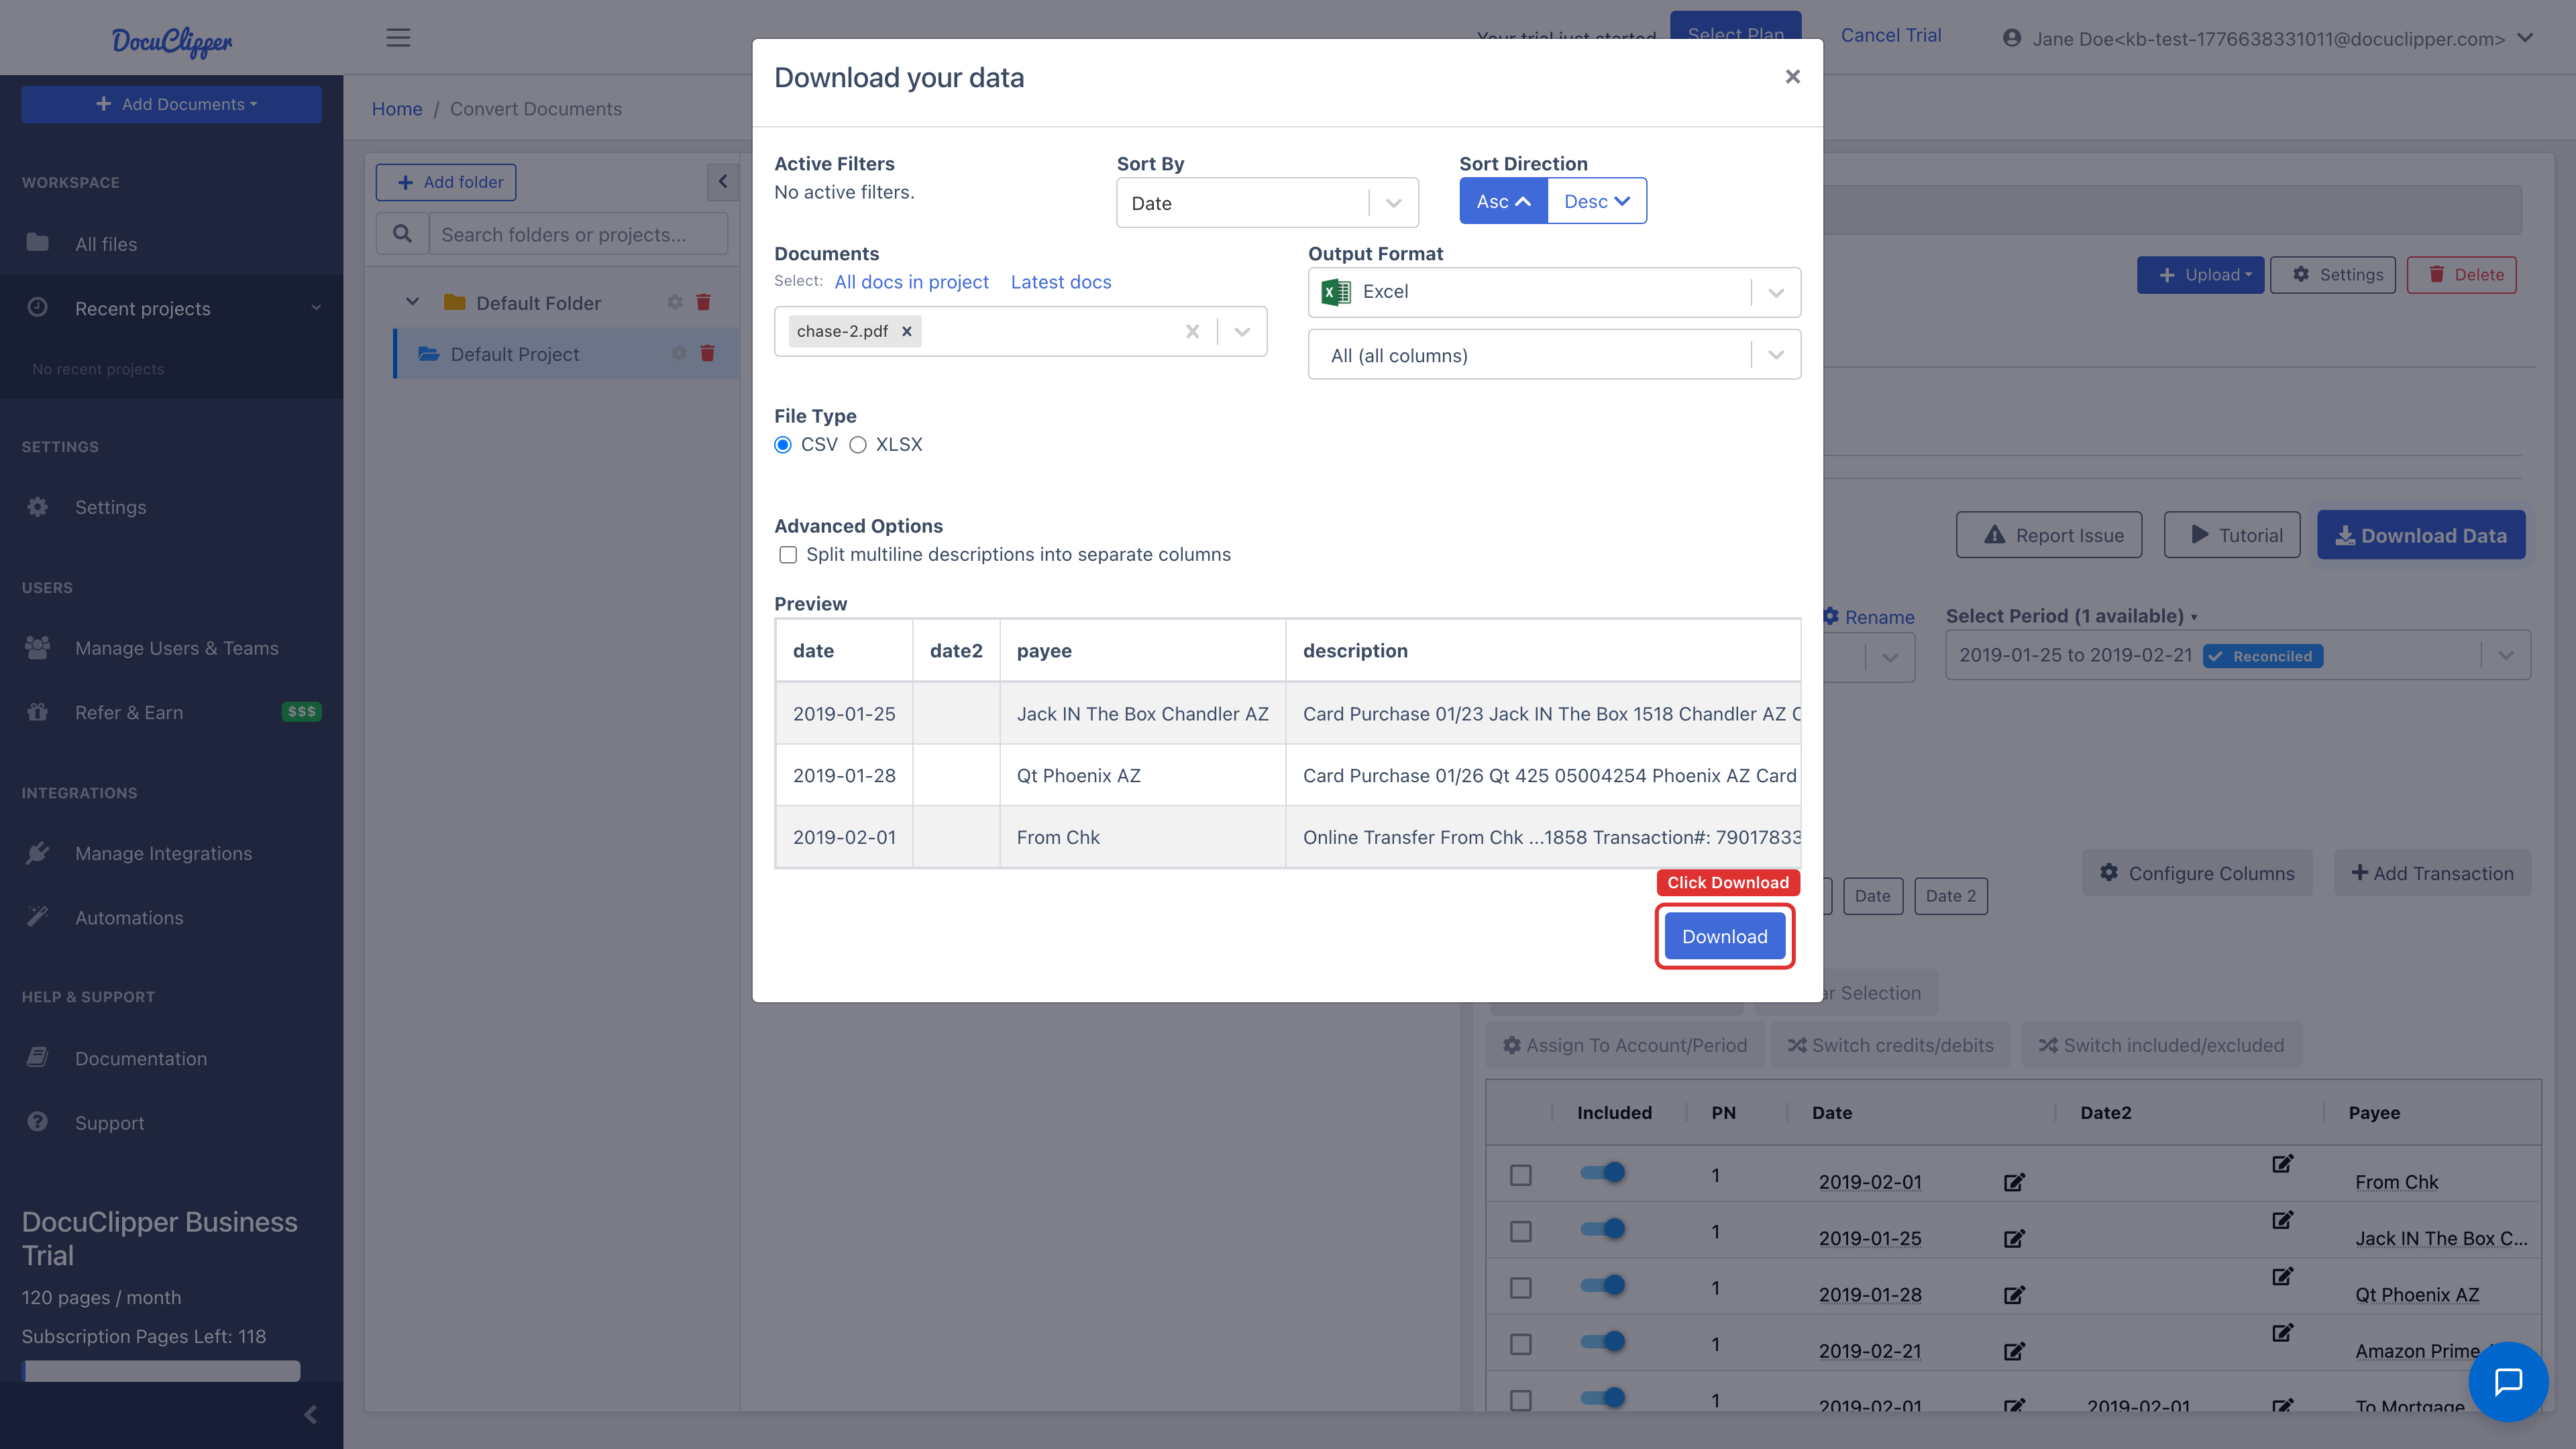
This will automatically download your reconciled CSV data into a QBO (QuickBooks Online) file formatted specifically for seamless import into your QuickBooks Online account.
If needed, you can also download in other formats like Excel, QIF, or IIF.
FAQs
How do I convert a CSV file to QBO format?
Upload your CSV through Add Documents, map each CSV column to the matching DocuClipper field, add the start and end balances to fully reconcile the data, then download the result as a QBO Web Connect file.
Do my CSV column headings need to match DocuClipper's field names exactly?
No. The mapper matches by meaning, not by exact text. For example, a "Transaction Description" column maps to "Description" and "Date 1" maps to "Posting Date".
Why are my transactions showing as Not Reconciled after upload?
A CSV import contains the individual transactions but not the start date, end date, start balance, or end balance. Add those four values in the review step and the statement will reconcile.
What if my bank is not listed in the QBO download dialog?
Pick Chase Web Connect as a generic option. QuickBooks Online will still accept the file and post the transactions to the account you choose.
Can I export to formats other than QBO?
Yes. The same converted CSV data can be downloaded as Excel, QIF, or IIF from the Output Format dropdown.