DocuClipper's New Project-Based Interface
Learn how to use DocuClipper's project-based interface. Create folders and projects, upload documents, and navigate the workspace.
Last updated
Overview
DocuClipper organizes work into a folder-based project structure so you can group, manage, and secure documents by client, case, or department. The interface uses a two-level hierarchy:
- Level 1 (L1): Folders (e.g., companies, clients, or financial period)
- Level 2 (L2): Projects under each folder (for example, "Q2 2025" or "John Smith Estate")
Getting Started
Creating Your First Folder
- On the main Folders screen, click + Add Folder.
- Enter a name (for example, "Estates" or "Corporations").
- Click the gear icon next to any folder to update permissions.
- Assign team access levels:
- No Access
- Can Access
Creating Projects within a Folder
- Click to expand any folder.
- Click Add Project under that folder.
- Enter a project name and click Create.
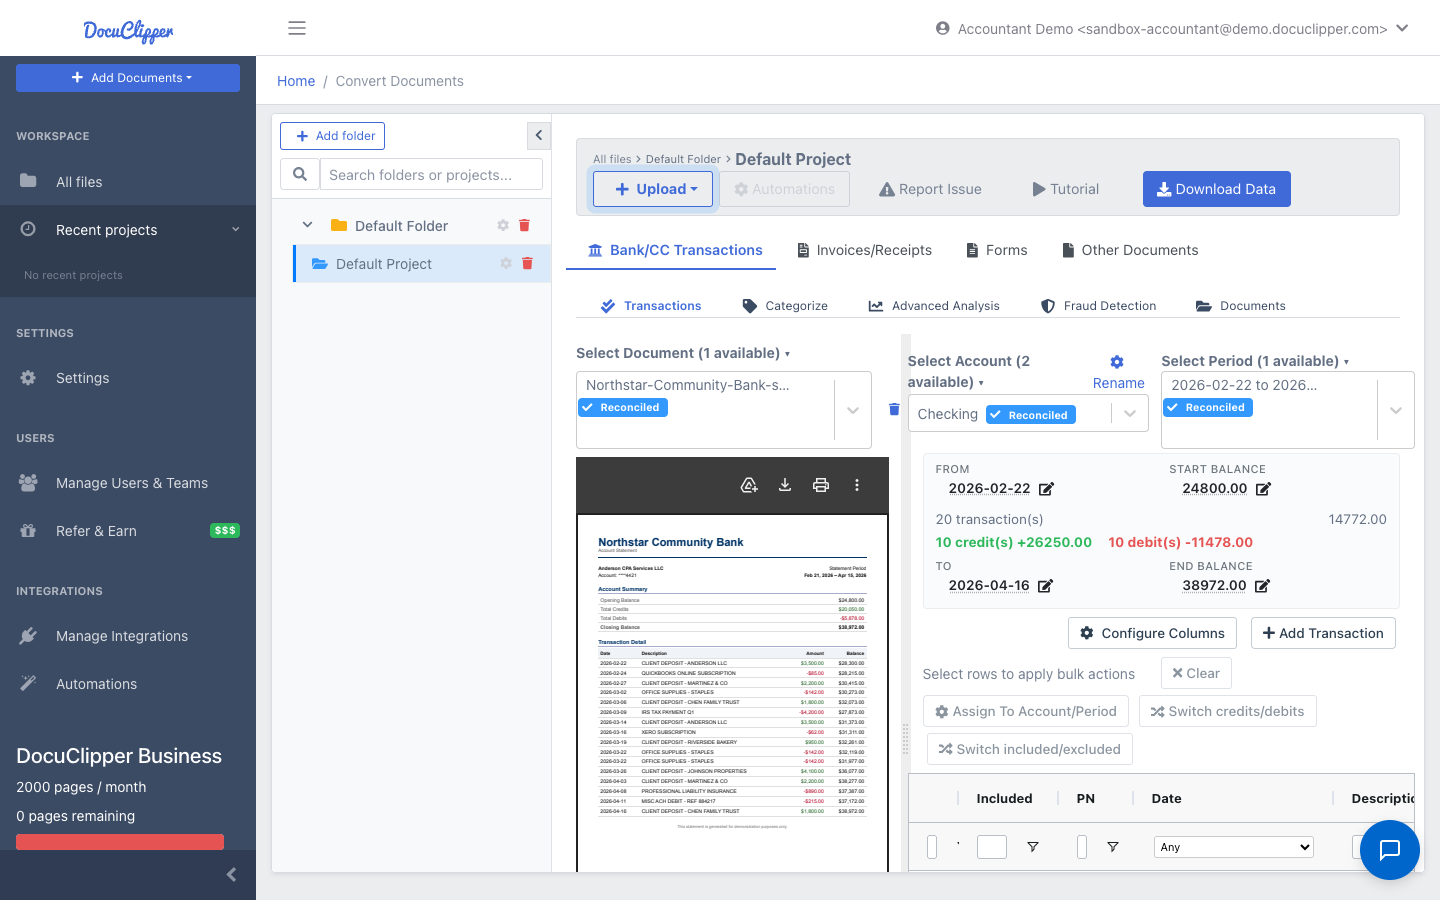
- Once created, open the project by clicking it in the folder tree. To add documents, click the Upload button (the blue dropdown at the top of the project) and choose the document type. Options include Bank/Credit Card Statements (PDF), Bank Transactions (CSV), Check Images, Invoices/Receipts, Forms (W-2, 1099, Paystubs, Tax Forms), and Other Documents.

Uploading & Converting Documents
From within any project, you can upload:
- Bank & Credit Card Statements (PDF)
- Bank Transactions (CSV)
- Invoices & Receipts
- Tax Forms
- Other Documents
Each type lives in its own tab inside the project.
Viewing Converted Documents
Once documents are processed, open the project and click the relevant tab to see results:
- Bank/CC Statements tab: bank and credit card transactions
- Invoices tab: processed invoices and receipts
- Forms tab: converted W-2, 1099, and other tax forms
- Other Documents tab: custom-extracted documents
Managing Unassigned Jobs
If you have documents that were converted before setting up the project structure, you'll see an alert indicating you have unassigned jobs. To assign these jobs to projects:
- Look for the blue alert banner stating "You have X jobs that aren't assigned to a project."
- Click the Assign Jobs link in the alert.
- You'll be taken to a page where you can bulk-assign these documents to specific projects.
- We do not recommend archiving all previous documents into a single project. Doing so causes poor performance in your dashboard and leads to longer load times.
Managing Access
- Folder-level permissions can be managed through team assignments
- Administrators can modify team access by editing the folder settings
- Projects inherit access permissions from their parent folder
- For help managing teams and users, check out this article
Search and Navigation
- Use the search bar at the top to quickly find folders or projects
- Folders can be expanded/collapsed for easier navigation
- Recently viewed folders remain expanded for quick access
Remember to organize your documents into appropriate projects to maintain an efficient workflow and make the most of DocuClipper's organizational features.