
How DocuClipper Transaction Categorization Works
Categorize bank transactions with transparent keyword rules — not machine learning. Use the 15 default categories, build custom groups, or upload a vendor/category CSV, and trigger it when you need it.
Last updated
DocuClipper categorizes bank transactions with keyword rules, not machine learning: each transaction description is matched against the keywords in a category group, and when more than one keyword matches, the most specific match wins. You can use the built-in set of 15 default categories, a custom group you define, or a vendor CSV uploaded in bulk — and because the rules are transparent keywords, results are predictable and easy to correct.
Transaction categorization is available on Professional, Business, and Enterprise plans. You can override any auto-assigned category manually or in bulk from the Categorize view.
Why categorization is a step you trigger
Categorization does not run automatically when a statement finishes converting. Extraction, account/period detection, and reconciliation are done for you on every conversion, but categorization is a separate step you run when you need it — and that's deliberate:
- It's rule-driven, not a model. Because it matches your keywords rather than guessing from a trained model, you can predict and tune results — which is why you edit keywords instead of retraining anything.
- Not every workflow needs it. A bookkeeper exporting straight to QuickBooks may skip it entirely; auto-running it would just clutter the project.
- You control the scope. A lender or forensic accountant usually wants to load the full set of statements (and sometimes define a custom category set) first, then categorize once across everything — that gives better results than re-running after each statement.
When you add new statements to a project later, categorization does not re-run on its own — re-trigger it after loading new periods or changing your keywords. Transfers and recurring detection are separate triggered steps too; see Why Categorization, Transfers, and Recurring Don't Run Automatically.
Where do I find transaction categorization in DocuClipper?
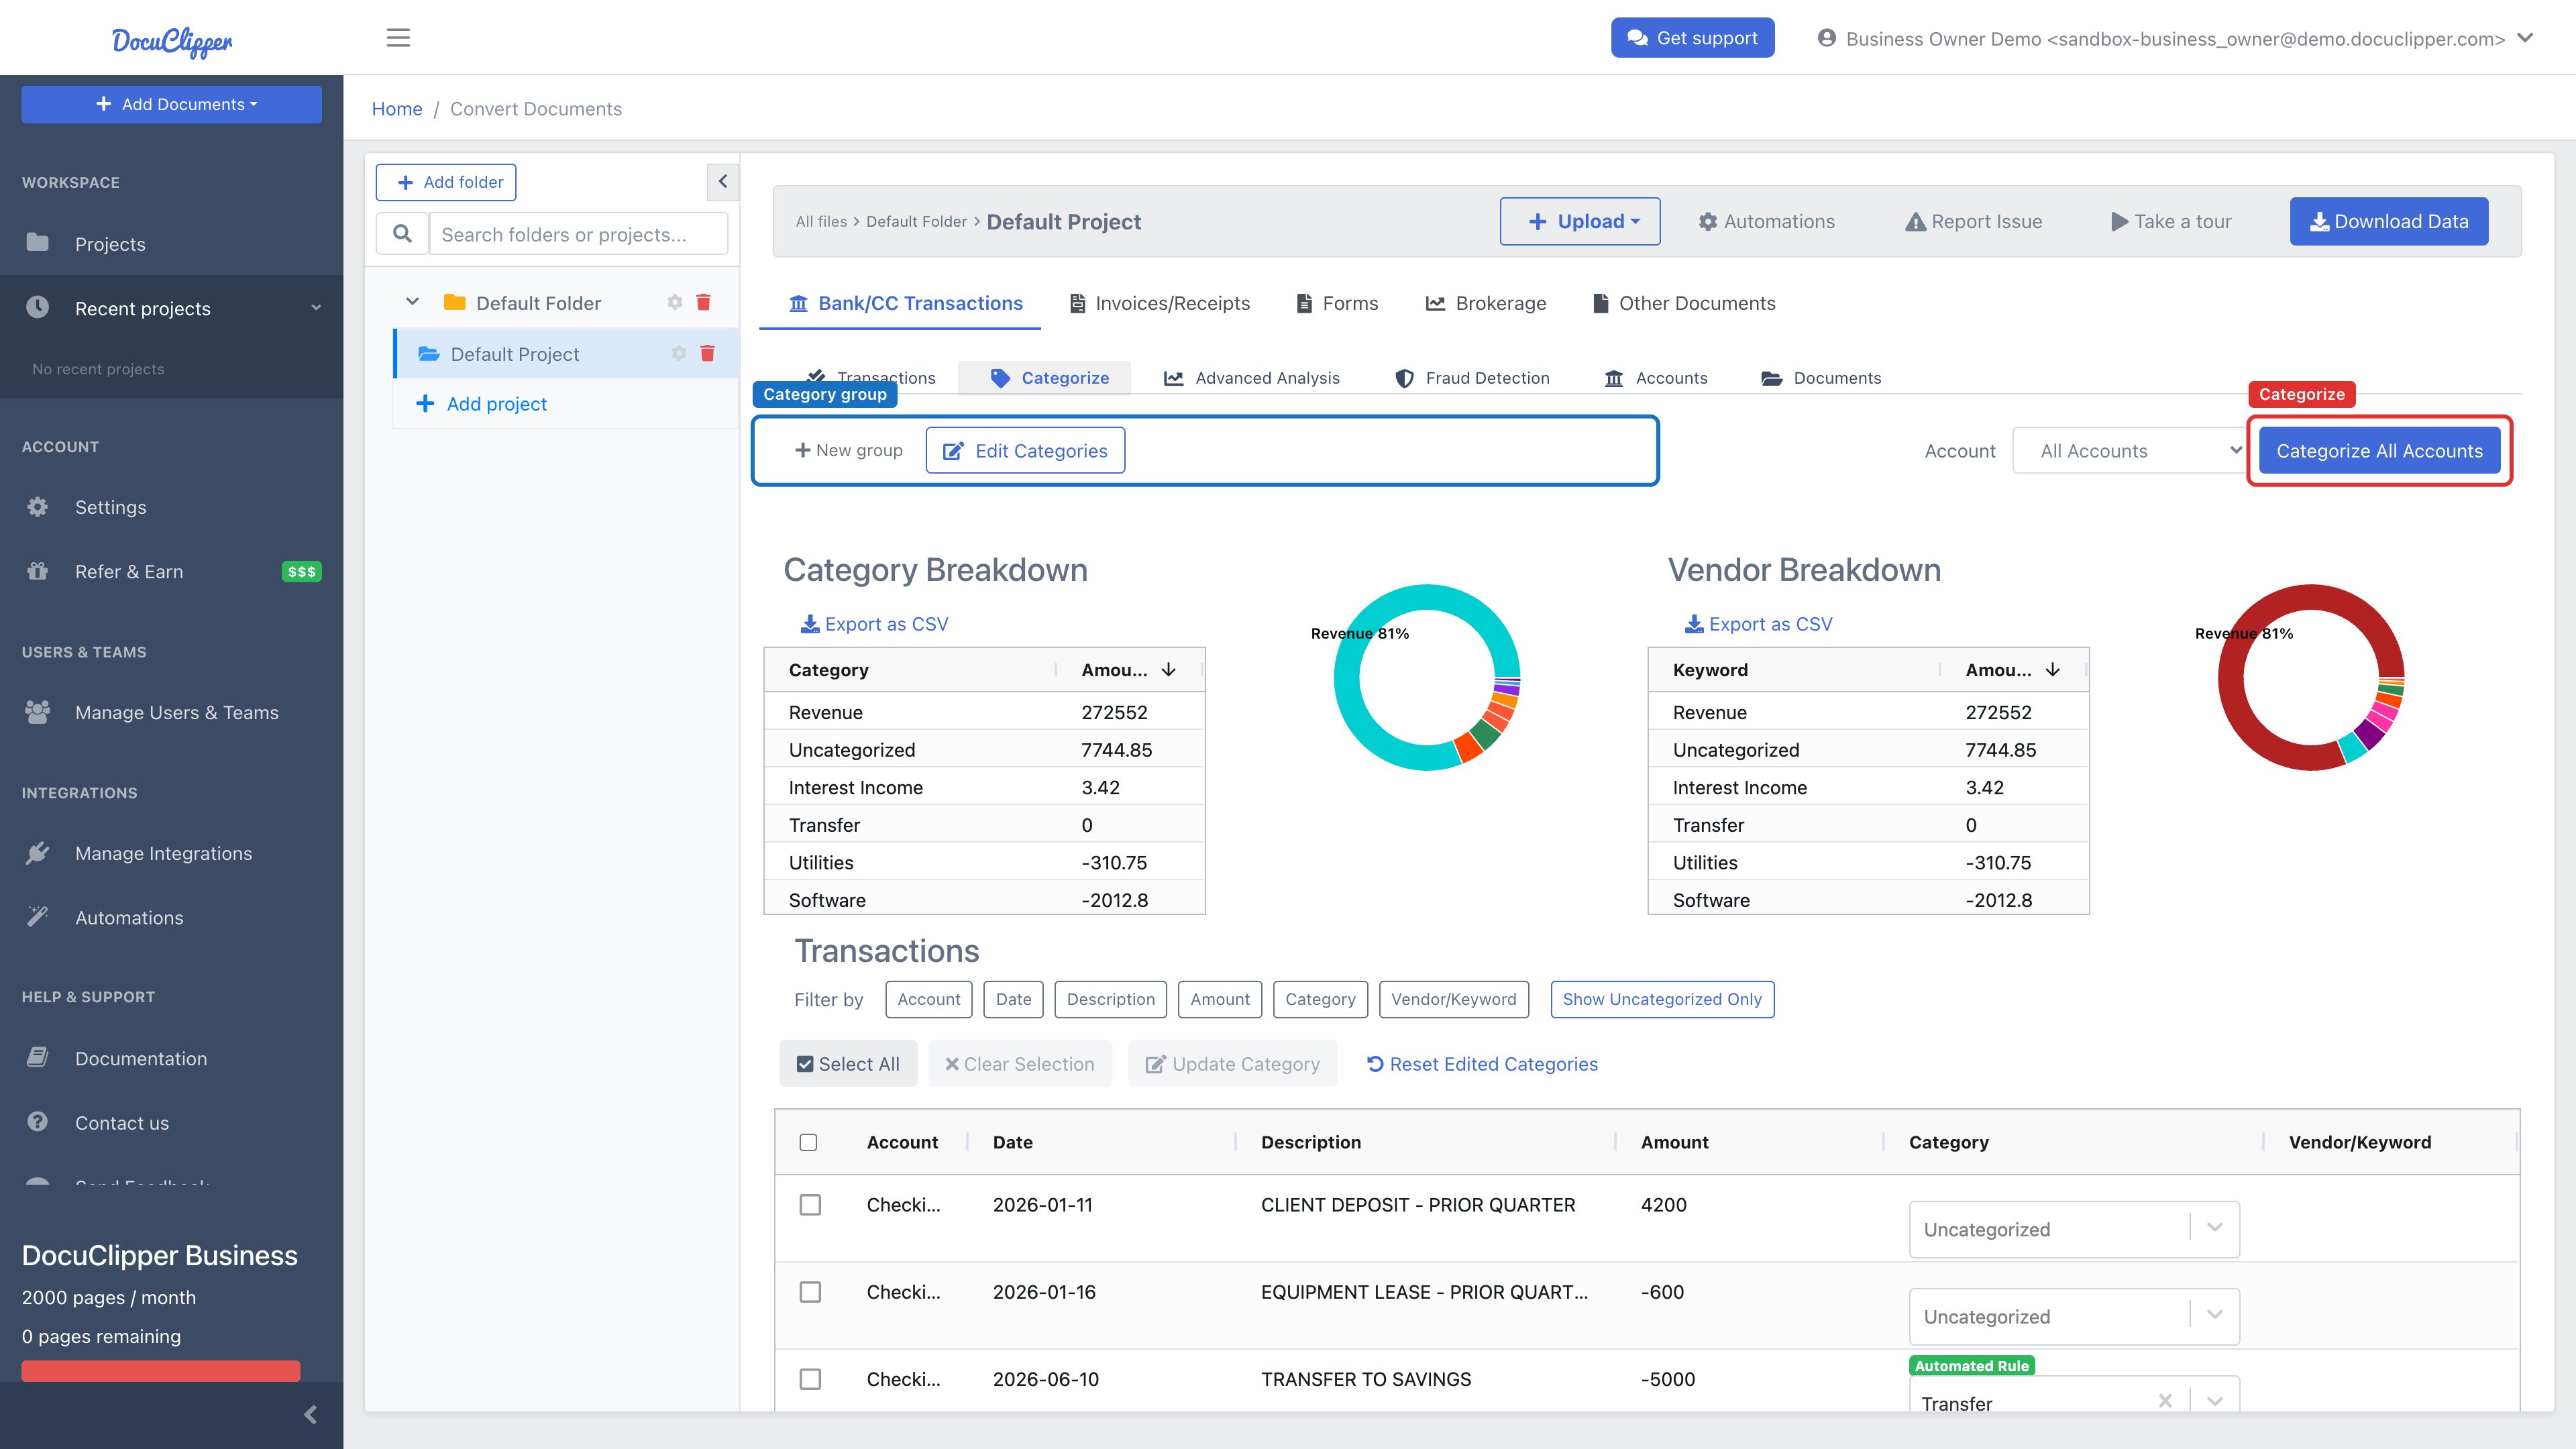
Open a converted bank statement and click Categorize (next to Reconcile in the Summary Table).
Automatic categorization with default categories
DocuClipper includes a built-in set of 15 default categories: Miscellaneous, Travel, Debt Payments, Savings and Investments, Education, Shopping/Retail, Entertainment, Healthcare, Insurance Premiums, Transportation, Eating Out/Dining, Groceries, Rent or Mortgage, Bills and Utilities, and Income.
To run automatic categorization:
- Navigate to Categorize.
- Make sure the Category dropdown is set to default.
- Click Categorize.
DocuClipper matches each transaction's description against the default group's keyword rules and assigns the category with the most specific matching keyword.
Adding and editing keywords
To customize which transactions land in which category:
- Select the category group from the dropdown and click Setup Categories.
- In the editor, find the category you want to adjust.
- Type a new keyword and hit Enter to save it. Transactions whose description contains that keyword will be assigned to that category.
- Click Add New Category to Group to create a new category, then add keywords to it.
How overlapping keywords are resolved
A single transaction description can contain more than one category's keyword — for example "CHAMBERLAINS PROPERTY RENT" might match both a broad rent keyword and a specific chamberlains keyword. DocuClipper resolves these overlaps predictably:
- Most specific keyword wins. The category whose matched keyword is longest is assigned, so a precise keyword (
chamberlains) beats a short, generic one (rent). When a transaction lands in the wrong category, add a longer, more distinctive keyword to the category you want. - Your keywords beat the defaults. Keywords in your own category group take precedence over the built-in default vendor database.
- Results are stable. The winner is chosen deterministically, so editing or re-saving one rule never silently changes how unrelated transactions were categorized — re-running Categorize on the same statements and keywords always produces the same result.
The keyword that won is recorded alongside the transaction, so you can always see why a category was assigned.
Updating uncategorized transactions
- Manual: Click the pencil icon on a transaction row and select the correct category.
- Bulk: Select multiple transactions (or select all), then click Update Categories and choose the category to apply.
Creating a custom categorization group
- Click Add New at the top of the category dropdown.
- Name the group (e.g. "Client Expenses") and click Add New Category Group.
- Open the group and click Setup Categories → Edit Categories/Keywords Manually.
- In the popup, enter a category name and click Add New Category to Group. Repeat for each category.
- Add keywords to each category and hit Enter to save.
- Click Close when done.
- Click Categorize All Accounts to apply the rules.
Uploading a vendor/category CSV
To build a whole categorization group at once, upload a vendor/category CSV instead of typing keywords one by one. Each row maps a vendor keyword to a category, and DocuClipper assigns that category to any transaction whose description contains the keyword (case-insensitive). A description that matches no keyword stays uncategorized. Shorter, distinctive keywords ("AMAZON", "UBER") match more transactions than long exact strings. It's the fastest way to categorize large statements or apply the same rules to every client.
Create the CSV with two columns — Vendor (the keyword to match, e.g. Amazon) and Category (the category to assign, e.g. Online Purchases). Add one row per keyword; multiple rows can share the same category. Save it as .csv.
Upload it:
- Go to the Categorize page.
- Click Add New and enter a name for the category group.
- Find the new group in the Category Group dropdown, then click Setup Categories.
- Click Upload Vendor/Category CSV and pick your file.
- Map your columns to Vendor and Category when prompted.
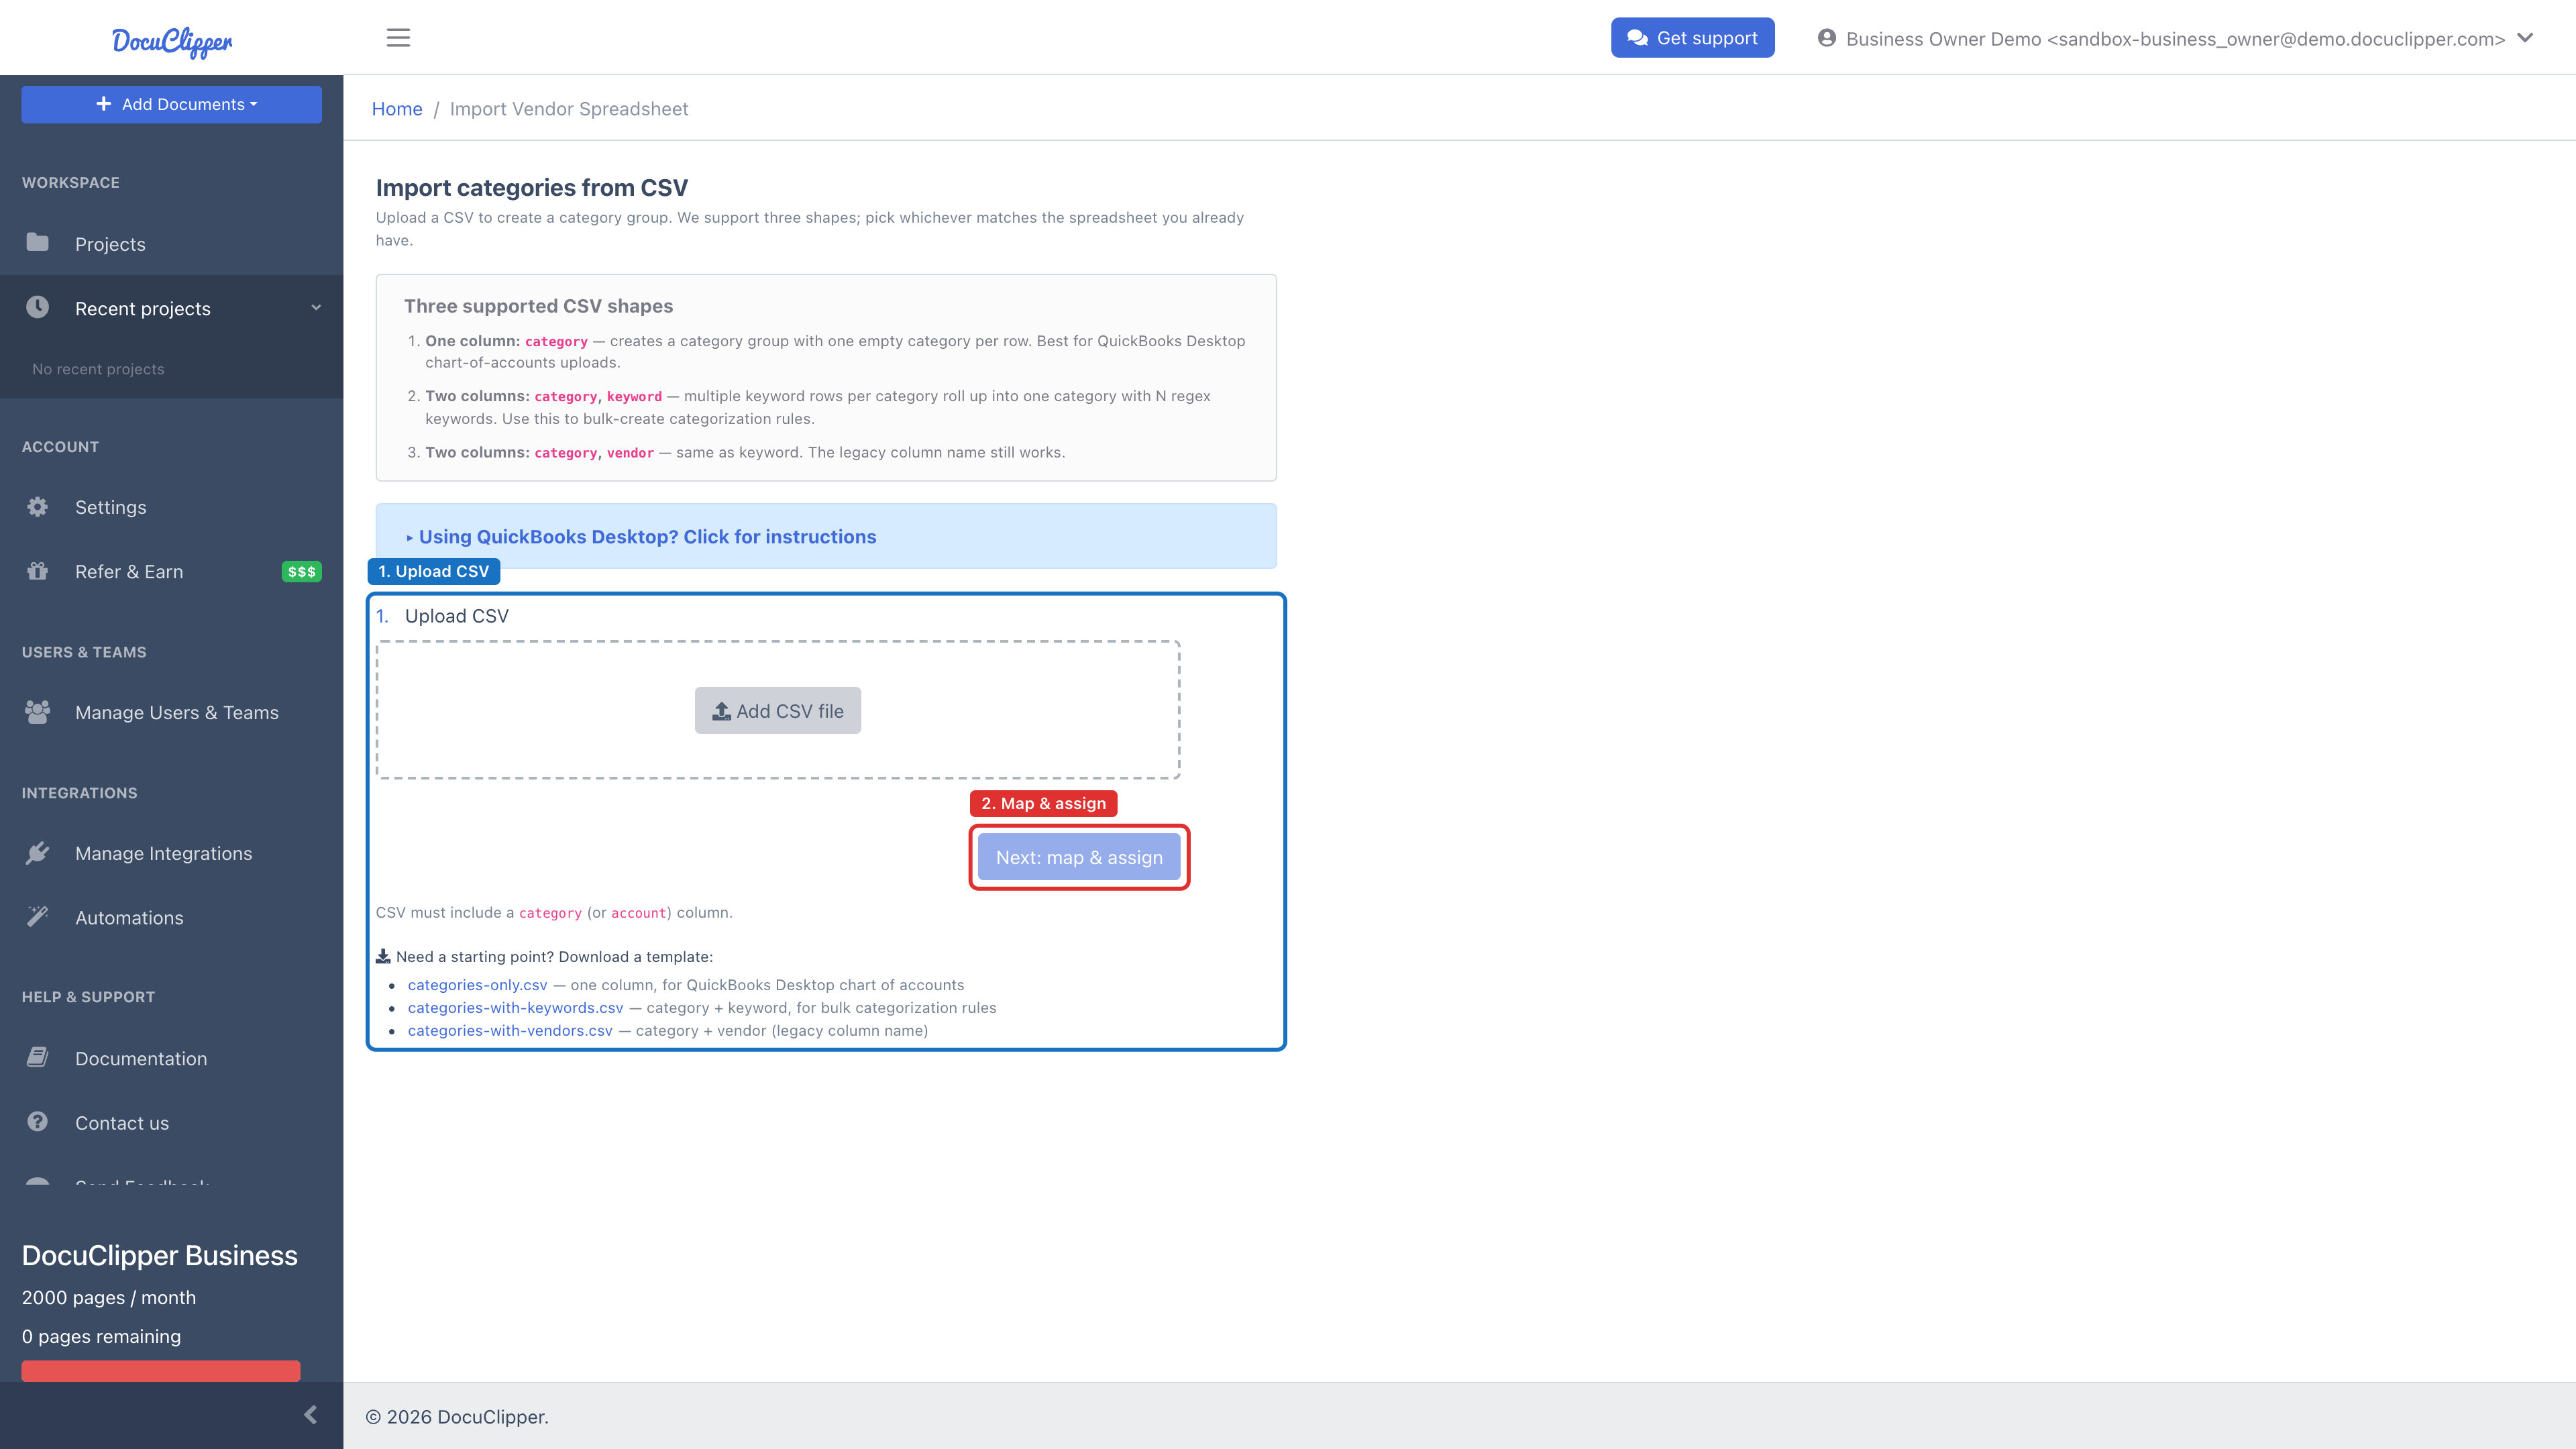
Make sure the group is selected in the dropdown, then click Categorize All Accounts to apply the rules. To adjust rules later, edit the CSV and re-upload, or open Setup Categories to add, correct, or delete keywords by hand — then re-run Categorize All Accounts. Keep separate groups for different transaction types or different clients.
Tips for effective categorization
- Use specific category names. "Gas" is more useful than "Auto".
- Add multiple keywords per category to improve match rates.
- Periodically review and update keywords as your transaction descriptions change.
- Use the manual override for any transaction the auto-categorization gets wrong.
Use cases
- Accountants and bookkeepers organizing client financial data
- Business owners analyzing expenses and payroll
- Tax professionals separating deductible expenses
- Forensic accountants investigating transaction patterns
For questions, contact support@docuclipper.com.
FAQs
Which plans include transaction categorization?
Transaction categorization is available on Professional, Business, and Enterprise plans.
How does DocuClipper decide which category a transaction belongs to?
Each transaction's description is matched against keywords in the active category group. The default group ships with 15 categories and a built-in vendor database; you can also add your own keywords or build custom groups. When a description matches more than one keyword, the most specific match (the longest matching keyword) wins, and your own keywords take precedence over the built-in defaults.
Can I edit a transaction's category after auto-categorization?
Yes. Click the pencil icon on a single row to change one category, or select multiple rows and use Update Categories to apply a category in bulk.
Can I create my own categories instead of using the defaults?
Yes. Use Add New at the top of the category dropdown to create a custom group, then add categories and keywords inside it. Click Categorize All Accounts to apply your rules.
How do I categorize many vendors at once from a spreadsheet?
Use the vendor categorization CSV upload to add categories and keywords in bulk rather than typing them one by one in the editor.
Why do some transactions stay uncategorized?
Their descriptions did not match any keyword in the active group. Add more specific keywords to the relevant category, or update the transactions manually using the pencil icon or bulk Update Categories action.